
Introduction
The PayDock platform is designed to be as simple and easy to use as possible.
There are a few different ways to interact with PayDock:
- The API is a REST API, giving you full control
- Client SDK is a client side javascript library, which provides a secure way of collecting payment information and an easy way to access Paypal and saved payment sources
- Using one of our mobile SDKs, including Android and IOS
Getting started
You can get up and running using the PayDock API in just a few minutes.
Sign up for a sandbox account by contacting PayDock here. This will give you access to the admin portal.
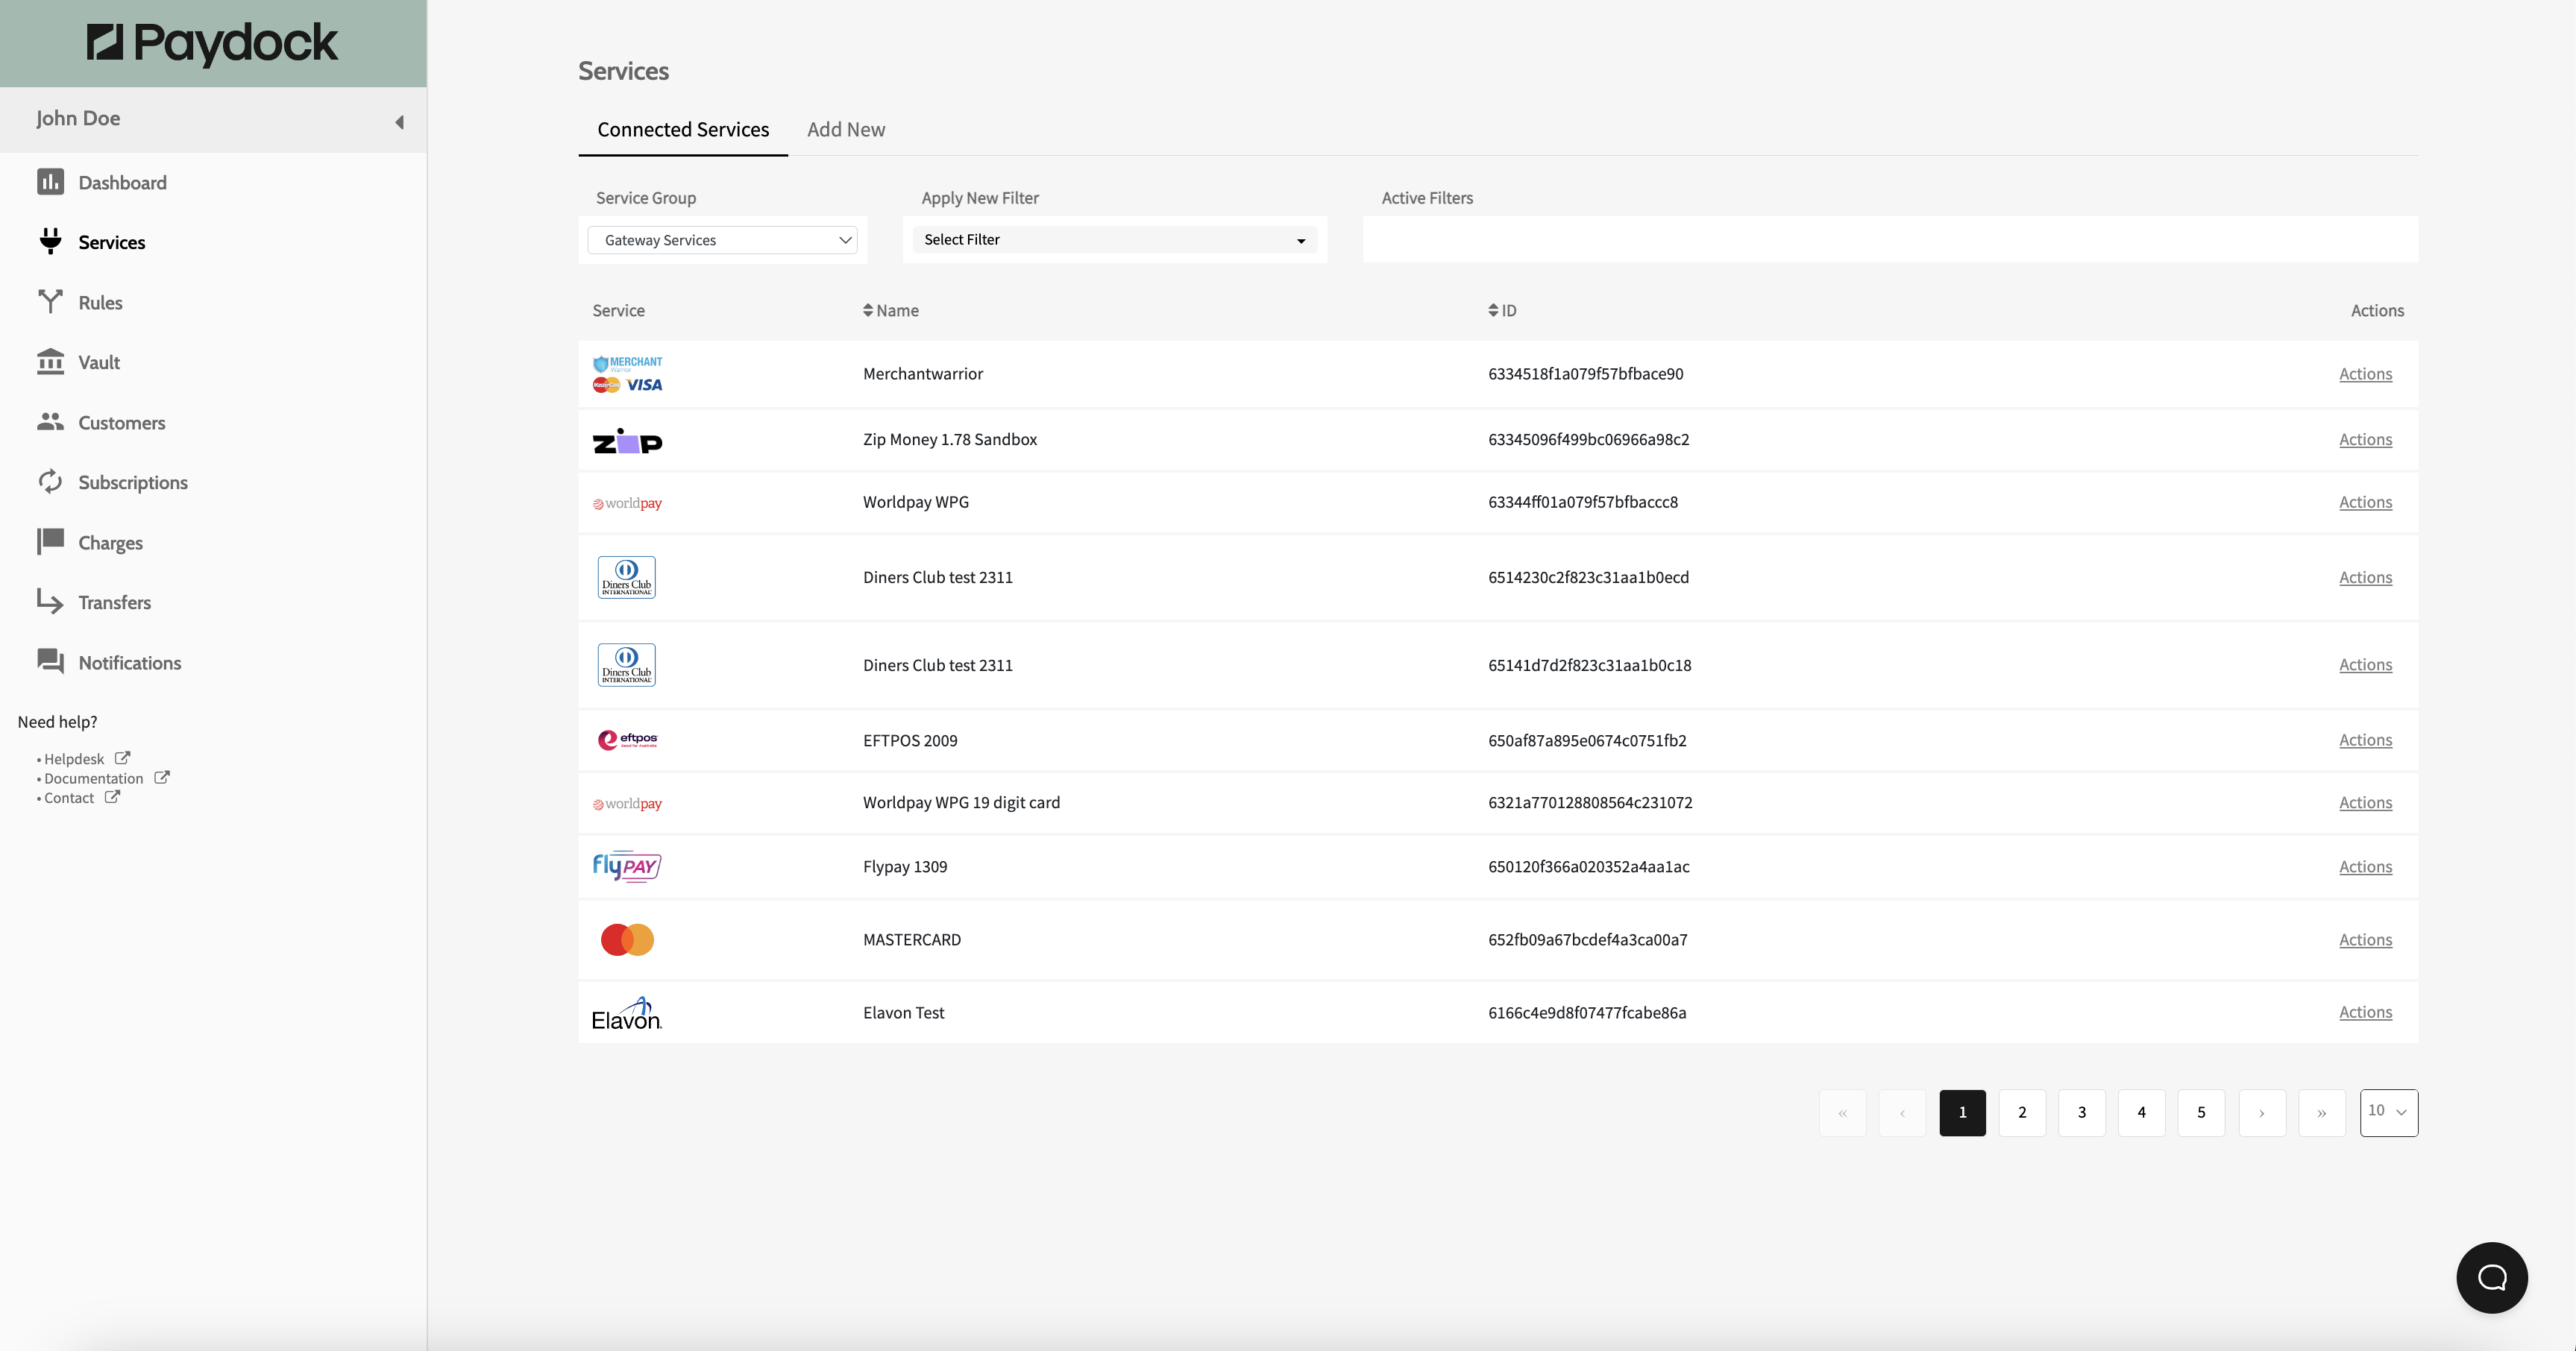
If you do not already have services to connect, you can usually sign up for test accounts. You can see a list of some of the services we support here.
Then add a gateway in Gateway --> Add New:
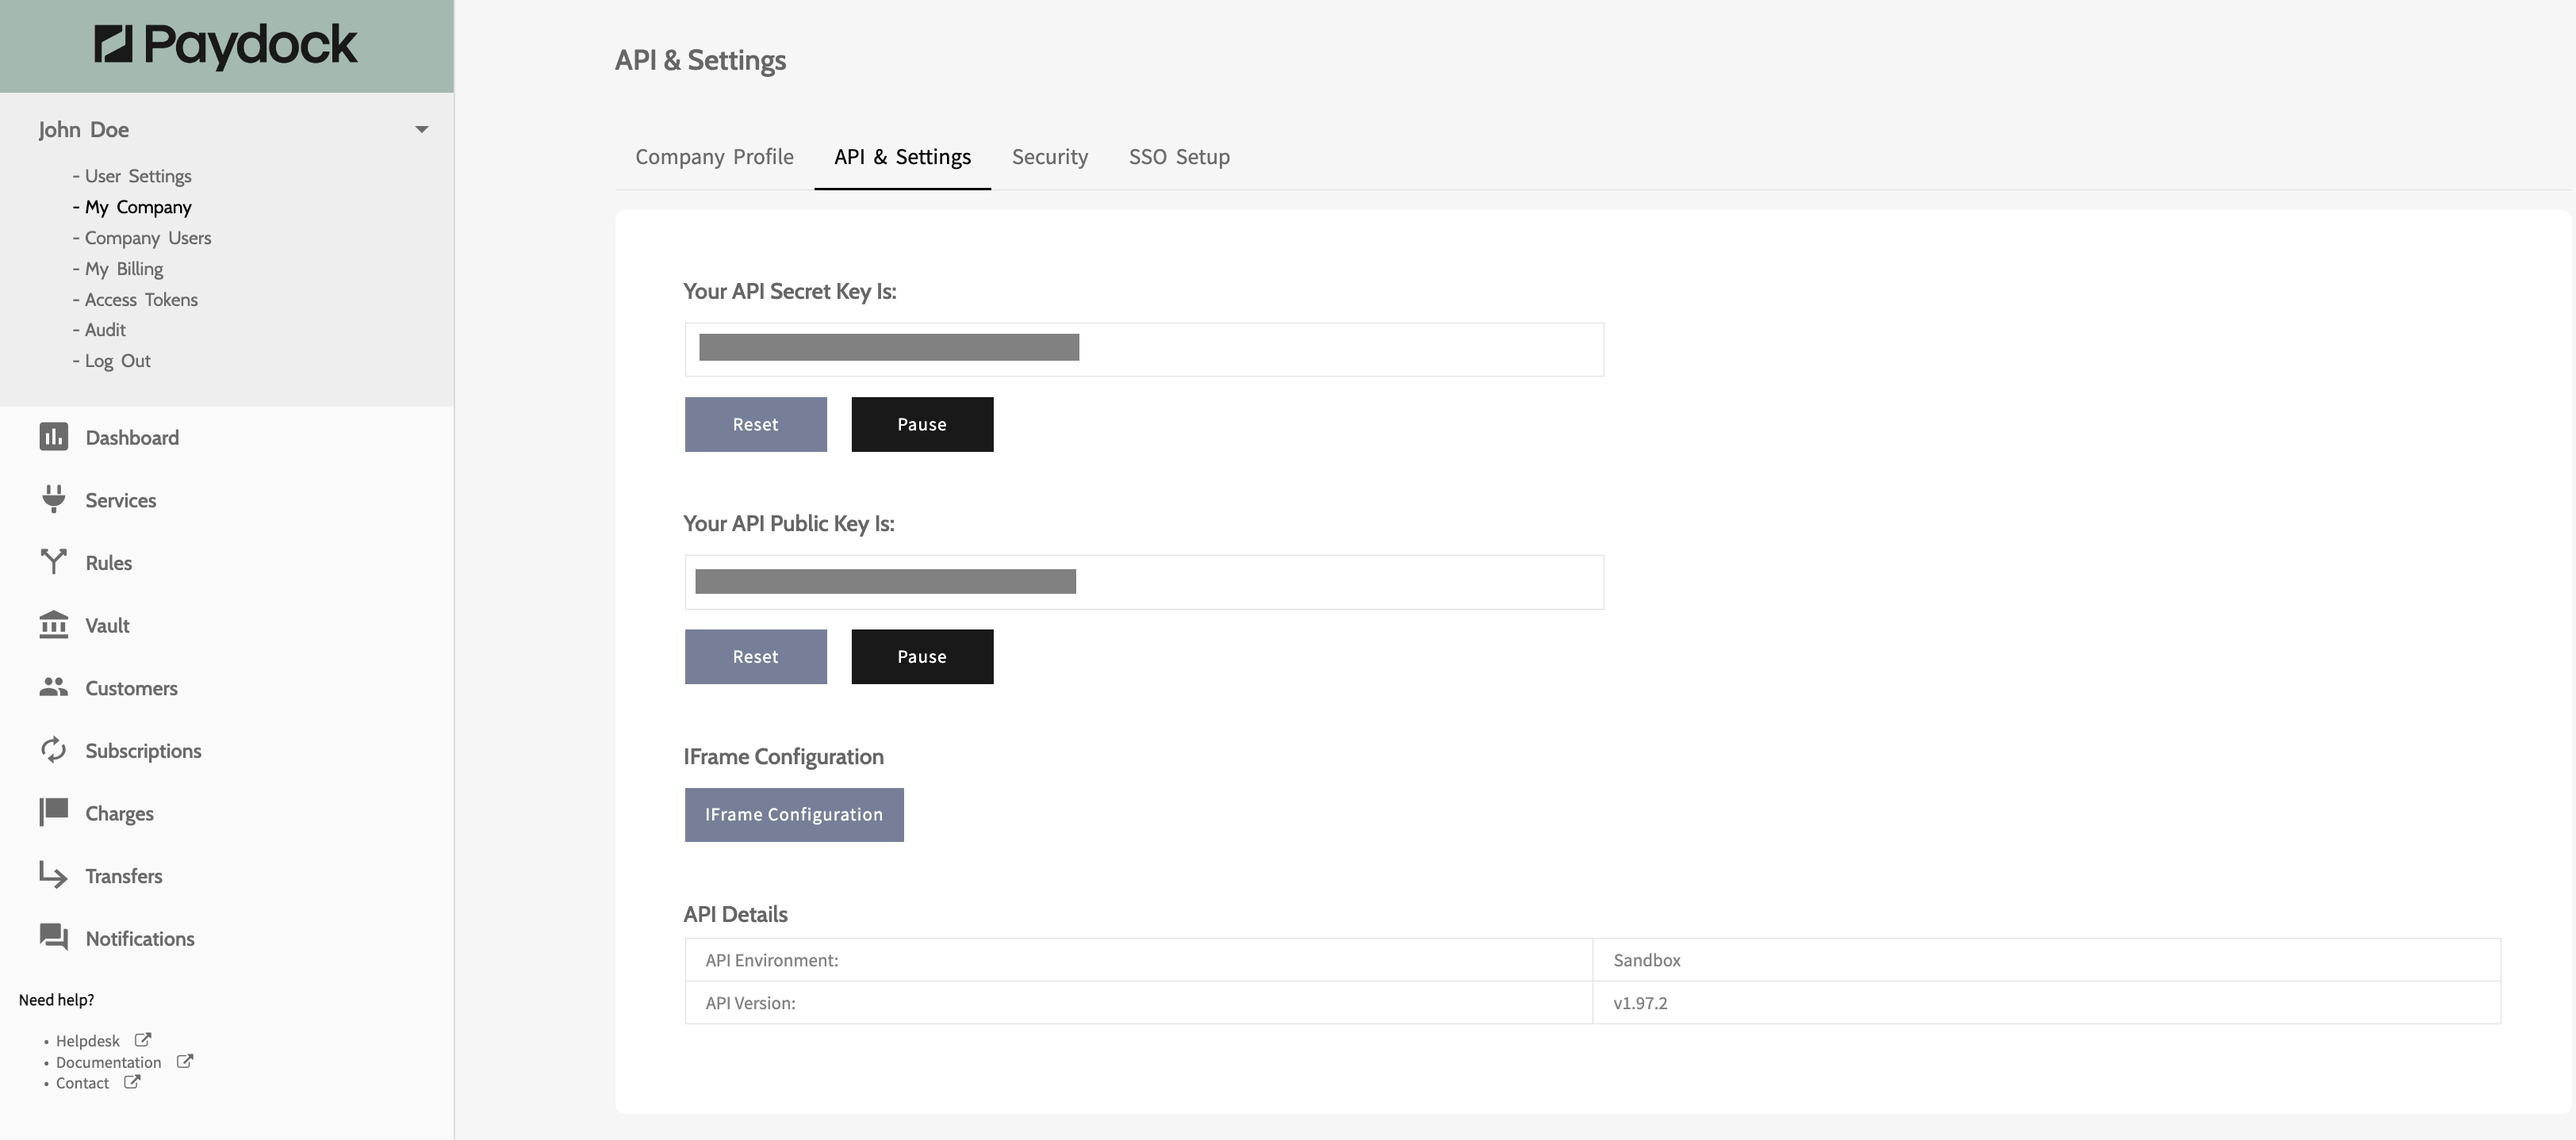
You can retrieve your API public and secret key from the admin portal in My Company --> API & Settings, which you'll need to authenticate:
Once done, jump into one of our Recipes:
Key Concepts
There are a few key concepts that help understand how to get the most out of PayDock's Platform
| Concept | Description |
|---|---|
| one-time token | This is a token that represents payment information. This is often generated on client (using Paydock.js or Client SDK). One time tokens expire after 3 hours. |
| payment source | A payment source represents a way of paying for something. This could be credit card details, bank account details or a PayPal account. There can be multiple payment sources associated with a customer. |
| gateway | A gateway is a payment gateway of any type that payments are routed to, eg Braintree, PayPal. |
| vault | The vault is PayDock's PCI compliant storage vault of payment sources. |
| vault token | A vault token is the reference code for a payment source, eg a credit card and expiry date |
| subscription | A subscription is a scheduled payment plan for a customer. |
| sandbox | A sandbox environment is a place where test API calls can be made without charging customers. |
| customer | An individual who can make payments. |
| admin portal | Web interface to manage your PayDock account |
Endpoints
An endpoint is a unique URL that represents an object or collection of objects which serves as the base of all PayDock API interactions.
PayDock provides two different public environments to access. You can access the different environments from the following URLS:
| Environment | API | Admin portal |
|---|---|---|
| Sandbox | https://api-sandbox.paydock.com | https://app-sandbox.paydock.com |
| Production | https://api.paydock.com | https://app.paydock.com |
To set up API calls, prepend all calls with:
Sandbox - https://api-sandbox.paydock.com
Production - https://api.paydock.com
Throughout the documentation URLs are provided relative to these base URLs.
eg
GET /v1/gateways for Sandbox, represents
GET https://api-sandbox.paydock.com/v1/gateways
eg
GET /v1/gateways for Production, represents
GET https://api.paydock.com/v1/gateways
Authentication
Authenticate with our API is provided by providing either your API Public Key or API Secret Key, depending on how you are using the PayDock platform. These are 40 character strings which you can find in out web app:
Authentication is managed slightly differently depending on how you're connecting to PayDock.
Connecting to the PayDock from the client side is managed through the Public Key or Access Token. Example:
- using Client-sdk
All other authentication is through the API Secret Key or Access Token. This is used to secure server side calls:
- using the API, the API Secret Key is added as a header
Response codes / Error codes
PayDock's API follows REST principles on status codes returned from our API.
In addition, the API will generally return a detailed error message and any downstream errors. See the right panel for examples
| HTTP code | Meaning | Description | Request type |
|---|---|---|---|
| 200 | Call successful | Appears on success request | any |
| 201 | Created successfully | Appears on success request while creating new resource | POST |
| 400 | Merchant data error | There is also an error code in response. Check the "error_summary" section for the details. | any |
| 403 | Permission denied | Authorization token does not have permission | any |
| 404 | Resource not found | The requested resource by id is not found for your visibility scope | any |
| 500 | System error | Unexpected server error | any |
| 408 | API unavailable | Only for .Net SDK. The response from the .Net SDK when it can't reach the API for some time | any |
In addition, the API will generally return a detailed error message and any downstream errors. See the right panel for examples
"Gateway processing error"

"error_summary": {
        "message": "Transaction Declined",
        "code": "transaction_declined",
        "status_code": "05",
        "status_code_description": "Do not honour",
        "details": {
            "gateway_specific_code": "DECLINED",
            "gateway_specific_description": "The requested operation was not successful",
            "messages": [
                "Transaction Declined"
            ]
        }
    }
|
http code |
Cause |
Error Code |
Error Structure |
|---|---|---|---|
|
400 |
Internal validation |
|
{
message: string, code: string, details: { path?: string, messages: string[] } } |
|
400 |
gateway validation |
|
message: string, code: string, details: { path?: string, gateway_specific_code: string, gateway_specific_description: string messages: string[] } } |
|
400 |
gateway proccesing |
|
{
message: string,
code: string, status_code: string, status_code_description: string, details: { path?: string, gateway_specific_code: string, gateway_specific_description: string messages: string[] } } |
|
400 - 599 |
other |
|
{
message: string, code: string, details: { messages: string[] } } |
PayDock vault
"Example response with vault token"
{
  "status": 201,
  "error": null,
  "resource": {
    "type": "customer",
    "data": {
      "__v": 0,
      "created_at": "2017-01-24T23:28:14.045Z",
      "updated_at": "2017-01-24T23:28:14.045Z",
      "status": "active",
      "default_source": "5887e30d28e281756b883f64",
      "reference": "Fuga consequuntur sint ab magnam",
      "first_name": "Natalie",
      "last_name": "Foster",
      "email": "nwashington@gmail.com",
      "_id": "5887e30c28e281756b883f63",
      "payment_sources": [
        {
          "updated_at": "2017-01-24T23:28:14.045Z",
          "vault_token": "dd634c0c-ea3b-4d82-b7fb-5ef2d2949ff6",
          "gateway_id": "58377235377aea03343240cc",
          "card_name": "Natalie Foster",
          "expire_month": 1,
          "expire_year": 2019,
          "card_number_last4": "1111",
          "card_scheme": "visa",
          "ref_token": "53774915",
          "status": "active",
          "created_at": "2017-01-24T23:28:13.826Z",
          "_id": "5887e30d28e281756b883f64",
          "type": "card"
        }
      ],
      "statistics": {
        "total_collected_amount": 0,
        "successful_transactions": 0
      },
      "_service": {
        "default_gateway_id": "58377235377aea03343240cc"
      }
    }
  }
}
PayDock provides a PCI compliant vault for payment details. When the vault is enabled, all payment details are stored in the vault. The vault is enabled or disabled across a whole PayDock account, rather than for individual requests.
When the vault is enabled, any time a payment source is added, this information is stored in the vault. This most commonly happens when a payment source is added to a customer or a new customer is created. This is also visible in the response, which includes the id for the vault token, see example to the right (payment_sources -> vault_token).
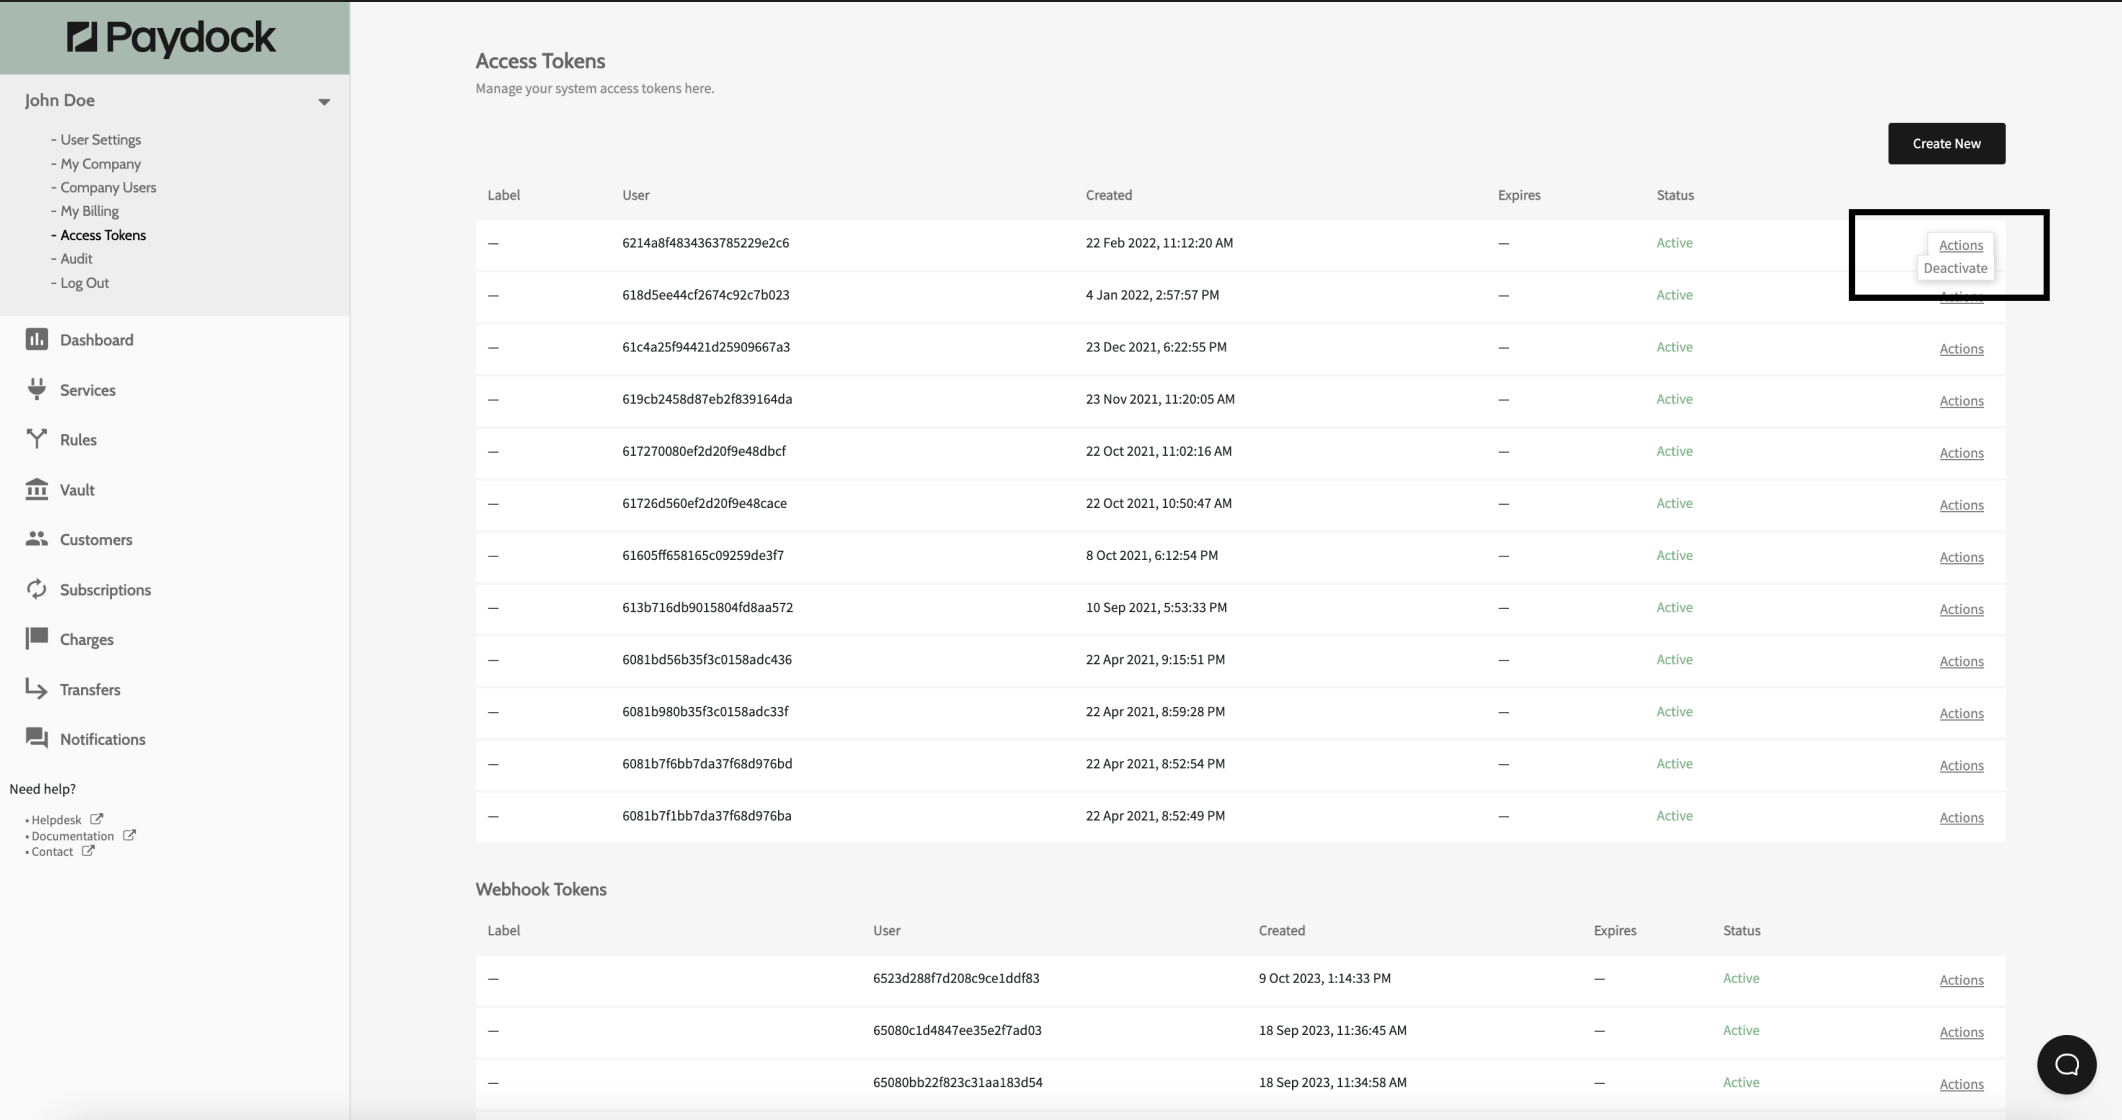
Access Tokens
Access tokens let you securely connect other systems or people to your PayDock account — without giving them your login details or full access.
You control exactly what each token can do, how long it lasts, and who can use it. Think of a token like a visitor pass: you decide what doors it opens and when it expires. You can generate an external access token in your PayDock dashboard if your role has the corresponding privileges. You can give only those permissions to this token which are enabled for your role.
Types of Access Tokens
There are two types of tokens, depending on where you are in the dashboard:
Brand-level tokens
- Created from the Brand scope
- Can access brand-level features only
- Only support API-based access (for server-to-server systems)
Merchant-level tokens
- Created from the Merchant scope
- Can access only that merchant
- Support both:
- API tokens (for backend systems)
- UI tokens (for browser-based tools and widgets)
Tokens created at one level cannot be used to access the other level.
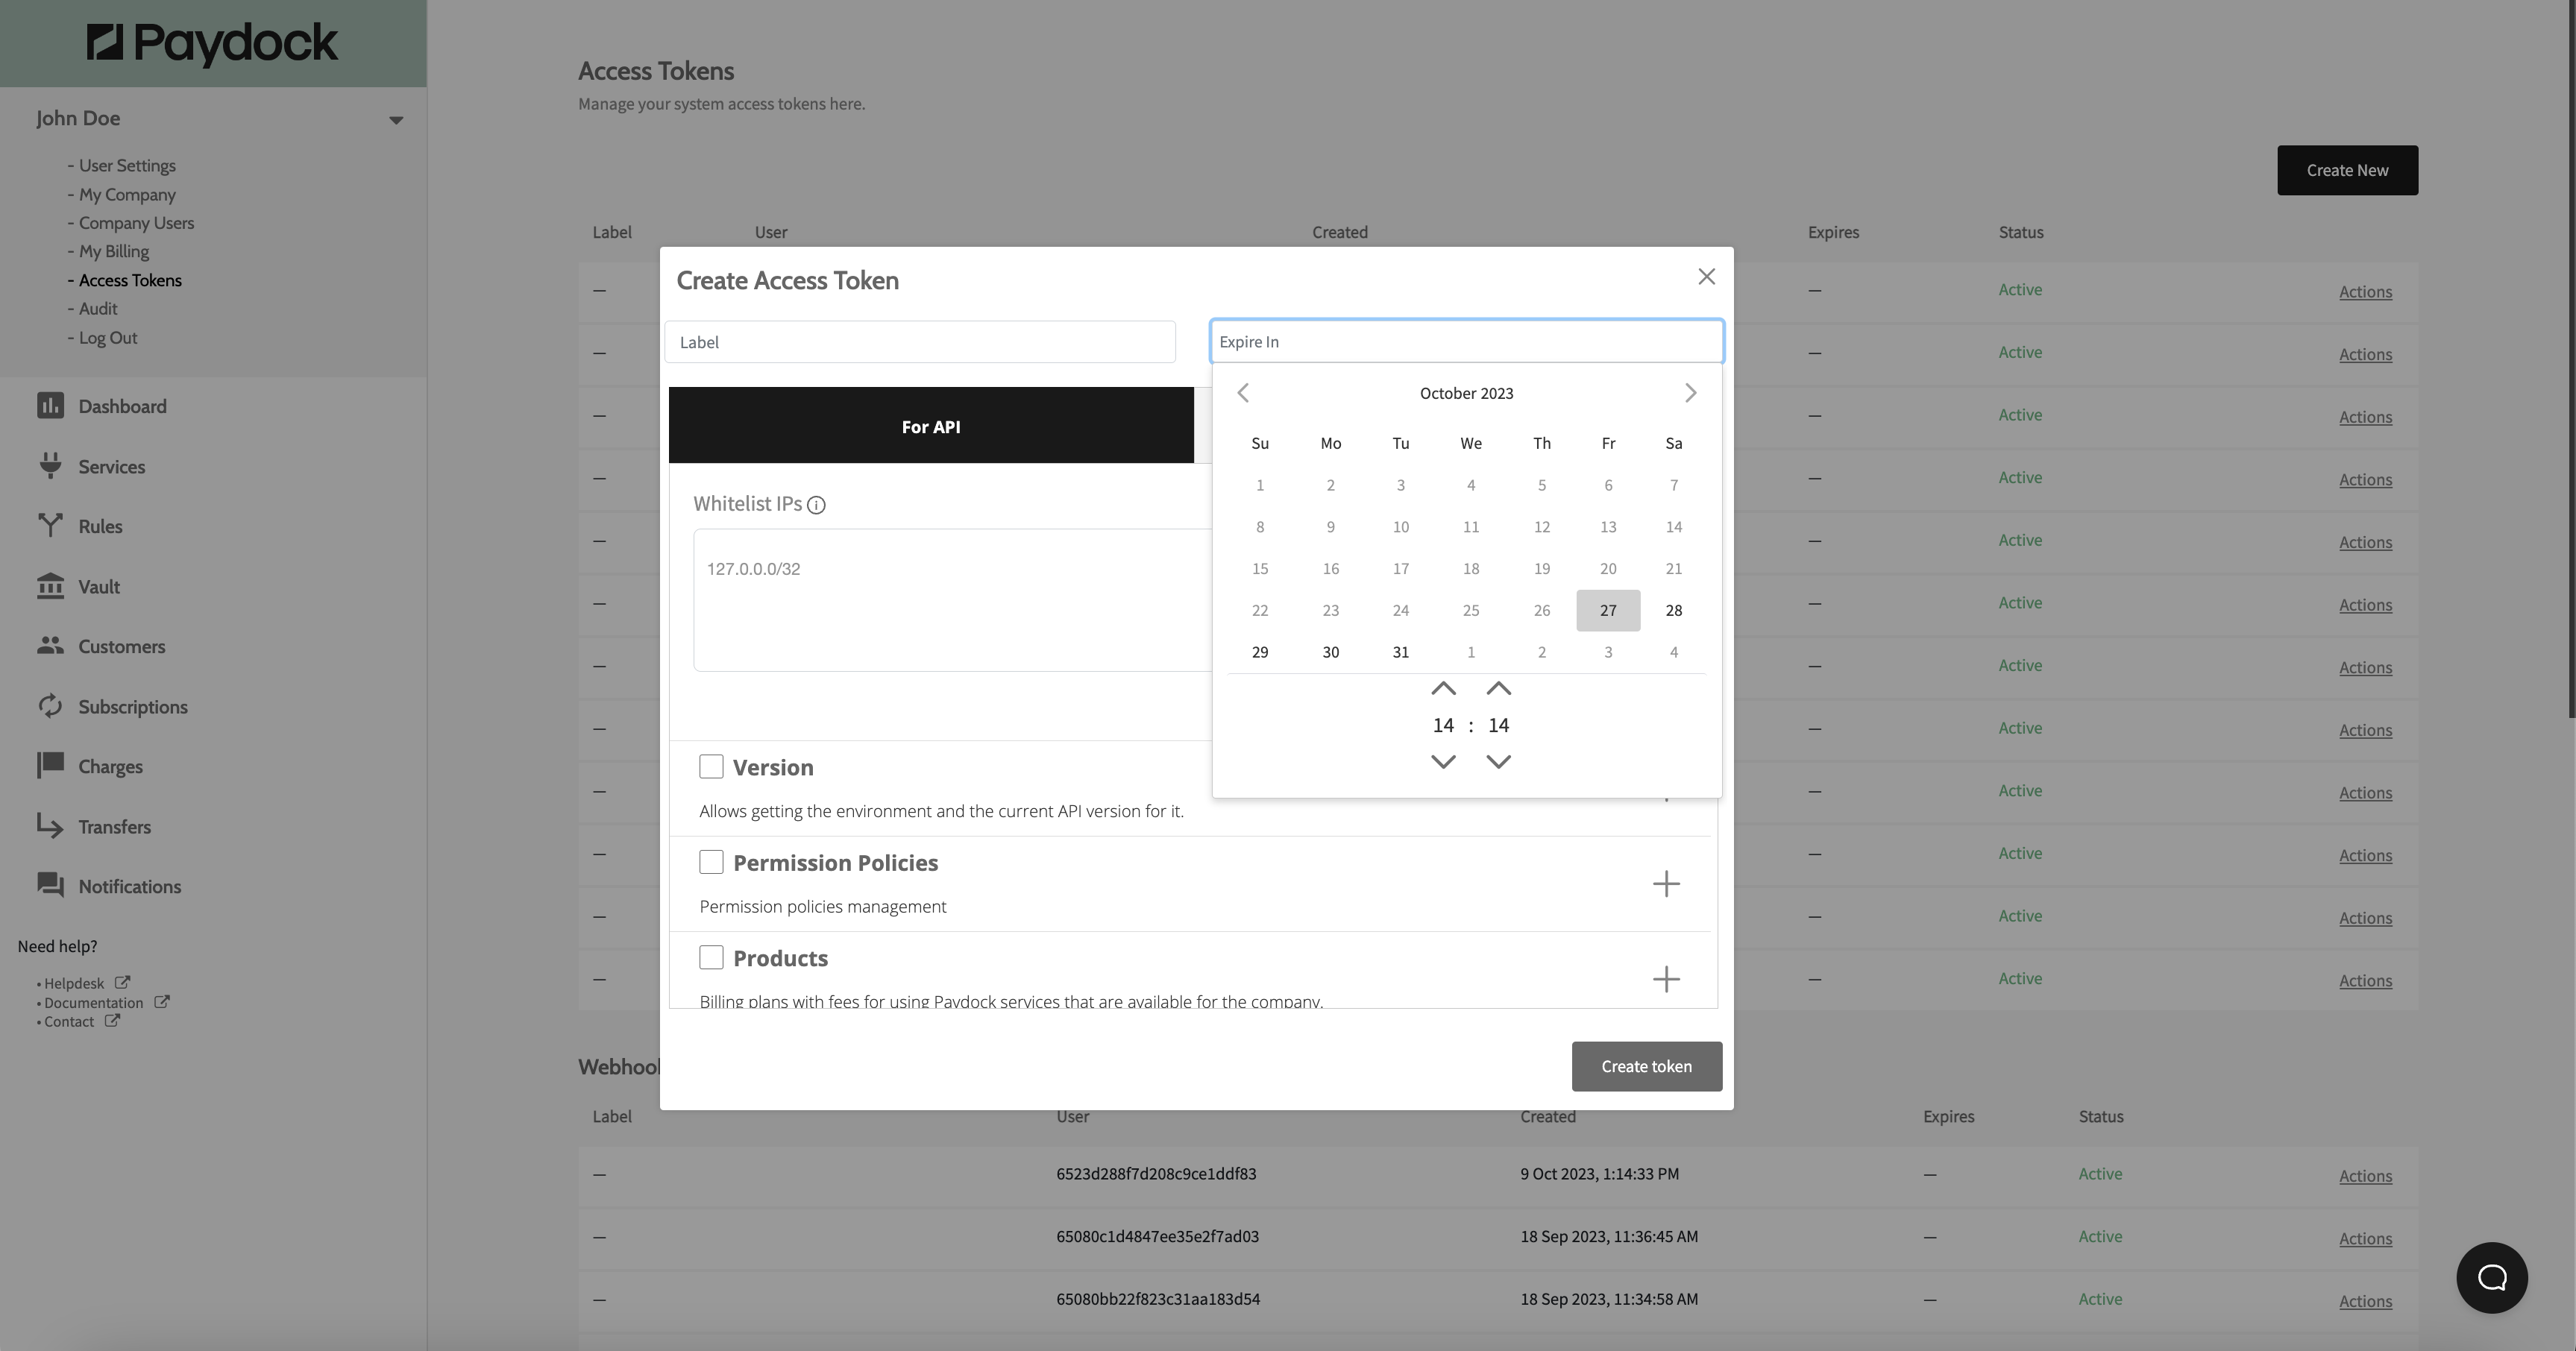
How to Create an Access Token
- Go to the Access Tokens section in your dashboard
- Click Create New
- Give the token a label (for example: "Reporting tool" or "Widget integration")
- Set how long it should last (e.g., 1 day, 7 days)
- Choose:
- API (for system integrations), or
- UI (for browser-based usage — available at merchant level only)
- API (for system integrations), or
- Limit access to specific IP addresses or domains (Optional)
- Select the exact permissions this token needs
- Click Create Token and copy it. The token value is only displayed once.
Why Permissions Matter
When you create an access token, you decide what it’s allowed to do (e.g., like view data, create payments, or update settings).
Giving a token more access than needed can lead to:
- Mistakes, like updating real data by accident
- Security risks if the token is lost or shared
- Unwanted changes to your account or merchant data
Always give the smallest amount of access needed. If someone only needs to look at payment history, don’t give them permission to create or delete anything. This is called the principle of least privilege.
Important: Widget tokens are publicly visible
If you are creating a UI token (for example, to use with a widget on your website), please note the following:
Widget tokens are public.
This means the token will be exposed in the browser and can be seen by anyone visiting the page, including other merchant users or potential attackers.
Because of this, it is very important that you:
- Only allow the specific permissions needed for the widget to work
- Do not give access to actions like viewing customer lists or managing charges
- Set an expiration time so the token is not valid forever
Example
If you’re using the token only to submit a payment form, the token should only have that permission and no other.
Giving a public-facing token broad access is one of the most common mistakes, and can lead to unauthorized actions if someone misuses it.
How to Use Tokens Safely
Remember: access tokens are like passwords and should be treated with care.
Best practices:
- Set an expiration time when creating the token and rotate them frequently
- Deactivate tokens when they’re no longer needed
- Never send a token in chat, email, or screenshot
- Only share tokens with people you trust
- Store tokens in a secure system (never in a Google Doc or text file)
- Don’t reuse the same token across multiple systems
If a token is lost or misused, go to your dashboard and deactivate it immediately.
How to Use a Token in an API Request
If someone is using the token to connect to your API, it must be added in the request header.
Correct:
x-access-token: YOUR_TOKEN
Request example
GET  https://apista.paydock.com/v1/users/self
Headers: X-Access-Token: YOUR_TOKEN

Authorized response
{
    "status": 200,
    "error": null,
    "resource": {
        "type": "user",
        "data": {
            "_id": "YOUR_ID",
            "email": "YOUR_EMAIL",
            "first_name": "test",
            "last_name": "test",
            "created_at": "2020-04-10T10:48:20.746Z",
            "updated_at": "2025-06-12T13:16:29.016Z",
            "meta": {
                "login_counter": 0,
                "allowlist_ips": [],
                "last_login_date": "2025-06-12T13:16:29.016Z"
            }
        }
    }
}

Request example
GET  https://apista.paydock.com/v1/users/self
Headers: none

Access forbidden response
{
    "status": 403,
    "error": {
        "message": "Access forbidden",
        "code": "token_required",
        "details": {
            "path": "",
            "messages": []
        }
    },
    "resource": {
        "type": "key-management"
    },
    "error_summary": {
        "message": "Access forbidden",
        "code": "token_required",
        "details": {
            "messages": []
        }
    }
}
Incorrect:
- Don’t put the token in the URL
- Don’t send it in plain text or logs
Common Mistakes to Avoid
| Mistake | Why it's a problem |
|---|---|
| Giving full access to every token | Risk of misuse, especially if shared |
| Not setting an expiration | Tokens stay active forever if not revoked |
| Sharing tokens over email or chat | Easy to leak or lose control |
| Using the same token for everything | Hard to track who is doing what |
| Forgetting to disable unused tokens | Leaves an open door in your system |
Good Examples
| Use Case | Token Type | Scope | Expiration | Example Permissions |
|---|---|---|---|---|
| Person building reports | API | Brand | 7 days | View reports |
| Hosted checkout widget | UI | Merchant | 2 hours | Submit card, tokenize data |
| Temporary contractor | API | Merchant | 1 hour | View charges only |
Summary
- Create one token per use case
- Always review permissions before clicking "Create"
- Rotate tokens frequently
- Deactivate tokens you don’t use anymore
- If in doubt, ask your team or our support team
Access tokens give are a flexible tool that requires responsibility. Use them carefully. Protect your business.
Checkout Feature
This document will guide you on how to correctly integrate the Checkout feature via Paydock.
What is Checkout?
The Checkout feature revolutionises the merchant's checkout process by offering a user-friendly, adaptable, and easily customisable checkout solution. This innovative approach streamlines transactions and provides a seamless experience for both merchants and customers. Through available customisation options, merchants can align the checkout interface with their brand identity, making it appear native to their e-commerce ecosystem. This includes matching colour schemes and fonts to create a cohesive shopping experience from browsing to purchase completion.
Key Benefits
- Ease of deployment and maintenance: Deployment of new features/capabilities with minimal code, providing simple integration and easily add additional features into your existing ecommerce ecosystem.
- Reduced Complexity: Eliminates the need for merchants to understand and manage complex business flows and payment gateway specifics by providing a single Master Widget that requires one API call for initialization.
- Centralized Customisation: Allows for consistent styling and layout configurations across different platforms with minimal code changes.
- Enhanced Monitoring: Provides a comprehensive overview of the user's payment journey, facilitating better tracking and troubleshooting.
Core Functionalities
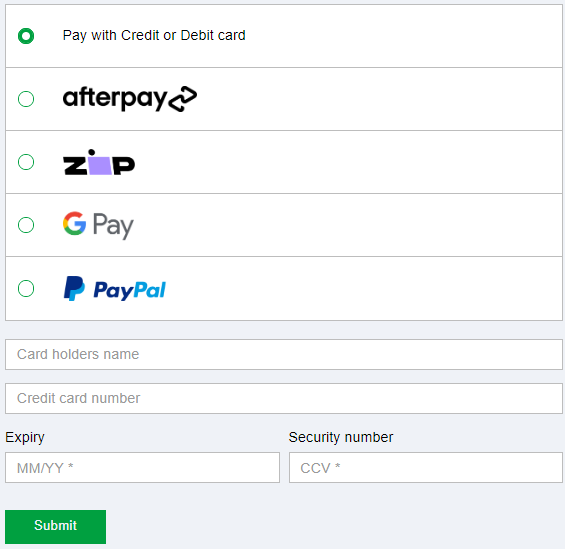
- Presents a wide array of payment methods to customers
- Integrates value-added services seamlessly
- Facilitates a smooth and secure transaction flow
| Current Supported Services and Flows | |
|---|---|
| Card Payments Flows: | Card Payments with 3D Secure (Recommended) Card Payments without 3D Secure |
| Wallet Based Payment Methods | Apple Pay Direct Charge Google Pay Direct Charge PayPal Direct Charge |
| Alternate Payment Methods: | Afterpay v1 Direct Charge Zip Direct Charge |
Before you begin:
How to Setup Checkout
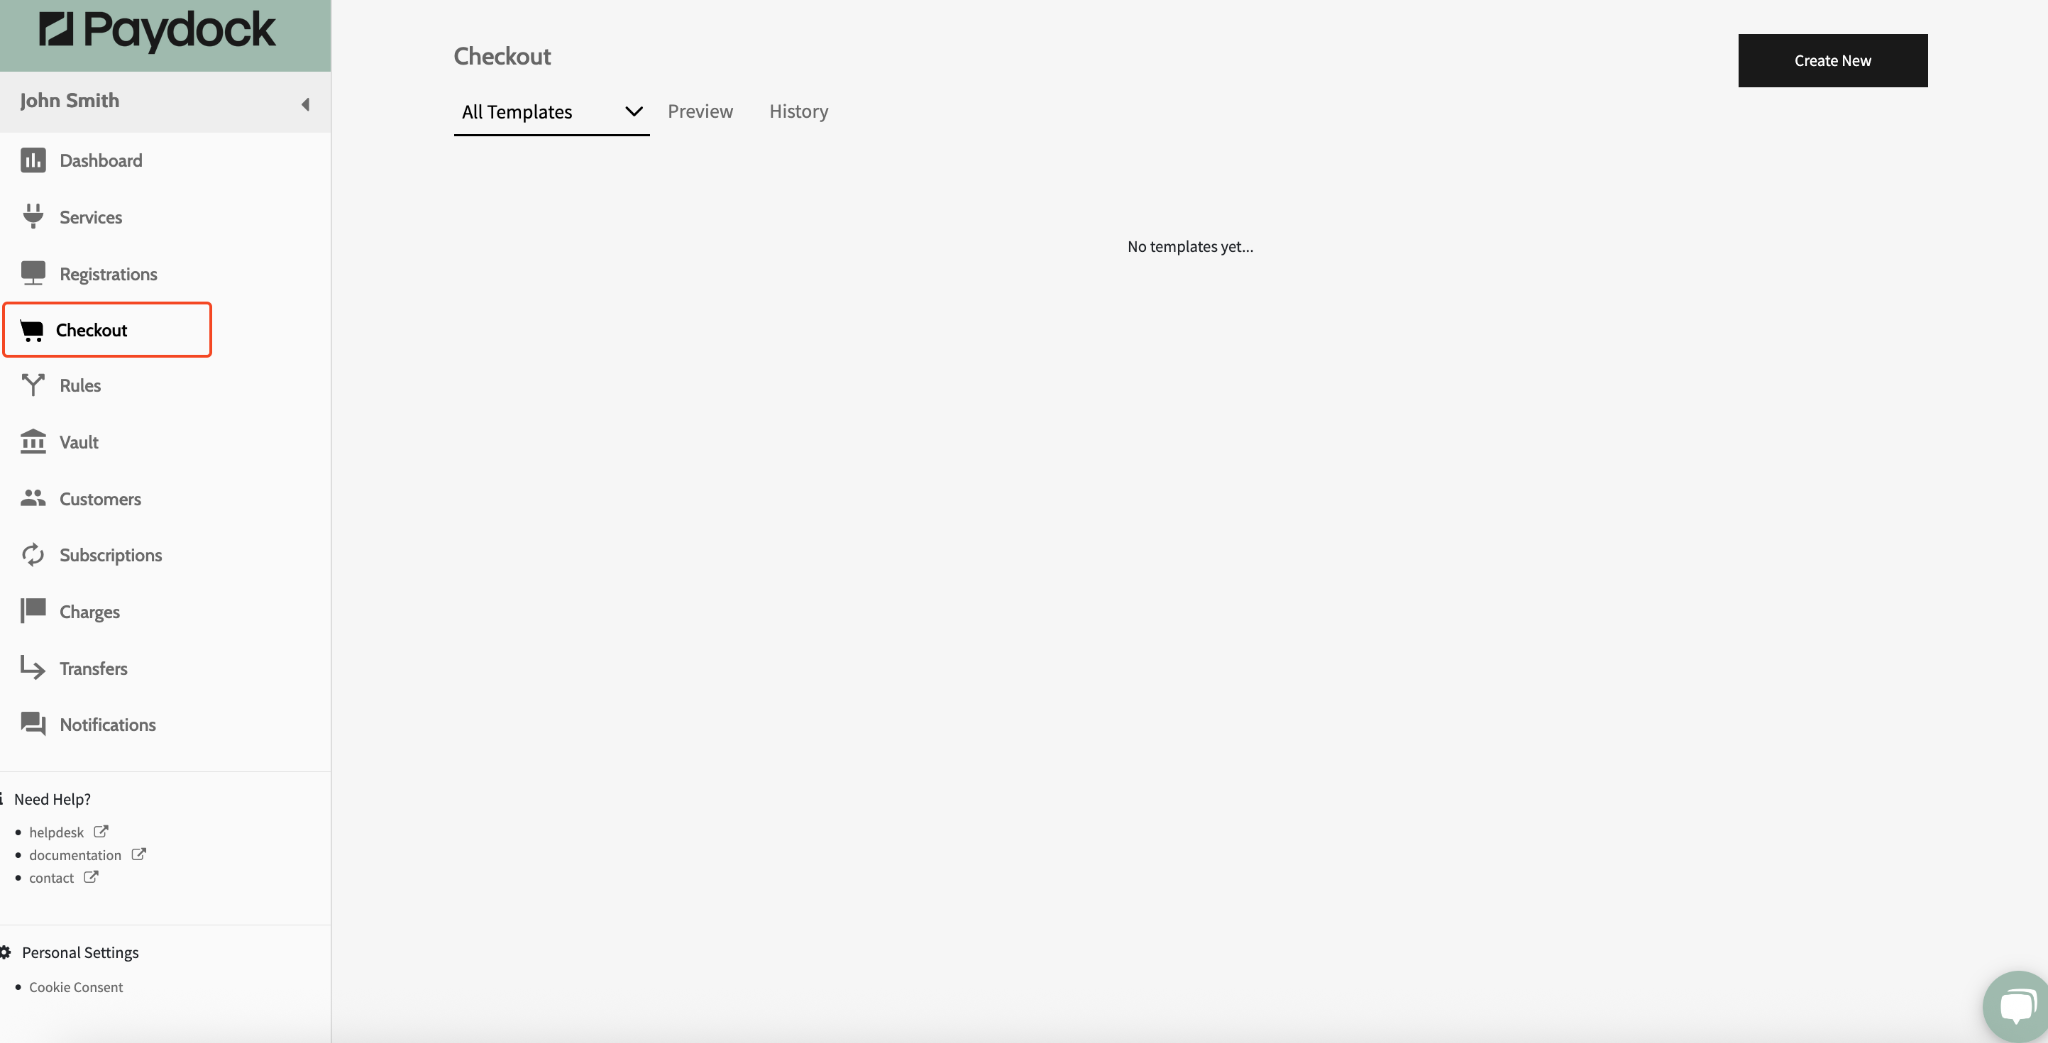
- Log into the Paydock Merchant Dashboard
- Navigate to 'Checkout' in the navigation section
- Select ' Create New'
From the 'Select Template Options' you will get the choice of
- Customisation - (Template designed specifically for customising the look and feel of your checkout experience)
- Configuration - (Templated designed specifically for selecting what workflows/payment services will be included in your checkout experience)
- Configuration & Customisation - (Allows you to create the 2 above templates simultaneously)
Select the template that you wish, for a first-time setup, we recommend using the Configuration & Customisation option.
- Customisation - (Template designed specifically for customising the look and feel of your checkout experience)
On the next step, you will get the option to label your templates, we recommend that you keep these unique and call out if the template is for configuration or customisation. On configuration you will also get the option to select which version of the configuration template you want to create.
After selecting your API version this will bring up a list of services, for the service you wish to enable, select a transaction flow associated with the service you wish to enable and select the Service ID from the available dropdown. You can see a list of all your services in the 'Services' screen
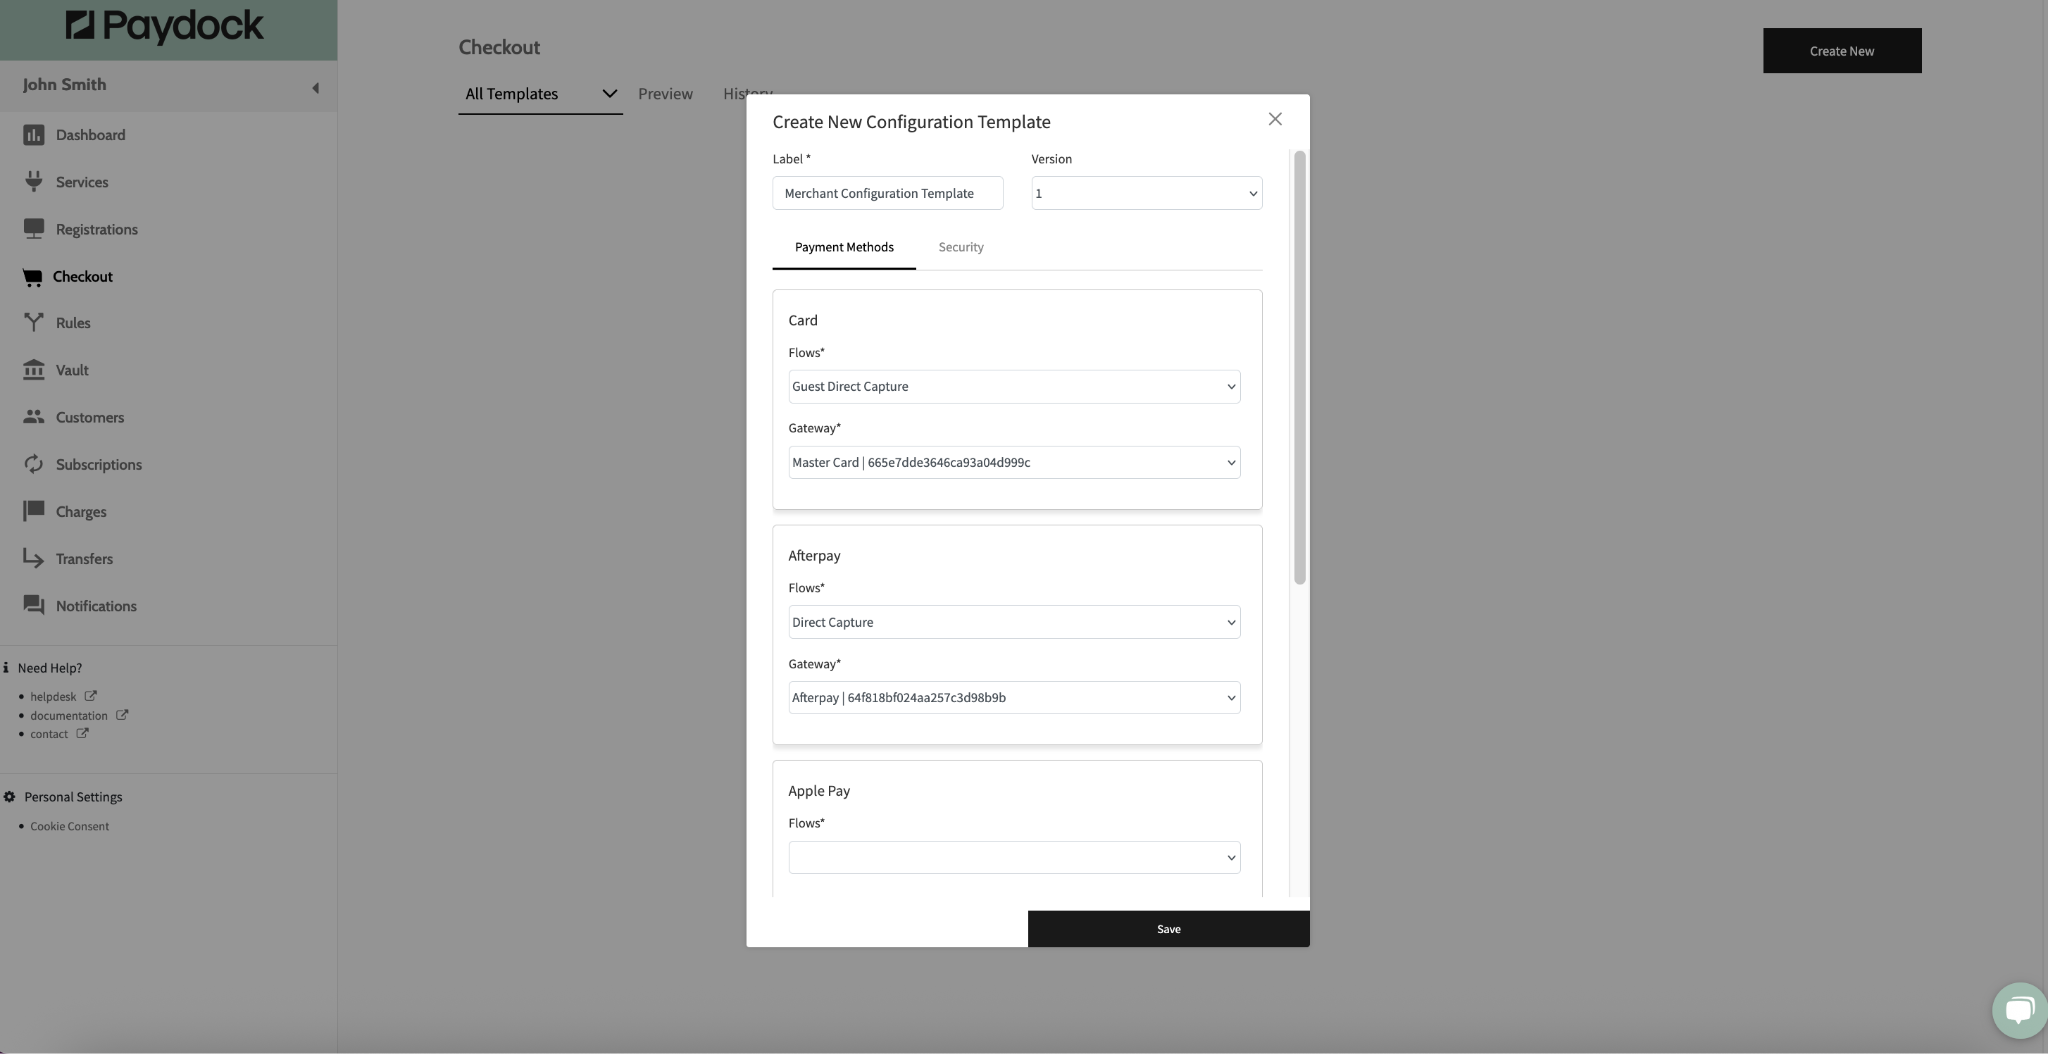
Once you have selected your workflows and Service ID's associated with each service, click 'Save and Next' (You will also have the ability to update an existing configuration template once it has been created)
You will need to label your customisation template, similar to Step 5, we recommend you keep the label for your configuration template unique and identify that it is a Configuration Template.
You will have the ability to customise the look and feel of your Checkout Widget via the following fields:
- Background Colour
- Border Colour
- Text Colour
- Button Colour
- Font Family
- Font Size
- Background Colour
Apply your customization settings and click 'Save' (You will also have the ability to update an existing customisation template once it has been created)
 You will now see the templates you just created appear in your Templates list with an associated ID which can be used in your integration.
 If you wish to preview the templates that you have created, you can select the 'Preview' option on the Checkout page which will give you the ability to add some configuration data to render the widget within the Merchant Dashboard. (Note: Preview option is only currently available in the PreProduction environment)
Enter information into the provided fields and select the Configuration and Customisation templates you have just created. Once the information has been entered, hit 'Create' and this will render the widget into the 'Preview' column.
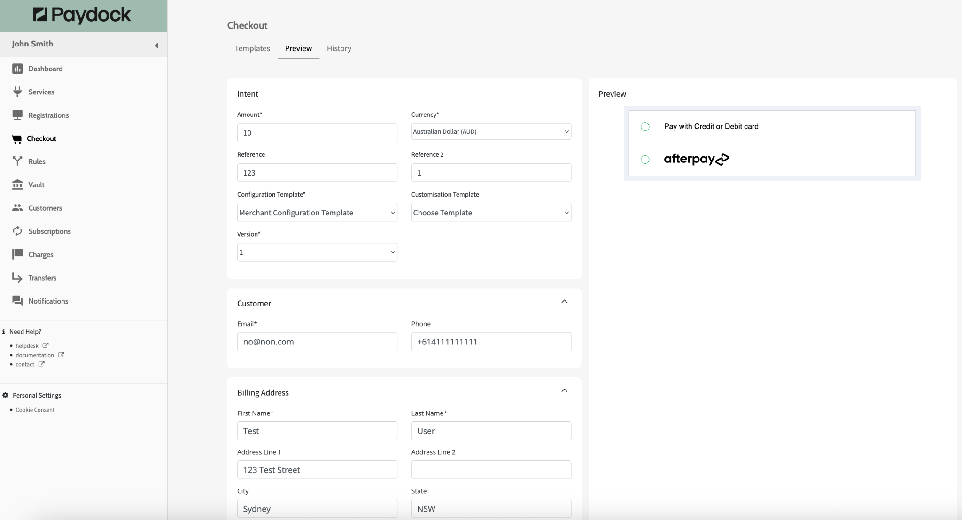
In the PreProduction environment the preview tab will allow you to run test transactions using your created templates you have created. For testing Card Payments, you can use our Paydock Test Cards
How to Integrate the Checkout Master Widget
Step 1) Create Configuration and Customisation Templates
Refer to the 'How to Setup Checkout' part of this guide to see how this can be done.
Step 2) Generate Intent Token via API
The Intent encapsulates the payment context for the transaction. It is recommended that you collect all fields within the intent token request as this will allow you to use all existing payment methods and future proof you for any additional payment methods that are added in the future.
| API Endpoint | <https://api.paydock.com/v1/checkouts/intent> |
|---|---|
| HTTP Method | POST |
| Headers | x-access-token- Paydock_ACCESS_TOKEN - This is your Paydock API Access Token. Content-Type - application/json - Type will always be application/json. |
| Request Parameters | customisation.template_id - string - Your previously created Customisation ID for the Checkout Widget configuration.template_id - string - Your previously created Configuration ID for the Checkout Widget customer.email - string - Customers Email Address customer.phone - string - Phone Number of Customer customer.billing_address.first_name - string - First Name of Customer. customer.billing_address.last_name - string - Last Name of Customer. customer.billing_address.address_line1 - string - Customer Address Line 1 customer.billing_address.address_line2 - string - Customer Address Line 2. customer.billing_address.address_city - string - Customers City. customer.billing_address.address_state - string - Customers State. customer.billing_address.address_country - string - Customers Country customer.billing_address.address_postcode - string - Customers Postcode amount - string - Total amount for the transaction. version - string - The version of Checkout API being used. currency - string. Always set to 'AUD' reference - string. A unique reference for the transaction |
Request Body:
JSON
{
    "customisation": {
        "template_id": "YOUR_CUSTOMISATION_TEMPLATE_ID"
            },
    "configuration": {
        "template_id": "YOUR_CONFIGURATION_TEMPLATE_ID"
            },
    "customer": {
         "email": "test@test.com",
         "phone": "+6141111111",
         "billing_address": {
            "first_name": "Test",
            "last_name": "User",
            "address_line1": "123 Test Street",
            "address_line2": "Unit 123",
            "address_city": "Sydney",
            "address_state": "NSW",
            "address_country": "AU",
            "address_postcode": "2000"
             }
        },
    "amount": 120,
    "version": 1,
    "currency": "AUD",
    "reference": "Order 12345678"

}
Response body:
JSON
{
    "status": 201,
    "error": null,
    "resource": {
        "type": "checkout",
        "data": {
            "_id": "67107db89d218493ecc4e082",
            "version": 1,
            "status": "active",
            "reason": null,
            "amount": 120,
            "currency": "AUD",
            "reference": "Order 12345678",
            "journey": [
                {
                    "sense": "info",
                    "title": "Workflow created",
                    "message": "Checkout process created ....",
                    "thread": "main",
                    "context": null,
                    "_id": "67107db89d218493ecc4e085",
                    "created_at": "2024-10-17T03:00:08.850Z",
                    "updatedAt": "2024-10-17T03:00:08.850Z"
                }
            ],
            "created_at": "2024-10-17T03:00:08.759Z",
            "updated_at": "2024-10-17T03:00:08.850Z",
            "token": "YOUR_INTENT_TOKEN"
        }
    }
}
Store the returned intent_token to utilise in the next step.
Note:'customisation.template_ID' and 'reference' fields are optional.
Step 3) Render the Widget using the intent_token
Use the returned intent_token from the previous step and use it to render the Checkout Widget to the end-user.
HTML
<div id="widget"></div>
<script
src="https://widget.paydock.com/sdk/latest/widget.umd.js"></script>

<script>
var widget = new cba.Checkout('#widget',"{{intent_token}}");
Step 4) Add event handling
The Master Widget in the checkout process sends specific notifications to merchants about their customers' checkout status. These notifications are crucial for managing the cardholder experience, addressing various checkout outcomes including:
onPaymentSuccessful
This event is triggered when a payment is completed successfully. It allows the merchant to
execute specific actions, such as updating the order status, notifying the customer of the
successful transaction, and/or redirecting the customer to a confirmation page
onPaymentError
This event is triggered when a payment fails. Merchants can use this event to handle payment
errors, such as displaying error messages to customers or logging the error details. When this event is returned, and the transaction has declined we recommend generating a new Intent Token and re-initialising the checkout widget to provide the end user with the ability to re-attempt their transaction.
onPaymentExpired
This event is triggered when a payment workflow session expires. This typically happens if the
customer takes too long to complete the payment (e.g after 15 minutes of inactivity).
Example below:
HTML
<!DOCTYPE html>
<html lang="en">
  <head>
    <meta charset="UTF-8">
    <title>Checkout</title>
    <style></style>
  </head>
  <body>
    <h1>Widget</h1>
    <div id="widget"></div>
    <script src="https://widget.paydock.com/sdk/latest/widget.umd.js"></script>
    <script>
      var widget = new paydock.Checkout('#widget', "{{intent_token}}");
      widget.onPaymentSuccessful(function(data) {
        console.log("success: ", data)
      });
      widget.onPaymentFailure(function(error) {
        console.log("failure: ", error)
      });
      widget.onPaymentExpired(function(data) {
        console.log("expired: ", data)
      })
    </script>
  </body>
</html>
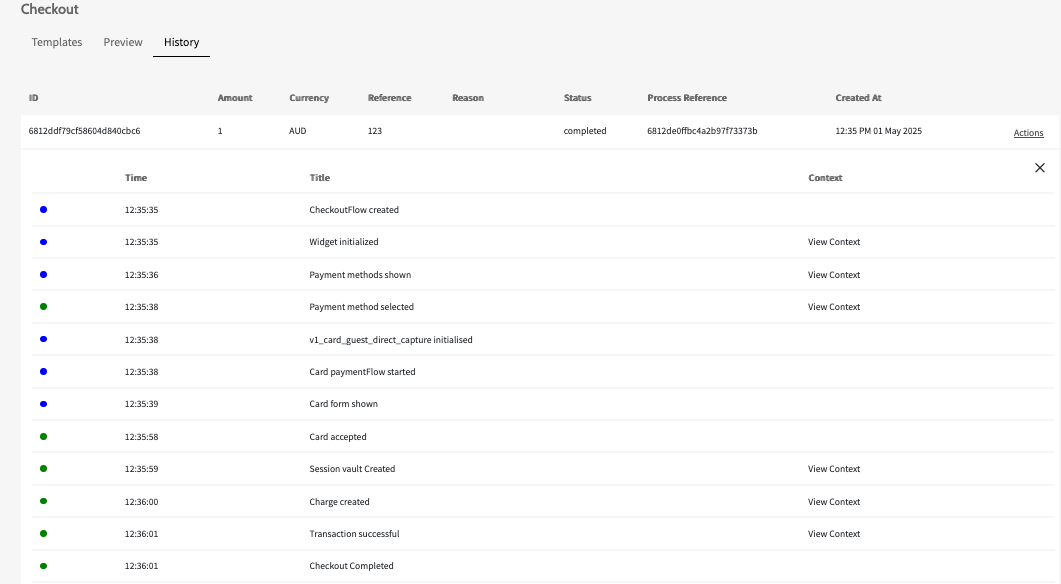
History
Paydock provides you with the ability to review the history of your users checkout experience by providing insights into the steps taken for your user to complete their checkout process. This includes:
- ID - Intent token ID
- Amount - As entered in the intent API request
- Currency - As entered in the intent API request
- Reference - As entered in the intent API request (optional)
- Reason - Additional information about the outcome of a given intent session
- Status - Status of a given intent session
- Process Reference - The ID of the charge generated through the Payment Workflow
process. - Created at - The time when the intent API request was successfully completed
Selecting Actions --> View logs will provide you with further insights to exactly what payment methods were selected and details around the outcome of these actions. These have been categorised into colour statuses, which are:
- Green = Success
- Blue = Informational action
- Orange = Warning
- Red = Error
Versioning
Versioning in Templates:
When a merchant creates Configuration or Customisation templates
in the Dashboard, they will see the 'Version' field. This field is important because it allows them
to manage and apply different versions of their templates across various checkout workflows.
- Version Transparency:
Each version of a template corresponds to a specific set of
features and behaviours. By specifying the version in the template, merchants can
ensure that the same configuration is applied consistently across all their checkouts.
- Backward Compatibility:
If the merchant updates a template to a new version, previous
versions remain supported. This means they can maintain older checkout workflows
without disruption while taking advantage of new features in updated versions.
Versioning in the Create Intent Endpoint:
When generating an intent using the /intent API
endpoint, merchants need to explicitly pass the version of the workflow that they want to use.
This is key to maintaining consistency between the API and the Master Widget.
- Explicit Versioning:
By specifying the workflow version in merchants' API request, they
ensure that the API and the Master Widget are aligned. This removes any ambiguity
about which version of the checkout process is being used, reducing the risk of
inconsistencies.
- Stability
During updates, even as Paydock releases updates to the API and Master
Widget, their integration remains stable. Merchants only move to a new version of the
workflow when they are ready, giving them control over the timing of any changes.
Network Tokenisation
Overview
Network Tokenisation is used in payment processing and protects sensitive card information. It does this by replacing actual card details (FPAN) with a unique identifier or token, which can be used to process payments without exposing the raw card information.
Supported Card Schemes
The following card schemes are supported:
- Mastercard via SCOF integration (phase 1)
- Visa via VTS integration (phase 1)
- Other schemes (tbc)
Supported Gateways
- MPGS (phase 1)
- Cybersource (phase 2)
Supported Value Added Services
- MPGS in-built 3ds (phase 1)
- Standalone 3ds Gpayments (phase 1)
Value Proposition
- Enhanced Security: Replaces sensitive card details with tokens, minimizing exposure of actual card information.
- End-to-End Encryption: Ensures data security throughout the transaction process, from the point of sale to the backend systems.
- Support for Various Payment Methods: Network tokenization supports different types of transactions, including e-commerce, in-store, and mobile payments.
- Scalability: As businesses grow, tokenization can easily scale to handle increasing transaction volumes without compromising security.
- Lower Fraud-related Costs: By mitigating fraud risks, merchants can save on costs associated with chargebacks, fraud investigations, and other related expenses.
- Increased Consumer Confidence: Enhanced security measures can increase customer trust in the merchant’s payment systems, leading to higher satisfaction and loyalty.
- Card Lifecycle Management: Automated issuer updates ensure that network tokens stored on file are kept up to date, reducing friction for end customers in subscription + returning customer stored on file use cases.
How to use the Network Token feature?
Configuration Guide
In the Paydock Merchant (Company) represents one legal entity. When configuring the company merchants can provide ABN as a business identification value. In the context of a Network, tokenisation functionality is recommended to have 1 Registration and 1 Service configured per Merchant account. The schemes (Visa and Mastercard) require Merchants to have 1 Registration (TRID) per legal entity. One TRID can’t be shared between multiple legal entities.
1. Network Token Registration
Before Network Tokens can be provisioned, merchants have to onboard/register with the Visa and/or Mastercard Network Tokenisation service (at the scheme-side). Going forward, the Network Tokens created and used by this merchant will be performed within the context of their registration (TRID). Network Tokens can’t be shared between Registrations (TRIDs). One registration should represent 1 legal entity based on scheme requirements.
**Note:* This operation is supported by both the API and the UI in Paydock.*
Create
Merchants are able to create Registrations via Paydock API and UI
- POST /v1/registrations - Create NT Registration.
- Fields that should be provided by merchant:
- “group”: network_token",
- "mode": "test" (or “live” or “virtual)”,
- "name": "Name of Registration in Paydock"
- "type": "MastercardSCOF" (or “VisaVTS)”,
- “merchant_data”: object
- “enable_vault_update”: false/true (If “Enable Vault Update” is true, then Vault Tokens linked to Network Tokens will be updated on Issuer Updates received from schemes)
- Merchant must have permission registrations:create
- Fields that should be provided by merchant:
Visa/VTS (API)
The following fields are relevant for the Visa/VTS registration request as part of merchant_data:
- Primary Legal Name (required)
- Website URL (required)
- City (required)
- Country (required)
- Acquirer Identifiers (required if Business Identification Value and Business Identification Type are not provided)
- Business Identification Value (required if Acquirer Identifiers are not provided)
- Business Identification Type (required if Acquirer Identifiers are not provided)
- Company Address line 1 (optional)
- Company Address line 2 (optional)
- Company State Province Code (optional)
- Company Postal Code (optional)
- Company Phone (optional)
- Dun and Bradstreet Number (optional)
- Company Trade Name (optional)
- Primary Contact First Name (optional)
- Primary Contact Last Name (optional)
- Primary Contact Email (required)
- Duns Number (optional)
Note: VTS registration in the production environment takes between 72 hours to a maximum of 5 calendar days. Before the onboarding is completed on the Visa side, merchants will not be able to provision or manage Network tokens
Mastercard/SCOF (API)
The following fields are relevant for the Mastercard/SCOF registration as part of merchant_data:
- Program Name (required)
- Acquirer Identifiers (ICA, BIN, Merchant ID) (optional)
- Primary Legal Name (optional)
- Logo URL (optional)
- Primary Website URL (optional)
- Display Name (optional)
- Merchant Category Codes (optional)
- Company Address Name (optional)
- Company Address line 1 (optional)
- Company Address line 2 (optional)
- Company Address line 3 (optional)
- Company City (optional)
- Company State (optional)
- Company Postal Code (optional)
- Company Country (optional)
- Debit Token Requested (optional)
Note: It takes 3+ hours for Mastercard/SCOF registration to be created.
After registration is successfully created, the status of registration will be changed to “completed”. Only at this point can subsequent steps be completed.
For more information on the Registrations API, please see the associated Postman documentation. registrations -> create
Update
Merchants are able to update Registrations via Paydock API and UI
Visa VTS
Visa doesn’t support registration update on the scheme side, so ONLY Paydock fields can be changed for Visa Registration. Paydock doesn’t support Visa Registration Update via UI, however, it’s available from API.
- PUT /v1/registrations/{id} - Update NT Registration.
- Merchants have to provide ONLY the fields they want to change in the Update NT Registration Request
- Merchant must have permission registrations:modify
- Merchants have to provide ONLY the fields they want to change in the Update NT Registration Request
Mastercard SCOF
Mastercard supports registration update on the scheme side, but ONLY a limited number of fields can be changed for Mastercard Registration. Please refer to Postman documentation to get information on which fields can be updated. Paydock support Mastercard SCOF Registration update for both UI and API.
- PUT /v1/registrations/{id} - Update NT Registration.
- Merchants have to provide ONLY the fields they want to change in the Update NT Registration Request
- Merchant must have permission registrations:modify
- Merchants have to provide ONLY the fields they want to change in the Update NT Registration Request
For more information on the Registrations API, please see the associated Postman documentation. registrations -> update
Read
Merchants are able to get and search Registrations via Paydock API.
- GET /v1/registrations - Search Registrations. This endpoint allows merchants to search registrations
- Merchant must have permission registrations:search
- Merchant must have permission registrations:search
- GET /v1/registrations/{id} - Get Registration by ID. This endpoint allows merchants to get Registration by ID
- Merchant must have permission registrations:get
For more information on the Registrations API, please see the associated Postman documentation. registrations -> get, search
Delete
Merchants are able to delete Registrations via Paydock API and UI
- DELETE /v1/registrations/{id} - Archives Registration on a Paydock side without deleting on the scheme side
- Merchant must have permission registrations:delete
For more information on the Registrations API, please see the associated Postman documentation. registrations -> delete
Revoke
Merchants are able to revoke Registrations via Paydock API and UI
- DELETE /v1/registrations/{id}/revoke - Archives Registration on a Paydock side and the scheme side
- Merchant must have permission registrations:revoke
Revoke operation is supported only for Mastercard via UI and API. Visa doesn’t support Revoke API. To Revoke Visa Registration, please reach out to the support team
For more information on the Registrations API, please see the associated Postman documentation. registrations -> revoke
2. Network Token Service Connectivity
The intent of the Service connectivity in Paydock, is to create the service_id that will be used for the API requests made
API Service Connectivity
After completing the registration process, the Network Token Service (NTS) needs to be configured to start creating network tokens. This involves connecting the appropriate NTS and setting it as the default=true for each card scheme.
Key points:
- For Visa cards only: Configure Visa NTS as default=true
- For Mastercard only: Configure Mastercard NTS as default=true
- For both: Configure both services as default=true
Important Notes:
- Services can only be connected to registrations with "completed" status
- Paydock recommends creating only one service per scheme per registration as scheme will return the same Network Token for multiple services. To optimize your setup and avoid redundancy, configure only the necessary services for your specific card scheme requirements.
- If NTS is configured, but not set up as default=true Network Tokens will not be created under Vault API. This enables flexibility for merchants to easily turn on/off Network Token creation.
Visa/VTS
Create service endpoint: POST {{url}}/v1/services
The following fields are relevant for the VisaVTS service connection:
- Service Name (required)
- Group (must be set to network_token)
- Type (must be set to VisaVTS)
- Mode (test or live)
- Registration ID
- Network Token Options with Default=true/false
For more information on the Visa/VTS service connection API, please see the associated postman API collection under: services -> create
Mastercard/SCOF
Create service endpoint: POST {{url}}/v1/services
The following fields are relevant for the Visa/VTS service connection:
- Service Name (required)
- Group (must be set to network_token)
- Type (must be set to MastercardSCOF)
- Mode (test or live)
- Registration ID
- Network Token Options with Default=true/false
For more information on the MastercardSCOF service connection API, please see the associated postman API collection under: services -> create
UI Service Connectivity (Phase 2)
Mastercard/SCOF and Visa/VTS
- Log into your company level account
- Navigate to Services from the menu on the left
- Click on the Add New tab from the top of the page
- Select the Network token group from the Service Group drop-down list
- Navigate to or search Network Token service (Visa or Mastercard) and click on the Activate button
- Complete the fields below to enable the Network Token service.
- Label – This is for your reference only
- Select existing Network Token Registration from the Registrations dropdown.
- Based on the selected Network Token registration, the following details will be auto-populated (as they are derived from the Network Token registration)
- Registration ID
- Group
- Type
- Environment
- Set flag “Set as Default“ = true if you want Network Tokens be created under the hood of the Vault API.
Note: If no service is “Set as Default“ = “true”. Network Tokens can’t be created. To support Network Tokens for Mastercard and Visa both services should be connected with “Set as Default“ = true. - Click Connect to complete the Network Token service connection.
- Label – This is for your reference only
3. Network Tokens Management
After service is connected Network Tokens can be created either automatically (under the Vault API) or with new endpoints for existing Vaults. Merchants are able to create network tokens via Paydock API.
Note: This is pre-requirements to start using Network Tokens for payments processing. Network Tokens only supported for Vault type “permanent“. Merchants must request and receive cardholder consent to “store card” before provisioning network tokens, as creating network tokens without cardholder consent is non-compliant.
For VISA: Network Tokens can't be created for Visa vaults without an email. If the email field is not provided by the merchant in the Vault creation request, Paydock will automatically generate it. It’s highly recommended for merchants to provide email and fall back to use Paydock’s generation in rare cases. Based on Visa feedback, there is no implication of using Paydock-generated emails, as it will not impact the success rate of the provisioning requests or transaction processing.
Create
- POST /v1/vault/payment_sources - Create Vault. Network Tokens will be automatically created under the hood of Vault API if the following requirements are met otherwise ONLY Vault will be created:
- Merchant has active Network Token service connected for relevant scheme with “default“ configured to “true“ and Registration connected to the service is in status “Completed“
- Merchant has permission vault-tokens:create
- Merchant has active Network Token service connected for relevant scheme with “default“ configured to “true“ and Registration connected to the service is in status “Completed“
- POST /v1/vault/payment_sources/{id}/network-tokens - Create Network Token. This endpoint allows merchants to create a Network Token for an existing Vault
- Merchant has active Network Token service connected for relevant scheme with “default“ configured to “true“ and Registration connected to the service is in status “Completed“
- Merchant has permission vault-network-tokens:create
- Merchant has active Network Token service connected for relevant scheme with “default“ configured to “true“ and Registration connected to the service is in status “Completed“
For more information on the Network Token API, please see the associated postman API collection under: network-tokens -> create
**Note:* For merchants requiring Network Token provisioning across multiple Vaults simultaneously, Paydock offers a streamlined solution Bulk Processing which allows to Provision Network Tokens for up to 100 Vaults in a single request*
How to Request:
- Contact Paydock support with your bulk provisioning needs
- Provide the necessary details for each Vault (up to 100)
- Our team will process the request and provision Network Tokens across specified Vaults
Read
Merchants are able to get and search network tokens via Paydock API.
- GET /v1/vault-tokens/{id} - Get Vault by Id. This endpoint allows merchants to get a Vault with Network Tokens
- Merchant has permission payment-sources-vault:get
- Merchant has permission payment-sources-vault:get
- GET /v1/vault/payment_sources - Search Vaults. This endpoint allows merchants to search Vaults with Network Tokens created in Paydock
- Merchant must have permission payment-sources-vault:search
- Merchant must have permission payment-sources-vault:search
- GET /v1/vault-tokens/{vault_token}/network-tokens/{id} - Get Network Token by Id. This endpoint allows merchants to get a Network Token by Paydock Id
- Merchant must have permission vault-network-tokens:get
For more information on the Network Token API, please see associated postman API collection under: network-tokens -> get, search
Update
Merchants are able to change “default“ network token for payments processing, this is relevant where a single vault_token has multiple Network Tokens underneath it. In this case, one of the child Network Tokens must be set as the ‘default’.
- PUT /v1/vault-tokens/{vault_token}/network-tokens/{id} - Update network token. This endpoint allows merchants to change “default“ network token for payments processing
- Merchant has permission vault-network-tokens:modify
For more information on the Network Token API, please see the associated postman API collection under: network-tokens -> modify
Delete
Merchants are able to delete network tokens from Paydock and scheme via Paydock API.
- DELETE /v1/vault/payment_sources/{id} - Delete Vault by Id. This endpoint allows merchants to delete Vault and Network Tokens by Vault Id
- Merchant has permission payment-sources-vault:delete
- Merchant has permission payment-sources-vault:delete
- DELETE /v1/vault-tokens/{vault_token}/network-tokens/{id} - Delete Network Token by Id. This endpoint allows merchants to delete Network Token by Id.
- Merchant must have permission vault-network-tokens:delete
**Note:* If Network Token with “default“ = true was deleted and Vault doesn’t have any default Network Token charges will be processed using raw card data*
For more information on the Network Token API, please see the associated postman API collection under: network-tokens -> delete
Network Tokens Failover
During the initial Vault creation, if a network token creation fails, our system automatically assesses the nature of the error. Errors are classified as either:
- Hard errors: These are non-retryable issues (such as a card being ineligible for tokenisation)
- Soft errors: These are temporary issues that can be resolved with retried attempts, such as temporary unavailability of the card network
For soft errors, our system employs an automatic retry mechanism. It will attempt to create the network token again at the following intervals: 1 hour, 12 hours, 24 hours.
This process ensures that up to three reattempts to create the network token are performed, maximizing the chances of successful tokenisation.
If the third and final reattempt fails, the merchant can reach out to support@paydock.com if further investigation is required (noting, this should be a rare case and the merchant should explore the available logs prior to reaching out to Paydock team).
4. Charge Creation with Network Tokens
There are no changes in endpoints and request bodies for the existing /charges and /subscriptions endpoints. These endpoints were extended to introduce compatibility with Network Tokens.
Charges flow that support Network Tokens:
- Charge creation with Vault
- Charge creation with Customer with Vault
Note: If the payment source is Vault token and Vault has a default Network Token and Registration to be used in status “Completed“, the charge will be made using Network Token instead of card data.
Subscriptions flows
- Subscription creation with Customer with Vault
- New subscription: A new subscription can be created with the Customer with Vault payment source. If Vault has default=true active Network Token and Registration to be used in status “Completed“, the charges will be made using Network Token instead of card data.
- Existing subscription: An existing subscription can be switched to use Network Tokens when:
- A subscription is created with the Customer with Vault payment source and then an active Network Token is created for this Vault with default=true. In this case, all subsequent charges under this subscription will be made using Network Token instead of card data if Registration is in the status “Completed“.
- A subscription is created with the Customer with Vault payment source and then the Default Customer Payment Source for this subscription is changed to Vault with an active Network Token with default=true. In this case, all subsequent charges under this subscription will be made using Network Token instead of card data if Registration is to be used in the status “Completed“.
- New subscription: A new subscription can be created with the Customer with Vault payment source. If Vault has default=true active Network Token and Registration to be used in status “Completed“, the charges will be made using Network Token instead of card data.
As stated earlier in this document:
- MPGS in-built 3ds will be available in Phase 1
- Standalone 3ds Gpayments will be available in Phase 1
On Fly Network Token creation
If a permanent Vault token does not have any Network Token already created under it, then the system will attempt to provision a Network Token if all of the following conditions are met:
- The gateway used for the charge supports Network Tokens
- Network Token Service is connected for the relevant scheme and “Set as default” = true
- Registration connected to the Network token service is in status Completed
On Fly Network token creation is supported for:
- Charges
- Subscriptions
- Verify
Issuer Updates
Network Token Issuer Updates
Network Token Issuer Updates enables merchants to keep Network Tokens up-to-date when Network Token's underlying information changes.
Scenarios when Network Tokens will be updated by Paydock:
- Network Tokens will be updated when:
- Network Token expiry date changes
- Network Token status changes (e.g. from Active to Suspended)
- Network Token expiry date changes
Vault (Card Details) Issuer Updates
Merchants can configure Vault updates to keep Vault Tokens up-to-date when underlying Card Information changes and Paydock receives notification from card schemes.
**Note:* Only Vaults with active Network Tokens are supported for this functionality. Vault updates cannot be performed if the Vault does not have an associated Network Token.*
Enable Vault Update is available as a configuration at the Registration level. By default, “Enable Vault Update” is turned off, and merchants need to explicitly “turn it on” by checking the checkbox or passing a parameter on the API level.
- If “Enable Vault Update” is turned on, then Vault Tokens linked to Network Tokens will be updated on Issuer Updates received from schemes.
- Vault Tokens and Customer Payment sources will be updated on card expiry date change
- Vault Tokens will be archived when the card is no longer active.
- Customer Payment Sources will NOT be archived. Merchants would need to explicitly update Payment sources linked to Vault and replace them with a new one
- Vault Tokens and Customer Payment sources will be updated on card expiry date change
- If “Enable Vault Update” is turned off, then Vault Tokens linked to Network Tokens will NOT be updated on Issuer Updates received from schemes.
**Note:* When PAN changes, merchants need to request new card details from customers and re-create the Vault token with Network Token under the hood*
Notifications
Merchants can configure Notifications for Network Tokenisation functionality covering TRID (Token Requestor ID) onboarding, Token Management, and Vault Update processes.
Supported Types of Notifications
- Email
- Sms
- Webhook
Supported Network Token Notifications:
- Vault Updated (Issuer Update): Notification is triggered when Vault (expiry year, expiry month, status) is updated based on Issuer Updates from schemes
- Network Token Registration Success: Notification is triggered when Visa or Mastercard Registration is moved to Completed status
- Network Token Registration Failure: Notification is triggered when Visa or Mastercard Registration is moved to Failed status
- Network Token Creation Failed Notification: Notification is triggered when Network Token provisioning fails after 3 Failover attempts or during On Fly flow
- Network Token Update (Issuer Update) Notification: Notification is triggered when Network Token (expiry year, expiry month, status) is updated based on Issuer Updates from schemes
The following Network Token related fields are available for merchants to select when configuring their notification templates
| Field | Description |
|---|---|
| token_id | Unique ID of the Network Token entity in the Paydock Database |
| token_service_id | Unique ID of the Network Token Service entity used to provision cryptogram for a charge |
| token_external_id | The external ID of the Network Token in Visa or Mastercard |
| token_reference | External token reference in Visa or Mastercard |
| token | External Network Token value |
| token_reference_id | Unique ID associated with a single token (Visa ONLY) |
More information on how to configure notifications in Paydock: Link
Permissions information
Feature toggles
Global and brands are able to disable/enable Network Tokens functionality for merchants:
- At the brand level, enable “Feature Options Allowed Registrations Network Token“ to enable Network Token registrations to be created, deleted, revoked and updated
- At the brand level, enable “Feature Options Allowed Services Network Token“ to enable Network Token services to be connected, deleted, updated
User permissions and access token permissions
| Function | Permission | Description | Linked API |
|---|---|---|---|
| Registration | registrations:create | Allows users to create Network Token registrations | POST /registrations |
| Registration | registrations:get | Allows users to to get registration details by Id | GET /registrations/{id} |
| Registration | registrations:search | Allows users to search all registrations created | GET /registrations |
| Registration | registrations:modify | Allows users to update registration | PUT /registrations/{id} |
| Registration | registrations:delete | Allows users to delete registration. Note, this only deletes from Paydock-side and will remain active on scheme side | DELETE /registrations/{id} |
| Registration | registrations:revoke | Allows users to revoke a registration, which will delete registration from both Paydock and scheme side. Note: This is only supported by Mastercard/SCOF (due to Visa-side limitation only). If this is operation is required for Visa/VTS, please contact support@paydock.com) | DELETE /registrations/{id}/revoke |
| Services | services:create | Allows users to connect Network Token service to the registration | POST /services |
| Services | services:modify | Allows users to update Network Token service | PUT /services/:id |
| Services | services:search | Allows users to search services created in Paydock | GET /services |
| Services | services:get | Allows users to get service by Id | GET /services/{id} |
| Services | services:delete | Allows users to delete Network Token service. Note: The Network Token service cannot be deleted if there is at least one active token created via this service. All network tokens should be deactivated first before deleting the service | DELETE /services/:id |
| Vaults | vault-tokens:create | Allows users to create Paydock Vault Tokens. Note: Network Tokens will be automatically created within the Paydock Vault Token when using the Vault API if all the following requirements are met: Merchant has active Network Token service connected for relevant scheme “default“ configured to “true“ for this service Registration connected to the service is in status “Completed“ If this is not true, the vault will be created without creating an underlying Network Token. | POST /v1/vault/payment_sources |
| Vaults | payment-sources-vault:get | Allows users to get details of a vault by vault_token ID. If a Network Token exists within this vault, its details will be returned | GET /v1/vault-tokens/{id} |
| Vaults | payment-sources-vault:search | Allows users to search all Vaults in their company account, if a Network Token exists within a given vault, its details will be returned | GET /v1/vault/payment_sources |
| Vaults | payment-sources-vault:delete | Allows users to delete Vault Token by vault_token_id. If a Network Token exists within this vault, it will also be deleted from Paydock | DELETE /v1/vault/payment_sources/{id} |
| Vaults/Network Token (available via Access token only as API based) | vault-network-tokens:create | Allows users to create a Network Token for underneath an existing Vault Token. Note: The following must be true for this to work: Merchant has active Network Token service connected for relevant scheme “default“ configured to “true“ Registration connected to the service is in status “Completed“ | POST /v1/vault/payment_sources/{id}/network-tokens/ |
| Vaults/Network Token (available via Access token only as API based) | vault-network-tokens:get | Allows merchants to get a Network Token by Network Token Id. | GET /v1/vault-tokens/{vault_token}/network-tokens/{id} |
| Vaults/Network Token (available via Access token only as API based) | vault-network-tokens:modify | Allows users to change “default“ network token for payments processing | PUT /v1/vault-tokens/{vault_token}/network-tokens/{id} |
| Vaults/Network Token (available via Access token only as API based) | vault-network-tokens:delete | Allows users to delete Network Token by Network Token ID. This will remove the Network Token from both Paydock + scheme side. The Paydock vault_token will not be deleted (only the Network Token will be removed) | DELETE /v1/vault-tokens/{vault_token}/network-tokens/{id} |
Reporting
Below are the fields available in the charges/transaction reporting:
| Field | Description | Type |
|---|---|---|
| token_id | Unique ID of the Network Token entity in the Paydock Database | ObjectID in MongoDB (ObjectId() ). maximum 24 characters |
| token_service_id | Unique ID of the Network Token Service entity used to provision cryptogram for charge | ObjectID in MongoDB (ObjectId() ). maximum 24 characters |
| token_external_id | External ID of the Network Token in VTS or SCOF | String. maximum 255 characters. Note: Format: Alphabetic, numeric, and hyphens ( - ), e.g. spaces are not allowed; |
| token_reference | External token reference in VTS or SCOF | String. maximum 64 characters. |
| token | External Network Token value | String. maximum 32 characters. |
| token_reference_id | Unique ID associated with a single token (Visa ONLY) | String. maximum 32 characters. |
| payment_account_reference | A non-financial reference assigned to each unique FPAN that's used to link the payment account of that PAN to affiliated payment tokens. | String. maximum 29 characters. |
MPGS Account Configuration
Merchants are encouraged to enable the “Bypass Check Card Details Do Not Change for Agreement” in their Master Merchant (MM) account. This is to ensure that API requests are not rejected where subsequent requests have either a different card or Network Tokens as their payment source compared to the original Cardholder Initiated Transaction (CIT).
The privilege allows account information to be changed throughout the series of recurring transactions on the same agreement.
![][image8]
Note - Merchant will need to check if this permission currently exists on their MPGS account. If not, then the merchant needs to raise an implementation project with MPGS to enable it on their MSO.
Implementation considerations
Backbook cutover
Token Migration will be introduced in later phases. For merchants who already have existing Vaults and want to bulk provision network tokens, Paydock will introduce a migration process, (potentially in Phase 3). The approach depends on how many Vaults need NT provisioning:
- If the number of tokens is not large: Bulk Network Token provisioning can be used for up to 100 Vaults per request.
- If the number of tokens is large: The recommendation is to wait for the migration solution in Phase 3.
Merchants can define their approach based on their specific needs and the volume of tokens requiring provisioning.
Token provisioning at checkout/Use of FPAN for initial transactions
Network Tokens are created under the hood of the Vault API which is used by merchants during the checkout process. The response time from the Visa/Mastercard service (when requesting a network token to be created) may take a few seconds to complete. Therefore, to avoid exposure of this latency to the cardholder during checkout flow, Network Token creation will be performed asynchronously. This means that the Network Token will be used in charge processing only if by the time the /charges endpoint is called, the Network Token has been successfully provisioned. If the Network Token is not yet created, then FPAN will be used instead.
This is as per best practice recommendation from the schemes.
EFTPOS merchant choice routing
If a Vault Token is used for merchant choice routing to EFTPOS, if the rules determine that EFTPOS gateway should be routed to, then FPAN will be used. If the rules determine that MPGS gateway should be routed to then Network Token will be used.
Standalone 3ds (Gpayments)
Standalone 3DS can be performed using:
- FPAN:
- Network Tokens
It’s recommended by schemes to use the same payment source for Standalone 3DS and for the following Charge. For example, if a 3DS check is performed using NT then a Charge should be also performed with Network Tokens for merchants to be granted a liability shift. However, if the issuer supports tokenisation and has the token mapped to the PAN the authorisation will be approved with liability shift even if payment sources for 3DS and Charge are different.
By default, Standalone 3DS will be performed using FPAN regardless if Vault has an active Network Token or not. The main reason is that not all gateways support Network Tokens and Paydock doesn’t know which Gateway merchant will use for Charge processing. If merchants want Standalone 3DS to be performed with Network Tokens there are the following options available.
Option 1: Integrate Analyse API
This option is recommended for merchants who enabled Routing Rules and have Standalone 3DS as part of their payment processing flow.
For Merchant flow will be the following:
- Call Analyse endpoint and pass required data
- Get Gateway ID from Analyse response and call standalone 3DS API passing Gateway ID
- Call Charges API with attached standalone 3ds without Gateway ID
Paydock will complete the following checks using the passed Gateway ID to define if 3DS can be completed with NT:
- If the Vault token has an active Network Token, NT Registration status is "Completed," and gateway_id supports NT, then 3DS will be completed with NT otherwise with FPAN.
Refer to the Analyse Endpoint Integration Guide for more context.
Option 2: Specify Gateway ID
This option is recommended for merchants who don’t have Routing Rules enabled as part of their payment processing flow.
Merchants have to Include gateway_id in the standalone 3DS request. Paydock will complete the following checks using the passed Gateway ID to define if 3DS can be completed with NT:
- If the Vault token has an active Network Token, NT Registration status is "Completed," and gateway_id supports NT, then 3DS will be completed with NT.
Note: When attaching a standalone 3DS to create a charge, use the same gateway_id as for the standalone 3DS endpoint.
Important: If raw card details are used for standalone 3DS (because NT has not yet been provisioned), NT will be utilised for financial charges if the gateway supports it and NT is already provisioned.
API Reference
The PayDock API is organized around REST. Our API has predictable, resource-oriented URLs, and uses HTTP response codes to indicate API errors. We use built-in HTTP features, like HTTP authentication and HTTP verbs, which are understood by off-the-shelf HTTP clients. JSON is returned by all API responses, including errors.
To make the API as explorable as possible, accounts have test mode and live mode API keys. There is no "switch" for changing between modes, just use the appropriate URL to perform a live or test transaction. Requests made with test mode credentials never hit the banking networks and incur no cost.
PayDock users can interact with the service in a number of ways.
Visit PayDock Postman documentation page:
Or visit PayDock Master Merchant (Brand) documentation:
Development SDKs
PayDock provides SDKs or libaries for different programming languages to make integration as simple as possible.
Client side
Client SDK
The Client SDK is our recommended solution for collecting payment details on your website.
The Client SDK is also available through npm.
More detailed documentation on classes and methods available through npm - reference by class.
Client-sdk
It is a solution for collecting and handling payment sources in secure way.
With SDK you can create a payment form widget as an independent part or insert use inside your form.
The SDK supports methods for customization of widget by your needs (styling, form fields, etc)
Other information
To work with the widget you will need public_key or access_token (see Authentication)
Also you will need added gateway (see API Reference by gateway)
Get started
The Client SDK ships in JavaScript ES6 (EcmaScript 2015) in three different formats (CJS, ESM and UMD) along with respective TypeScript declarations. Below, we exemplify how to import each format.
Download from CDN
<script src="https://widget.paydock.com/sdk/latest/widget.umd.min.js"></script>
<script>
    var widget = new paydock.HtmlWidget('#tag', 'publicKey', 'gatewayId');
</script>
For browser environments, you can import the Client SDK directly from our CDN to
your project's HTML. To accomplish this, include the Client SDK in your page
using one and only of the two script tags below. After this step you will be
able to access the Client SDK features via the global variable paydock.
For production we recommend using the compressed version (.min.js) since
it will result in faster loading times for your end users.
Compressed version for production:
https://widget.paydock.com/sdk/latest/widget.umd.min.jsFull version for development and debug:
https://widget.paydock.com/sdk/latest/widget.umd.js
You may download the production version of the Client SDK scripts here, and, the development version here.
For more advanced use-cases, the library has UMD format that can be used in RequireJS, Webpack, etc.
With package manager
// module import - CommonJS/Node projects ✅
const paydock = require('@paydock/client-sdk')
const api = new paydock.Api('publicKey');
// named import - ESM projects or TypeScript projects ✅
import { HtmlWidget } from '@paydock/client-sdk'
const widget = new HtmlWidget('#selector', 'publicKey', 'gatewayId');
// namespaced import - ESM projects or TypeScript projects ✅
import * as Paydock from '@paydock/client-sdk'
const widget = new Paydock.HtmlWidget('#selector', 'publicKey', 'gatewayId');
// default import - Not officially supported . They are handled differently by different tools / settings!
 ❌
import paydock from '@paydock/client-sdk'
>>> "Uncaught SyntaxError: The requested module does not provide an export named 'default'"
Our NPM package is compatible with all package managers (e.g., npm, yarn,
pnpm, bun). Using npm the following command would add the Client SDK as a
production dependency.
npm install @paydock/client-sdk
After installation is complete, if you are developing in NodeJS environments or
using tools that expect your JavaScript code to be in CJS format (e.g., Jest,
Karma, RequireJS, Webpack), you can import the Client SDK using CommonJS modules.
For these environments the UMD format (@paydock/client-sdk/bundles/widget.umd.js)
can also be used as a fallback. Alternatively, in case you are developing in
projects that have access to modern bundlers such as Vite or others (e.g., SPA
libs or SSR Metaframeworks), you can import the Client SDK features using ESM
through named imports or namespaced imports.
Widget
You can find description of all methods and parameters here
A payment form where it is possible to enter card data/bank accounts and then receive a one-time token for charges, subscriptions etc. This form can be customized, you can customize the fields and set styles. It is possible in real-time to monitor the actions of user with widget and get information about payment-source using events.
Widget simple example
Container
<div id="widget"></div>
You must create a container for the widget. Inside this tag, the widget will be initialized
Initialization
var widget = new paydock.HtmlWidget('#widget', 'publicKey');
widget.load();
// ES2015 | TypeScript

import { HtmlWidget } from '@paydock/client-sdk';

var widget = new HtmlWidget('#widget', 'publicKey');
widget.load();
Then write only need 2 lines of code in js to initialize widget
Full example
<!DOCTYPE html>
<html lang="en">
<head>
    <meta charset="UTF-8">
    <title>Title</title>
    <style>iframe {border: 0;width: 100%;height: 300px;}</style>
</head>
<body>
    <form id="paymentForm">
        <div id="widget"></div>
        <input name="payment_source_token" id="payment_source_token" type="hidden">
    </form>
    <script src="https://widget.paydock.com/sdk/latest/widget.umd.min.js" ></script>
    <script>
        var widget = new paydock.HtmlWidget('#widget', 'publicKey');
        widget.onFinishInsert('input[name="payment_source_token"]', 'payment_source');
        widget.load();
    </script>
</body>
</html>
Widget advanced example
Customization
widget.setStyles({
  background_color: 'rgb(0, 0, 0)',
  border_color: 'yellow',
  text_color: '#FFFFAA',
  button_color: 'rgba(255, 255, 255, 0.9)',
  font_size: '20px'
 });
This example shows how you can customize to your needs and design
Customization from html
<div id="widget"
  widget-style="text-color: #FFFFAA; border-color: #yellow"
  title="Payment form"
  finish-text="Payment resource was successfully accepted"></div>
This example shows how you can set style and texts from html
Settings
widget.setRefId('id'); // your unique identifier to identify the data

widget.setFormFields(['phone', 'email']); // add additional fields for form of widget

widget.setSupportedCardIcons(['mastercard', 'visa']); // add icons of supported card types
This example shows how you can use a lot of other methods to settings your form
Error handling
Overview
Error events are emitted when an error occurs during widget operations. These events provide detailed information about the error, including its category, cause, and contextual details.
Error Event Structure
Base Properties
| Property | Type | Description |
|---|---|---|
event |
string |
Always set to "error" |
purpose |
string |
Indicates the purpose of the action that triggered the error event (e.g., "payment_source") |
message_source |
string |
Source of the message (e.g., "widget.paydock") |
ref_id |
string |
Reference ID for the operation |
widget_id |
string |
Unique identifier of the widget instance |
error |
object |
Error object containing error information |
Error Object Properties
The error object contains detailed information about the error:
| Property | Type | Description |
|---|---|---|
category |
string |
High-level error classification |
cause |
string |
Specific error cause |
retryable |
boolean |
Indicates if the operation can be retried |
details |
object |
Additional error context |
Error Categories
| Category | Description |
|---|---|
configuration |
Configuration-related errors |
identity_access_management |
Authentication and authorization errors |
internal |
Internal system errors |
process |
Process and operation errors |
resource |
Resource-related errors |
validation |
Input validation errors |
Error Causes
| Cause | Category | Description |
|---|---|---|
aborted |
process |
Operation was aborted |
access_forbidden |
identity |
Access to resource is forbidden |
already_exists |
validation |
Resource already exists |
canceled |
process |
Operation was canceled |
invalid_configuration |
configuration |
Invalid widget configuration |
invalid_input |
validation |
Invalid input provided |
not_found |
resource |
Requested resource not found |
not_implemented |
process |
Requested feature not implemented |
rate_limited |
process |
Too many requests |
server_busy |
process |
Server is too busy to handle request |
service_unreachable |
process |
Unable to reach required service |
unauthorized |
identity |
Authentication required |
unknown_error |
internal |
Unexpected error occurred |
unprocessable_entity |
validation |
Valid input but cannot be processed |
Error Details Object
| Property | Type | Description |
|---|---|---|
cause |
string |
Matches the top-level error cause |
contextId |
string |
Context identifier (usually matches widget_id) |
message |
string |
Human-readable error message |
timestamp |
string |
ISO 8601 timestamp of when the error occurred |
Example
widget.hideUiErrors(); // hide default UI errors and handle errors by listening to error events with widget.on('error')

widget.on('error', (error) => {
    console.log(error);
    // {
    //     "event": "error",
    //     "purpose": "payment_source",
    //     "message_source": "widget.paydock",
    //     "ref_id": "",
    //     "widget_id": "d4744f30-dcf5-168e-7f78-c8273a3401d4",
    //     "error": {
    //         "category": "process",
    //         "cause": "service_unreachable",
    //         "details": {
    //             "cause": "service_unreachable",
    //             "contextId": "d4744f30-dcf5-168e-7f78-c8273a3401d4",
    //             "message": "The service is not availabe",
    //             "timestamp": "2025-02-13T09:30:21.157Z"
    //         },
    //         "retryable": false
    //     }
    // }
});
Handling Errors (Tips)
When handling errors, consider:
- Check the
retryableflag to determine if the operation can be retried - Use the
categoryfor high-level error handling logic - Use the
causefor specific error handling cases - The
contextIdcan be used for error tracking and debugging - The
timestamphelps with error logging and debugging
Full example
<!DOCTYPE html>
<html lang="en">
<head>
 <meta charset="UTF-8">
 <title>Title</title>
 <style>iframe {border: 0;width: 100%;height: 400px;}</style>
</head>
<body>
<form id="paymentForm">
    <div id="widget"
        widget-style="text-color: #FFFFAA; border-color: #yellow"
        title="Payment form"
        finish-text="Payment resource was successfully accepted">
    </div>

    <div
        id="error"
        style="
            display: none;
            max-width: 600px;
            margin: 16px auto;
            padding: 16px 20px;
            border-radius: 8px;
            background-color: #FEF2F2;
            border: 1px solid #FEE2E2;
            box-shadow: 0 1px 3px rgba(0, 0, 0, 0.1);
            font-family: system-ui, -apple-system, sans-serif;
            color: #991B1B;
            line-height: 1.5;
            font-size: 14px;
        "
        title="error"
        >
        <div style="display: flex; align-items: flex-start; gap: 12px;">
            <div>
                <h4 style="margin: 0 0 4px 0; font-size: 14px; font-weight: 600;">Access Error</h4>
                <div id="error-message"></div>
            </div>
        </div>
    </div>
</form>

<script src="https://widget.paydock.com/sdk/latest/widget.umd.js" ></script>
<script>
 var widget = new paydock.HtmlWidget('#widget', 'publicKey', 'gatewayId');

 widget.setSupportedCardIcons(['mastercard', 'visa']);
 widget.setFormFields(['phone', 'email']);
 widget.setRefId('custom-ref-id');
    widget.onFinishInsert('input[name="payment_source_token"]', 'payment_source');

    widget.on('error', ({ error }) => {
        document.getElementById('error-message').textContent = error.details.message;
        document.getElementById('error').style.display = 'block';
    });
 widget.load();
</script>

</body>
</html>
Payment sources widget
You can find description of all methods and parameters here
This widget provides a list of previously added (saved) payment-sources by customer_id or reference. The widget provides an opportunity to use events to track the process of selecting payment-sources and provide meta information about the payment-sources.
Payment-source requires a query_token that represents a pre-generated and secure token for limiting the list payment-sources, for a specific user or reference.
In order to generate this token, you need to send a GET request to getCustomerList where required query parameter must be id or reference. In response you get response.query_token which you can use in the widget.
Payment sources simple example
Container
<div id="list"></div>
You must create a container for the widget. Inside this tag, the widget will be initialized
Initialization
var list = new paydock.HtmlPaymentSourceWidget('#list', 'publicKey', 'queryToken');
list.load();
// ES2015 | TypeScript

import { HtmlPaymentSourceWidget } from '@paydock/client-sdk';

var list = new HtmlPaymentSourceWidget('#list', 'publicKey', 'queryToken');
list.load();
Then write only need 2 lines of code in js to initialize widget
Full example
<!DOCTYPE html>
<html lang="en">
<head>
    <meta charset="UTF-8">
    <title>Title</title>
    <style>iframe {border: 0;width: 40%;height: 300px;}</style>
</head>
<body>
    <div id="list"></div>
    <script src="https://widget.paydock.com/sdk/latest/widget.umd.min.js" ></script>
    <script>
        var list = new paydock.HtmlPaymentSourceWidget('#list', 'publicKey', 'queryToken');
        list.load();
    </script>
</body>
</html>
Payment sources advanced example
Customization
list.setStyles({
    icon_size: 'small'
});
This example shows how you can customize to your needs and design
Settings
list.filterByTypes(['card', 'checkout']); // filter by any payment source types
list.filterByGatewayIds(['gateway1']); // also other filters

list.setRefId('id'); // your unique identifier to identify the data

list.setLimit(4); // Pagination elements will show if count of elements more then argument passed

list.onSelectInsert('input[name="ps_id"]', 'payment_source_id'); // insert one-time-token to your input after finish checkout

list.on('select', function(data) {
    console.log(data);
});
This example shows how you can use a lot of other methods to settings your form
Full example
<!DOCTYPE html>
<html lang="en">
<head>
    <meta charset="UTF-8">
    <title>Title</title>
    <style>iframe {border: 0;width: 40%;height: 300px;}</style>
</head>
<body>
    <div id="list"></div>
    <input type="text" name="ps_id" />
    <script src="https://widget.paydock.com/sdk/latest/widget.umd.min.js" ></script>
    <script>
        var list = new paydock.HtmlPaymentSourceWidget('#list', 'publicKey', 'queryToken');
        list.filterByTypes(['card', 'checkout']);
        list.filterByGatewayIds(['gateway1']);
        list.setRefId('id');
        list.setLimit(4);
        list.setStyles({
            icon_size: 'small'
        });

        list.load();

        list.onSelectInsert('input[name="ps_id"]', 'payment_source_id');
        list.on('select', function(data) {
            console.log(data);
        });
    </script>
</body>
</html>
Checkout button
You can find description of all methods and parameters here PayPal meta parameters description here Zipmoney meta parameters description here
This widget allows you to turn your button into a full Checkout Button. As a result, you will be able to receive a one-time token for charges, subscriptions etc. And other data given to the user by the payment gateway.
Checkout button simple example
Container
<button type="button" id="button">
    checkout
</button>
You must create a button to turn it into checkout-button
Initialization
var button = new paydock.PaypalCheckoutButton('#button', 'publicKey', 'gatewayId');
// ES2015 | TypeScript


var button = new PaypalCheckoutButton('#button', 'publicKey');
Then write only need 1 line of code in js to initialize widget
Full example
<!DOCTYPE html>
<html lang="en">
<head>
    <meta charset="UTF-8">
    <title>Title</title>
</head>
<body>
    <button type="button" id="button">checkout</button>
    <script src="https://widget.paydock.com/sdk/latest/widget.umd.js" ></script>
    <script>
        var button = new paydock.PaypalCheckoutButton('#button', 'publicKey');
    </script>
</body>
</html>
Checkout button advanced example
Optional methods
button.onFinishInsert('input[name="pst"]', 'payment_source_token'); // insert one-time-token to your input after finish checkout

button.setMeta({
       brand_name: 'Paydock',
       reference: '15',
       first_name: 'receiver-name',
       last_name: 'receiver-last-name',
       phone: '9379992'}); // settings for checkout pages

button.on('finish', function (data) { // Add handler of event
       console.log('on:finish', data);
});
This example shows how you can use a lot of other methods to settings your button
Full Paypal example
<!DOCTYPE html>
<html lang="en">
<head>
    <meta charset="UTF-8">
    <title>Title</title>
</head>
<body>
<form id="paymentForm">
    <button type="button" id="button">
        <img src="https://www.paypal.com/en_US/i/btn/btn_xpressCheckout.gif" align="left" style="margin-right:7px;">
    </button>
</form>

<input type="text" name="pst" />

<script src="https://widget.paydock.com/sdk/latest/widget.umd.js" ></script>
<script>
    var button = new paydock.PaypalCheckoutButton('#button', 'publicKey', 'gatewayId');
    button.onFinishInsert('input[name="pst"]', 'payment_source_token');
    button.setMeta({
           brand_name: 'Paydock',
           reference: '15',
           first_name: 'Joshua',
           last_name: 'Wood',
           phone: '0231049872'});

    button.on('finish', function (data) {
           console.log('on:finish', data);
    });
</script>
</body>
</html>
Full ZipMoney example
<!DOCTYPE html>
<html lang="en">
<head>
    <meta charset="UTF-8">
    <title>Title</title>
</head>
<body>
<form id="paymentForm">
    <button type="button" id="button">
        <img src="https://encrypted-tbn0.gstatic.com/images?q=tbn:ANd9GcTVrrEYxDmq4WXv7hfHygKD9ltnOqv0K6soSAhmbKNllPNYWiLiJA" align="left" style="margin-right:7px;">
    </button>
</form>

<input type="text" name="pst" />

<script src="https://widget.paydock.com/sdk/latest/widget.umd.js" ></script>
<script>
    var button = new paydock.ZipmoneyCheckoutButton('#button', 'publicKey', 'gatewayId');
    button.onFinishInsert('input[name="pst"]', 'payment_source_token');
    button.setMeta("first_name": "Joshua",
       "tokenize": true,
       "last_name": "Wood",
       "email":"joshuawood@hotmail.com.au",
       "gender": "male",
       "charge": {
           "amount": "4",
           "currency":"AUD",
           "shipping_type": "delivery",
           "shipping_address": {
               "first_name": "Joshua",
               "last_name": "Wood",
               "line1": "Suite 660",
               "line2": "822 Ruiz Square",
               "country": "AU",
               "postcode": "3223",
               "city": "Sydney",
               "state": "LA"
           },
           "billing_address": {
               "first_name": "Joshua",
               "last_name": "Wood",
               "line1": "Suite 660",
               "line2": "test",
               "country": "AU",
               "postcode": "3223",
               "city": "Sydney",
               "state": "LA"
           },
           "items": [
               {
                   "name":"ACME Toolbox",
                   "amount":"2",
                   "quantity": 1,
                   "reference":"Fuga consequuntur sint ab magnam"
               },
               {
                   "name":"Device 42",
                   "amount":"2",
                   "quantity": 1,
                   "reference":"Fuga consequuntur sint ab magnam"
               }
           ]
       },

       "statistics": {
           "account_created": "2017-05-05",
           "sales_total_number": "5",
           "sales_total_amount": "4",
           "sales_avg_value": "45",
           "sales_max_value": "400",
           "refunds_total_amount": "21",
           "previous_chargeback": "true",
           "currency": "AUD",
           "last_login": "2017-06-01"
       });

    button.on('finish', function (data) {
           console.log('on:finish', data);
    });
</script>
</body>
</html>
Full Aftepay example
<!DOCTYPE html>
<html lang="en">
<head>
    <meta charset="UTF-8">
    <title>Title</title>
</head>
<body>
<button type="button" id="button">
    <img src="https://daepxvbfwwgd0.cloudfront.net/assets/logo_scroll-0c43312c5845a0dcd7a3373325da6402bc1d635d3415af28ed40d6c1b48e3d5c.png" align="left" style="margin-right:7px;">
</button>

<input type="text" name="pst" />

<script src="https://widget.paydock.com/sdk/latest/widget.umd.js" ></script>
<script>
    var button = new paydock.AfterpayCheckoutButton('#button', 'publicKey', 'gatewayId');

    button.onFinishInsert('input[name="pst"]', 'payment_source_token');
    button.showEnhancedTrackingProtectionPopup(true);
    button.setMeta({
        amount: "100",
        currency: "AUD",
        reference: 'Vitae commodi provident assumenda',
        email: 'wanda.mertz@example.com',
        first_name: 'Wanda',
        last_name: 'Mertz',
        address_line: '61426 Osvaldo Plains',
        address_line2: 'Apt. 276',
        address_city: 'Lake Robyn',
        address_state: 'WY',
        address_postcode: '07396',
        address_country: 'Australia',
        phone: '0412345678',
    });

    button.on('finish', function (data) {
           console.log('on:finish', data);
    });
</script>
</body>
</html>
Api
You can find description of all methods and parameters here
This wrapper helps you to work with paydock api emdpoints
Get browser details
var browserDetails = await new paydock.Api('publicKey').setEnv('env').getBrowserDetails();
// ES2015 | TypeScript

import { Api } from '@paydock/client-sdk';

var browserDetails = await new paydock.Api('publicKey').setEnv('env').getBrowserDetails();
Initialization
var response = await new paydock.Api('publicKey').setEnv('env').charge().preAuth({
      amount: 100,
      currency: 'AUD',
      token: 'token',
    });
// ES2015 | TypeScript

import { Api } from '@paydock/client-sdk';

var response = await new Api('publicKey').setEnv('env').charge().preAuth({
      amount: 100,
      currency: 'AUD',
      token: 'token',
    });
Then write only need 2 lines of code in js to make request
Initialization full example
<!DOCTYPE html>
<html lang="en">
<head>
    <meta charset="UTF-8">
    <title>Title</title>
    <style></style>
</head>
<body>
    <script src="https://widget.paydock.com/sdk/latest/widget.umd.min.js" ></script>
    <script>
         (async function() {
            var response = await new Api('publicKey').setEnv('env').charge().preAuth({
                amount: 100,
                currency: 'AUD',
                token: 'token',
            });
        })();
    </script>
</body>
</html>
Canvas3ds
You can find description of all methods and parameters here
This widget provides you to integrate 3d Secure
Canvas3ds simple example
Container
<div id="widget"></div>
You must create a container for the widget. Inside this tag, the widget will be initialized
Initialization
var canvas3ds = new paydock.Canvas3ds('#widget', 'token');
canvas3ds.load();
// ES2015 | TypeScript

import { Canvas3ds } from '@paydock/client-sdk';

var list = new Canvas3ds('#widget', 'token');
list.load();
Then write only need 2 lines of code in js to initialize widget
Full example
<!DOCTYPE html>
<html lang="en">
<head>
    <meta charset="UTF-8">
    <title>Title</title>
    <style>iframe {border: 0;width: 40%;height: 300px;}</style>
</head>
<body>
    <div id="widget"></div>
    <script src="https://widget.paydock.com/sdk/latest/widget.umd.min.js"></script>
    <script>
        var canvas3ds = new paydock.Canvas3ds('#widget', 'token');
        canvas3ds.load();
    </script>
</body>
</html>
Canvas3ds advanced example
Settings
canvas3ds.setEnv('sandbox'); // set enviroment

canvas3ds.hide(); // hide widget

canvas3ds.show(); // show widget

canvas3ds.on('chargeAuthSuccess', function (data) {
  console.log(data);
});
canvas3ds.on('chargeAuthReject', function (data) {
  console.log(data);
});
canvas3ds.on('chargeAuthCancelled', function (data) {
  console.log(data);
});
canvas3ds.on('additionalDataCollectSuccess', function (data) {
  console.log(data);
});
canvas3ds.on('additionalDataCollectReject', function (data) {
  console.log(data);
});
canvas3ds.on('chargeAuth', function (data) {
  console.log(data);
});
This example shows how you can use a lot of other methods to settings your form
Full example
<!DOCTYPE html>
<html lang="en">
<head>
    <meta charset="UTF-8">
    <title>Title</title>
    <style>iframe {border: 0;width: 40%;height: 450px;}</style>
</head>
<body>
    <div id="widget3ds"></div>
    <script src="https://widget.paydock.com/sdk/latest/widget.umd.min.js"></script>
    <script>
        var canvas3ds = new paydock.Canvas3ds('#widget3ds', 'token');
        canvas3ds.on('chargeAuthSuccess', function (data) {
            console.log('chargeAuthSuccess', data);
        });
        canvas3ds.on('chargeAuthReject', function (data) {
            console.log('chargeAuthReject', data);
        });
        canvas3ds.load();
    </script>
</body>
</html>
Full example with pre authorization
<!DOCTYPE html>
<html lang="en">
<head>
    <meta charset="UTF-8">
    <title>Title</title>
    <style>iframe {border: 0;width: 40%;height: 450px;}</style>
</head>
<body>
    <div id="widget"></div>
    <div id="widget3ds"></div>
    <script src="https://widget.paydock.com/sdk/latest/widget.umd.min.js"></script>
    <script>
        (async function () {
            var htmlWidget = new paydock.HtmlWidget('#widget', 'publicKey', 'gatewayId');
            htmlWidget.load();
            var {payment_source} = await htmlWidget.on('finish');
            var preAuthResp = await new paydock.Api('publicKey').setEnv('sandbox').charge().preAuth({
                  amount: 100,
                  currency: 'AUD',
                  token: payment_source,
                });
            var canvas = new paydock.Canvas3ds('#widget3ds', preAuthResp._3ds.token);
            canvas.load();
            var chargeAuthEvent = await canvas.on('chargeAuth');
            console.log('chargeAuthEvent', chargeAuthEvent);
        })()
    </script>
</body>
</html>
Canvas 3ds for Standalone 3ds charges
After you initialized the standalone 3ds charge via v1/charges/standalone-3ds API endpoint, you get a token used to initialize the Canvas3ds. All above information regarding setup, loading and initialization still apply.
Full example
<!DOCTYPE html>
<html lang="en">
    <head>
        <meta charset="UTF-8" />
        <title>Title</title>
        <style>
            iframe {
                border: 0;
                width: 40%;
                height: 450px;
            }
        </style>
    </head>
    <body>
        <div id="widget3ds"></div>
        <script src="https://widget.paydock.com/sdk/latest/widget.umd.min.js"></script>
        <script>
            var canvas3ds = new paydock.Canvas3ds("#widget3ds", "token");
            canvas3ds.on("chargeAuthSuccess", function (data) {
                console.log(data);
            });
            canvas3ds.on("chargeAuthReject", function (data) {
                console.log(data);
            });
            canvas3ds.on("chargeAuthChallenge", function (data) {
                console.log(data);
            });
            canvas3ds.on("chargeAuthDecoupled", function (data) {
                console.log(data.result.description);
            });
            canvas3ds.on("chargeAuthInfo", function (data) {
                console.log(data.info);
            });
            canvas3ds.on("error", function ({ charge_3ds_id, error }) {
                console.log(error);
            });
            canvas3ds.load();
        </script>
    </body>
</html>
- The
chargeAuthSuccessevent is executed both for frictionless flow, or for challenge flow after the customer has correctly authenticated with the bank using whatever challenge imposed. - The
chargeAuthRejectevent is executed when the authorization was rejected or when a timeout was received by the underlying system:- A
data.statusofAuthTimedOutwill be received for timeouts. - A
data.statusofrejectedwill be received when the authorization was rejected. - A
data.statusofinvalid_eventwill be received for unhandled situations.
- A
- The
chargeAuthChallengeevent is sent before starting a challenge flow (i.e. opening an IFrame for the customer to complete a challenge with ther bank). Once the end customer performs the challenge, the Canvas3ds will be able to identify the challenge result and will either produce achargeAuthSuccessorchargeAuthRejectevent. - The
chargeAuthDecoupledevent is sent when the flow is a decoupled challenge, alongside adata.result.descriptionfield that you must show to the customer, indicating the method the user must use to authenticate. For example this may happen by having the cardholder authenticating directly with their banking app through biometrics. Once the end customer does this, the Canvas3ds will be able to recognize the challenge result is ready and will either produce achargeAuthSuccessorchargeAuthRejectevent. - The
errorevent is sent if an unexpected issue with the client library occurs. In such scenarios, you should consider the autentication process as interrupted:- When getting this event, you will get on
data.errorthe full error object.
- When getting this event, you will get on
Events and Values
| Event Value | Type | Description |
|---|---|---|
chargeAuthSuccess |
object |
Instance of ChargeEventResponse |
chargeAuthReject |
object |
Instance of ChargeEventResponse |
chargeAuthChallenge |
object |
Instance of ChargeEventResponse |
chargeAuthDecoupled |
object |
Instance of ChargeEventResponse |
chargeAuthInfo |
object |
Instance of ChargeEventResponse |
error |
object |
Instance of chargeError |
Response Values
ChargeEventResponse
| Param | Type | Description |
|---|---|---|
status |
string |
status for the event transaction |
charge_3ds_id |
string |
Universal unique transaction identifier to identify the transaction |
info |
string |
info field for chargeAuthInfo event |
result.description |
string [Optional] |
field that you must show to the customer, indicating the method the user must use to authenticate during the decoupled challenge flow. |
ChargeError
| Param | Type | Description |
|---|---|---|
error |
object |
error response |
charge_3ds_id |
string |
Universal unique transaction identifier to identify the transaction |
Vault Display Widget
You can find description of all methods and parameters here
The vault display form allows viewing card number and CVV. The form can be customised according to your needs. You can set styles as well as subscribe to widget events that help monitor user’s actions in real time.
Vault Display Widget simple example
Container
<div id="widget"></div>
You must create a container for the widget. Inside this tag, the widget will be initialized
Initialization
var widget = new paydock.VaultDisplayWidget('#widget', 'token');
widget.load();
// ES2015 | TypeScript

import { VaultDisplayWidget } from '@paydock/client-sdk';

var widget = new VaultDisplayWidget('#widget', 'token');
widget.load();
Then write only need 2 lines of code in js to initialize widget
Full example
<!DOCTYPE html>
<html lang="en">
<head>
    <meta charset="UTF-8">
    <title>Title</title>
    <style>iframe {border: 0;width: 100%;height: 300px;}</style>
</head>
<body>

    <div id="widget"></div>

    <script src="https://widget.paydock.com/sdk/latest/widget.umd.min.js" ></script>
    <script>
        var widget = new paydock.VaultDisplayWidget('#widget', 'token');
        widget.load();
    </script>
</body>
</html>
Widget advanced example
Customization
widget.setEnv('sandbox');

widget.on('after_load', function (data) {
  console.log(data);
});

widget.on('cvv_secure_code_requested', function (data) {
  console.log(data);
});

widget.on('card_number_secure_code_requested', function (data) {
  console.log(data);
});

widget.setStyles({
    background_color: 'rgb(0, 0, 0)',
    border_color: 'yellow',
    text_color: '#FFFFAA',
    button_color: 'rgba(255, 255, 255, 0.9)',
    font_size: '20px'
});
This example shows how you can use a lot of other methods to settings your form
Full example
<!DOCTYPE html>
<html lang="en">
<head>
    <meta charset="UTF-8">
    <title>Title</title>
    <style>iframe {border: 0;width: 40%;height: 450px;}</style>
</head>
<body>

    <div id="widget"></div>

    <script src="https://widget.paydock.com/sdk/latest/widget.umd.min.js" ></script>
    <script>
        var widget = new paydock.VaultDisplayWidget('#widget', 'token');

        widget.setEnv('sandbox');

        widget.on('after_load', function (data) {
          console.log(data);
        });

        widget.on('cvv_secure_code_requested', function (data) {
          console.log(data);
        });

        widget.on('card_number_secure_code_requested', function (data) {
          console.log(data);
        });

        widget.setStyles({
            background_color: 'rgb(0, 0, 0)',
            border_color: 'yellow',
            text_color: '#FFFFAA',
            button_color: 'rgba(255, 255, 255, 0.9)',
            font_size: '20px'
        });

        widget.load();
    </script>
</body>
</html>
Wallet Buttons
You can find description of all methods and parameters here
Wallet Buttons allow you to easily integrate different E-Wallets into your checkout. Currently supports ApplePay, Google Pay, Google Pay and Apple Pay via Stripe, Flypay and Flypay V2 checkout, Paypal Smart Buttons Checkout and Afterpay.
If available in your client environment, you will display a simple button that upon clicking it the user will follow the standard flow for the appropriate Wallet. If not available an event will be raised and no button will be displayed.
Wallet Buttons simple example
Container
<div id="widget"></div>
You must create a container for the Wallet Buttons. Inside this tag, the button will be initialized.
Before initializing the button, you must perform a POST request to charges/wallet from a secure environment like your server. This call will return a token that is required to load the button and securely complete the payment. You can find the documentation to this call in the PayDock API documentation.
Initialization
The following is the minimum required initialization parameters for Apple Pay and Google Pay via Stripe:
javascript
let button = new paydock.WalletButtons(
    "#widget",
    token,
    {
        amount_label: "Total",
        country: "DE",
    }
);
button.load();
// ES2015 | TypeScript
import { WalletButtons } from '@paydock/client-sdk';

var button = new WalletButtons(
    '#widget',
    token,
    {
        amount_label: 'Total',
        country: 'DE',
    }
);
button.load();
Flypay and Paypal wallets do not require any meta sent to the wallet, so the following is enough for initialization:
javascript
let button = new paydock.WalletButtons(
    "#widget",
    token,
    {}
);
button.load();
// ES2015 | TypeScript
import { WalletButtons } from '@paydock/client-sdk';

var button = new WalletButtons(
    '#widget',
    token,
    {}
);
button.load();
For Afterpay wallet, the country code is required:
javascript
let button = new paydock.WalletButtons(
    "#widget",
    token,
    {
        country: "AU",
    }
);
button.load();
// ES2015 | TypeScript
import { WalletButtons } from '@paydock/client-sdk';

var button = new WalletButtons(
    '#widget',
    token,
    {
        country: 'AU',
    }
);
button.load();
For Flypay v2 wallet, the client_id is required:
javascript
let button = new paydock.WalletButtons(
    "#widget",
    token,
    {
        client_id: "client_id",
    }
);
button.load();
// ES2015 | TypeScript
import { WalletButtons } from '@paydock/client-sdk';

var button = new WalletButtons(
    '#widget',
    token,
    {
        client_id: "client_id",
    }
);
button.load();
Setting environment
Current method can change environment. By default environment = sandbox.
Bear in mind that you must set an environment before calling button.load().
button.setEnv('sandbox');
Full example
<!DOCTYPE html>
<html lang="en">
<head>
    <meta charset="UTF-8">
    <title>Title</title>
</head>
<body>
    <h2>Payment using PayDock Wallet Button!</h2>
    <div id="widget"></div>
</body>
<script src="https://widget.paydock.com/sdk/latest/widget.umd.min.js" ></script>
<script>
        let button = new paydock.WalletButtons(
            "#widget",
            token,
            {
                amount_label: "Total",
                country: "DE",
            }
        );
        button.load();
</script>
</html>
Wallet Buttons advanced example
Checking for button availability
If the customer's browser is not supported, or the customer does not have any card added to their Google Pay or Apple Pay wallets, the button will not load. In this case the callback onUnavailable() will be called. You can define the behavior of this function before loading the button.
button.onUnavailable(() => console.log("No wallet buttons available"));
Forcibly closing the checkout
In some situations you may want to forcibly close the checkout so that your user is back in your checkout screen, fow which you can use this method. Currently supported by Flypay wallet only.
button.close();
Performing actions when the wallet button is clicked
In some situations you may want to perform some validations or actions when the user clicks on the wallet button, for which you can use this method. Currently supported by Paypal, ApplePay and GooglePay wallets.
button.onClick(() => console.log("Perform actions on button click"));
Performing actions when shipping info is updated
In Flypay, Paypal, ApplePay via MPGS and GooglePay via MPGS integrations after each shipping info update the onUpdate(data) will be called with the selected shipping address information, plus selected shipping method when applicable for Paypal, ApplePay and GooglePay. Merchants should handle this callback, recalculate shipping costs in their server by analyzing the new data, and submit a backend to backend request to POST charges/:id with the new total amount and shipping amount (you can find the documentation of this call in the PayDock API documentation).
For Paypal integration specifically, if shipping is enabled for the wallet button and different shipping methods were provided in the create wallet charge call, Merchants must ensure that the posted shipping.amount to POST charges/:id matches the selected shipping option amount (value sent in when initializing the wallet charge). In other words, when providing shipping methods the shipping amount is bound to being one of the provided shipping method amount necessarily. Bear in mind that the total charge amount must include the shipping.amount, since it represents the full amount to be charged to the customer.
After analyzing the new shipping information, and making the post with the updated charge and shipping amounts if necessary, the button.update({ success: true/false }) wallet button method needs to be called to resume the interactions with the customer. Not calling this will result in unexpected behavior.
button.onUpdate((data) => {
    console.log("Updating amount via a backend to backend call to POST charges/:id");
     // call `POST charges/:id` to modify charge
     button.update({ success: true });
});
For ApplePay via MPGS and GooglePay via MPGS integrations, you can also return a new amount and new shipping_options in case new options are needed based on the updated shipping data. Before the user authorizes the transaction, you receive redacted address information (address_country, address_city, address_state, address_postcode), and this data can be used to recalculate the new amount and new shipping options.
button.onUpdate((data) => {
    console.log("Updating amount via a backend to backend call to POST charges/:id");
     // call `POST charges/:id` to modify charge
     button.update({
        success: true,
        body: {
            amount: 15,
            shipping_options: [
                {
                    id: "NEW-FreeShip",
                    label: "NEW - Free Shipping",
                    detail: "Arrives in 3 to 5 days",
                    amount: "0.00"
                },
                {
                    id: "NEW-FastShip",
                    label: "NEW - Fast Shipping",
                    detail: "Arrives in less than 1 day",
                    amount: "10.00"
                }
            ]
        }
    });
});
Performing actions after the payment is completed
After the payment is completed, the onPaymentSuccessful(data) will be called if the payment was successful. If the payment was not successful, the function onPaymentError(data) will be called. If fraud check is active for the gateway, a fraud body was sent in the wallet charge initialize call and the fraud service left the charge in review, then the onPaymentInReview(data) will be called. All three callbacks return relevant data according to each one of the scenarios.
Note that these callbacks will not be triggered for the Afterpay wallet when Redirect mode is used, that is when the charge is initialized with the success_url and error_url parameters, since the payment completion is done through the Redirect method, and therefore this SDK will not be loaded once the payment is completed at checkout.
button.onPaymentSuccessful((data) => console.log("The payment was successful"));
button.onPaymentInReview((data) => console.log("The payment is on fraud review"));
button.onPaymentError((data) => console.log("The payment was not successful"));
Events
The above events can be used in a more generic way via de on function, and making use
of the corresponding event names.
button.on(EVENT.UNAVAILABLE, () => console.log("No wallet buttons available"));
button.on(EVENT.UPDATE, (data) => console.log("Updating amount via a backend to backend call to POST charges/:id");
button.on(EVENT.PAYMENT_SUCCESSFUL, (data) => console.log("The payment was successful"));
button.on(EVENT.PAYMENT_ERROR, (data) => console.log("The payment was not successful"));
This example shows how to use these functions for Apple and Google Pay via Stripe:
(Required meta fields: amount_label, country. Optional meta fields: wallets)
Apple and Google Pay via Stripe Full example
<!DOCTYPE html>
<html lang="en">
<head>
    <meta charset="UTF-8">
    <title>Title</title>
</head>
<body>
    <h2>Payment using PayDock Wallet Button!</h2>
    <div id="widget"></div>
</body>
<script src="https://widget.paydock.com/sdk/latest/widget.umd.min.js" ></script>
<script>
    let button = new paydock.WalletButtons(
        "#widget",
        charge_token,
        {
            amount_label: "Total",
            country: "DE",
            wallets: ["google", "apple"],
        }
    );
    button.setEnv('sandbox');
    button.onUnavailable(() => console.log("No wallet buttons available"));
    button.onPaymentSuccessful((data) => console.log("The payment was successful"));
    button.onPaymentError((data) => console.log("The payment was not successful"));
    button.onPaymentInReview((data) => console.log("The payment is on fraud review"));
    button.load();
</script>
</html>
This example shows how to use these functions for Paypal Smart Checkout Buttons:
(Required meta fields: - . Optional meta fields: request_shipping, pay_later, standalone, style)
Paypal Smart Checkout Buttons Full example
<!DOCTYPE html>
<html lang="en">
<head>
    <meta charset="UTF-8">
    <title>Title</title>
</head>
<body>
    <h2>Payment using PayDock Wallet Button!</h2>
    <div id="widget"></div>
</body>
<script src="https://widget.paydock.com/sdk/latest/widget.umd.min.js" ></script>
<script>
    let button = new paydock.WalletButtons(
        "#widget",
        charge_token,
        {
            request_shipping: true,
            pay_later: true,
            standalone: false,
            style: {
                layout: 'horizontal',
                color: 'blue',
                shape: 'rect',
                label: 'paypal',
            },
        }
    );
    button.setEnv('sandbox');
    button.onUnavailable(() => console.log("No wallet buttons available"));
    button.onUpdate((data) => {
        console.log("Updating amount via a backend to backend call to POST charges/:id");
        // call `POST charges/:id` to modify charge
        button.update({ success: true });
    });
    button.onPaymentSuccessful((data) => console.log("The payment was successful"));
    button.onPaymentError((data) => console.log("The payment was not successful"));
    button.onPaymentInReview((data) => console.log("The payment is on fraud review"));

    // Example 1: Asynchronous onClick handler
    const asyncLogic = async () => {
        // Perform asynchronous logic. Expectation is that a Promise is returned and attached to response via `attachResult`,
        // and resolve or reject of it will dictate how wallet behaves.
    }

    button.onClick(({ data: { attachResult } }) => {
        // Promise is attached to the result. On Paypal, when promise is resolved, the user Journey will continue.
        // If no promise is attached then the Paypal journey will not depend on the promise being resolved or rejected
        attachResult(asyncLogic());
    });

    // Example 2: Synchronous onClick handler
    // button.onClick(({ data: { attachResult } }) => {
    //     // Perform synchronous logic
    //     console.log("Synchronous onClick: Button clicked");
    //     // Optionally return a boolean flag to halt the operation
    //     attachResult(false);
    // });

    button.load();
</script>
</html>
This example shows how to use these functions for Flypay v1 Wallet.
(Required meta fields: - . Optional meta fields: request_shipping, pay_later, style)
Flypay Full example
<!DOCTYPE html>
<html lang="en">
<head>
    <meta charset="UTF-8">
    <title>Title</title>
</head>
<body>
    <h2>Payment using PayDock Wallet Button!</h2>
    <div id="widget"></div>
</body>
<script src="https://widget.paydock.com/sdk/latest/widget.umd.min.js" ></script>
<script>
    let button = new paydock.WalletButtons(
          "#widget",
          charge_token,
          {
               request_shipping: true
          }
     );
    button.setEnv('sandbox');
    button.onUnavailable(() => console.log("No wallet buttons available"));
    button.onUpdate((data) => {
          console.log("Updating amount via a backend to backend call to POST charges/:id");
          // call `POST charges/:id` to modify charge
          button.update({ success: true });
     });
    button.onPaymentSuccessful((data) => console.log("The payment was successful"));
    button.onPaymentError((data) => console.log("The payment was not successful"));
    button.onPaymentInReview((data) => console.log("The payment is on fraud review"));
    button.load();
</script>
</html>
This example shows how to use these functions for Flypay v2 Wallet.
(Required meta fields: - . Optional meta fields: -)
Flypay V2 Full example
<!DOCTYPE html>
<html lang="en">
<head>
    <meta charset="UTF-8">
    <title>Title</title>
</head>
<body>
    <h2>Payment using PayDock Wallet Button!</h2>
    <div id="widget"></div>
</body>
<script src="https://widget.paydock.com/sdk/latest/widget.umd.min.js" ></script>
<script>
    let button = new paydock.WalletButtons(
        "#widget",
        charge_token,
        {
            access_token: 'TOKEN',
            refresh_token: 'TOKEN',
            client_id: 'CLIENT_ID',
        },
    );
    button.setEnv('sandbox');
    button.onUnavailable((data) => console.log("No wallet buttons available"));
    button.onPaymentSuccessful((data) => console.log("The payment was successful"));
    button.onPaymentError((data) => console.log("The payment was not successful"));
    button.onAuthTokensChanged((data) => console.log('Authentication tokens changed'));
    button.load();
</script>
</html>
This example shows how to use these functions for ApplePay via MPGS and GooglePay via MPGS:
(Required meta fields: amount_label, country. Optional meta fields: raw_data_initialization, request_shipping, style.button_type, style.button_style)
ApplePay and GooglePay via MPGS Full example
<!DOCTYPE html>
<html lang="en">
<head>
    <meta charset="UTF-8">
    <title>Title</title>
</head>
<body>
    <h2>Payment using PayDock Wallet Button!</h2>
    <div id="widget"></div>
</body>
<script src="https://widget.paydock.com/sdk/latest/widget.umd.min.js" ></script>
<script>
    let button = new paydock.WalletButtons(
        "#widget",
        charge_token,
        {
            amount_label: "Total",
            country: 'DE',
            request_shipping: true,
            show_billing_address: true,
            style: {
                google: {
                    button_type: 'buy',
                    button_size_mode: 'static',
                    button_color: 'white',
                },
                apple: {
                    button_type: 'buy',
                    button_style: 'black',
                },
            },
            shipping_options: [
                {
                    id: "FreeShip",
                    label: "Free Shipping",
                    detail: "Arrives in 5 to 7 days",
                    amount: "0.00"
                },
                {
                    id: "FastShip",
                    label: "Fast Shipping",
                    detail: "Arrives in 1 day",
                    amount: "10.00"
                }
            ]
        }
    );
    button.setEnv('sandbox');
    button.onUnavailable(() => console.log("No wallet buttons available"));
    button.onPaymentSuccessful((data) => console.log("The payment was successful"));
    button.onPaymentError((data) => console.log("The payment was not successful"));
    button.onClick(() => console.log("On WalletButton Click"));
    button.onUpdate((data) => {
        console.log("Updating amount via a backend to backend call to POST charges/:id");
        // call `POST charges/:id` to modify charge
        button.update({
            success: true,
            body: {
                amount: 15,
                shipping_options: [
                    {
                        id: "NEW-FreeShip",
                        label: "NEW - Free Shipping",
                        detail: "Arrives in 3 to 5 days",
                        amount: "0.00"
                    },
                    {
                        id: "NEW-FastShip",
                        label: "NEW - Fast Shipping",
                        detail: "Arrives in less than 1 day",
                        amount: "10.00"
                    }
                ]
            }
        });
    });
    button.load();
</script>
</html>
Also, for ApplePay via MPGS you can initialize the ApplePayPaymentRequest with your own values instead of using the default ones. Below you can see an example on how to initialize the ApplePayPaymentRequest with the raw_data_initialization meta field.
Similarly, for GooglePay via MPGS you can initialize the PaymentMethodSpecification with your own values instead of using the default ones. Below you can see an example on how to initialize the PaymentMethodSpecification with the raw_data_initialization meta field.
ApplePay and GooglePay via MPGS Raw data initialization example
<!DOCTYPE html>
<html lang="en">
<head>
    <meta charset="UTF-8">
    <title>Title</title>
</head>
<body>
    <h2>Payment using PayDock Wallet Button!</h2>
    <div id="widget"></div>
</body>
<script src="https://widget.paydock.com/sdk/latest/widget.umd.min.js" ></script>
<script>
    let button = new paydock.WalletButtons(
        "#widget",
        charge_token,
        {
            raw_data_initialization: {
                apple: {
                    countryCode: "AU",
                    currencyCode: "AUD",
                    merchantCapabilities: ["supports3DS","supportsCredit","supportsDebit"],
                    supportedNetworks: ["visa","masterCard","amex","discover"],
                    requiredBillingContactFields: ["name","postalAddress"],
                    requiredShippingContactFields:["postalAddress","name","phone","email" ],
                    total: {
                        label: "Total",
                        amount: "10",
                        type: "final",
                    }
                },
                google: {
                    type: "CARD",
                    parameters: {
                        allowedAuthMethods: ["PAN_ONLY", "CRYPTOGRAM_3DS"],
                        allowedCardNetworks: [
                            "AMEX",
                            "DISCOVER",
                            "INTERAC",
                            "JCB",
                            "MASTERCARD",
                            "VISA",
                        ],
                        billingAddressRequired: true,
                    },
                },
            },
            amount_label: "Total",
            country: 'DE',
            request_shipping: true,
            show_billing_address: true,
            style: {
                google: {
                    button_type: 'buy',
                    button_size_mode: 'static',
                    button_color: 'white',
                },
                apple: {
                    button_type: 'buy',
                    button_style: 'black',
                },
            },
            shipping_options: [
                {
                    id: "FreeShip",
                    label: "Free Shipping",
                    detail: "Arrives in 5 to 7 days",
                    amount: "0.00"
                },
                {
                    id: "FastShip",
                    label: "Fast Shipping",
                    detail: "Arrives in 1 day",
                    amount: "10.00"
                }
            ]
        }
    );
    button.setEnv('sandbox');
    button.onUnavailable(() => console.log("No wallet buttons available"));
    button.onPaymentSuccessful((data) => console.log("The payment was successful"));
    button.onPaymentError((data) => console.log("The payment was not successful"));
    button.onUpdate((data) => {
        console.log("Updating amount via a backend to backend call to POST charges/:id");
        // call `POST charges/:id` to modify charge
        button.update({
            success: true,
            body: {
                amount: 15,
                shipping_options: [
                    {
                        id: "NEW-FreeShip",
                        label: "NEW - Free Shipping",
                        detail: "Arrives in 3 to 5 days",
                        amount: "0.00"
                    },
                    {
                        id: "NEW-FastShip",
                        label: "NEW - Fast Shipping",
                        detail: "Arrives in less than 1 day",
                        amount: "10.00"
                    }
                ]
            }
        });
    });
    button.load();
</script>
</html>
Click To Pay
Overview
Integrate with Click To Pay using Paydock's Click To Pay widget. For a full description of the methods and parameters, reference the README file.
Click To Pay simple example
The following section provides an example use case and integration for the widget.
Create a Container
To integrate the Click To Pay checkout iFrame, create a container in your HTML code. This container serves as the placeholder for the iFrame.
<div id="checkoutIframe"></div>
Initialize the Widget
Use the following code to initialize your widget:
var src = new paydock.ClickToPay(
    "#checkoutIframe",
    "service_id",
    "paydock_public_key_or_access_token",
    {}, // meta
);
src.load();
// ES2015 | TypeScript
import { ClickToPay } from '@paydock/client-sdk';
var src = new ClickToPay(
    "#checkoutIframe",
    "service_id",
    "paydock_public_key_or_access_token",
    {}, // meta
);
src.load();
NOTE: Paydock recommends that you use a Paydock Access Token instead of a public key for security reasons in production environments. When creating your access token, you must enable the Secure Remote Commerce and add a whitelist for the domain of your checkout screen.
Full example
A full example of the container and the initialized widget is as follows:
<!DOCTYPE html>
<html lang="en">
<head>
    <meta charset="UTF-8">
    <title>Title</title>
    <style>iframe {border: 0;width: 40%;height: 300px;}</style>
</head>
<body>
    <div id="checkoutIframe"></div>
    <script src="https://widget.paydock.com/sdk/latest/widget.umd.min.js" ></script>
    <script>
        var src = new paydock.ClickToPay(
            "#checkoutIframe",
            "service_id",
            "paydock_public_key_or_access_token",
            {},
        );
        src.load();
    </script>
</body>
</html>
Customize your Click To Pay Checkout
The following is an advanced example that includes customization. You can use these methods to enhance your checkout experience.
Settings
src.setEnv('sandbox'); // set environment
src.hideCheckout(); // hide checkout iframe
src.showCheckout(); // show checkout iframe
src.on('iframeLoaded', () => {
    console.log("Initial iframe loaded");
});
src.on('checkoutReady', () => {
    console.log("Checkout ready to be used");
});
src.on('checkoutCompleted', (token) => {
    console.log(token);
});
src.on('checkoutError', (error) => {
    console.log(error);
});
Full example
<!DOCTYPE html>
<html lang="en">
<head>
    <meta charset="UTF-8">
    <title>Title</title>
    <style>iframe {border: 0;width: 40%;height: 450px;}</style>
</head>
<body>
    <div id="checkoutIframe"></div>
    <script src="https://widget.paydock.com/sdk/latest/widget.umd.min.js" ></script>
    <script>
        var src = new paydock.ClickToPay(
            "#checkoutIframe",
            "service_id",
            "paydock_public_key_or_access_token",
            {},
        );
        src.on('iframeLoaded', () => {
            console.log("Initial iframe loaded");
        });
        src.on('checkoutReady', () => {
            console.log("Checkout ready to be used");
        });
        src.on('checkoutCompleted', (token) => {
            console.log(token);
        });
        src.on('checkoutError', (error) => {
            console.log(error);
        });
        src.load();
    </script>
</body>
</html>
Customize your billing address fields
To customize your billing address experience, Paydock uses a flag that manages whether a customer's billing address is mandatory. The options for this customization are NONE (default option), and POSTAL_COUNTRY or FULL.
var src = new paydock.ClickToPay(
    "#checkoutIframe",
    "service_id",
    "paydock_public_key_or_access_token",
    {
        "dpa_transaction_options": {
            "dpa_billing_preference": "FULL"
        }
    },
);
The Click To Pay checkout in the example requires the billing address from the customer, which is then returned as a part of the checkout data. The data is then stored and leveraged in the Paydock charge. You can also provide the billing address at the time of creating the charge. For example, if you have a different method for collecting the billing address, such as outside of the Click To Pay checkout, you can provide it alongside other information at the charge creation step: 1. Disable the billing address in Paydock's Click To Pay widget. 2. Get your One Time Token from the Click To Pay widget alongside other details that may have been collected outside the Click To Pay checkout as the shipping address. 3. Send the billing address when creating the charge.
POST v1/charges
{
    "amount": "10.00",
    "currency": "AUD",
    "token": "one_time_token",
    "customer": {
        "payment_source": {
            "gateway_id": "gateway_id",
            "address_line1": "address_line1",
            "address_line2": "address_line2",
            "address_city": "address_city",
            "address_postcode": "address_postcode",
            "address_state": "address_state",
            "address_country": "address_country"
        }
    },
    "shipping": {
        "address_line1": "address_line1",
        "address_line2": "address_line2",
        "address_line3": "address_line3",
        "address_city": "address_city",
        "address_postcode": "address_postcode",
        "address_state": "address_state",
        "address_country": "address_country"
    }
}
How to customize accepted cards
You can send a flag unaccepted_card_type to block the usage of a specific card type. The available options are 'DEBIT' and 'CREDIT'.
Example code
The following example demonstrates how to block the card:
var src = new paydock.ClickToPay(
    "#checkoutIframe",
    "service_id",
    "paydock_public_key",
    {
        unaccepted_card_type: 'DEBIT'
    },
);
Personalize the Style
Customize the look and feel of your UI. The following example demonstrates changes in the styling of the buttons.
Example code
var src = new paydock.ClickToPay(
    "#checkoutIframe",
    "service_id",
    "paydock_public_key",
    {},
);
src.setStyles({
    enable_src_popup: true,
    primary_button_color: 'red',
    secondary_button_color: 'red',
    primary_button_text_color: 'red',
    secondary_button_text_color: 'red',
    font_family: 'Arial',
});
Fraud prevention
The Fraud Prevention module allows you to add security layers to your payment workflows by integrating with any of our underlying fraud prevention providers.
Real time user behavior analysis
Forter
One of Forter's key features is our ability to track the user's real-time behavior on the site and use it to separate fraudsters from legitimate buyers. To take advantage of Forter's technology, a JavaScript snippet needs to be placed on EVERY page of your commerce site beginning with the homepage and up to and including the final "Thank you for your purchase" page.
The integration is simple and straightforward - you only need to configure event listeners and then instantiate a FraudPreventionService with your site configuration.
Additional setup is required in case your website uses Content Security Policies (CSP)
Forter: Code snippet
<!doctype html>
<html lang="en">

<head>
  <meta charset="utf-8">
  <title>Real time user behaviour anaylsis - Forter example</title>
  <base href="/">
  <meta name="viewport" content="width=device-width, initial-scale=1">
  <link rel="icon" type="image/x-icon" href="favicon.ico">
  <script src="https://widget.paydock.com/sdk/latest/widget.umd.js" ></script>
</head>

<body>
  <main>
    <h1>Real time user behaviour anaylsis - Forter example</h1>
    <div class="forter-test">
      <h2>Forter Integration</h2>

      <div class="status-card">
        <p>
          <strong>Integration Status:</strong>
          <span data-fraud-prevention="status-indicator" class="status pending">
            Pending
          </span>
        </p>
        <p>
          <strong>Token Value:</strong>
          <code data-fraud-prevention="forter-token">Not available</code>
        </p>
        <p data-fraud-prevention="error-container" style="display: none;">
          <strong>Error Code:</strong>
          <span data-fraud-prevention="error-code" class="error"></span>
        </p>
      </div>
    </div>
  </main>
  <script>
    const { FRAUD_PREVENTION_EVENTS, FraudPreventionService } = window.paydock

    let token = '';
    let errorCode = '';

    const render = () => {
      const statusIndicator = document.querySelector('[data-fraud-prevention="status-indicator"]');
      const tokenValue = document.querySelector('[data-fraud-prevention="forter-token"]');
      const errorContainer = document.querySelector('[data-fraud-prevention="error-container"]');
      const errorCodeElement = document.querySelector('[data-fraud-prevention="error-code"]');

      if (token) {
        statusIndicator.className = 'status success';
        statusIndicator.textContent = 'Active';
        tokenValue.textContent = token;
      } else {
        statusIndicator.className = 'status pending';
        statusIndicator.textContent = 'Pending';
        tokenValue.textContent = 'Not available';
      }

      if (errorCode) {
        errorCodeElement.textContent = errorCode;
        errorContainer.style.display = 'block';
      } else {
        errorContainer.style.display = 'none';
      }
    };

    document.addEventListener(FRAUD_PREVENTION_EVENTS.NAMESPACE, (event) => {
      switch (event.detail.type) {
        case FRAUD_PREVENTION_EVENTS.TYPES.FINTERPRINT_TOKEN_READY: {
          token = event.detail.payload.token;
          break;
        }
        case FRAUD_PREVENTION_EVENTS.TYPES.FINGERPRINT_TOKEN_ERROR: {
          errorCode = event.detail.payload.code;
          break;
        }
        default: {
          throw new Error(
            `${FRAUD_PREVENTION_EVENTS.NAMESPACE} emitted an unsupported event: ${JSON.stringify(event.detail)}.`,
          );
        }
      }

      render();
    });

    const fraudPreventionServiceConfig = {
      environmentId: 'sandbox',
      mode: 'test'
    }

    // Set "csp" to true if your website uses Content Security Policies
    const csp = false;

    new FraudPreventionService(fraudPreventionServiceConfig)
      .withForter({
        siteId: 'example_site_id_or_subsite_id',
        csp,
      });

    // new FraudPreventionService(fraudPreventionServiceConfig)
    //   .withAccessTokenStrategy("eyJhb_access_token_example_...")
    //   .withForter({
    //     providerId: environment.forter.serviceId,
    //     csp,
    //   });

    // new FraudPreventionService(fraudPreventionServiceConfig)
    //   .withPublicKeyStrategy("pk_example_...")
    //   .withForter({
    //     providerId: environment.forter.serviceId,
    //     csp,
    //   });
  </script>
</body>

</html>
Forter: Content Security Policies
If your site enforces Content Security Policies (CSP), make sure to:
- Set the
cspoption totruewhen invokingwithForteron yourFraudPreventionServiceinstance. - Allowlist Forter's domains on
connect-src,script-srcandworker-srcas shown below.
connect-src https://*.forter.com wss://cdn0.forter.com https://d2o5idwacg3gyw.cloudfront.net https://dz8rit8v72mig.cloudfront.net https://db7q4jg5rkhk8.cloudfront.net https://1.1.1.1 https://d94qwxh6czci4.cloudfront.net https://dr6vcclmzwk74.cloudfront.net https://d6rak4b14t5gp.cloudfront.net https://d3k4bt74u9esq1.cloudfront.net https://d1ezzflfzltk6e.cloudfront.net https://d3nocrch4qti4v.cloudfront.net https://duuytoqss3gu4.cloudfront.net https://df45ay5pw60dy.cloudfront.net
script-src https://*.forter.com https://dlthst9q2beh8.cloudfront.net https://d2nww8zpyj5pk0.cloudfront.net https://d2w2nqfk3z9hdt.cloudfront.net
worker-src blob:
PayPal Smart Button Integration
PayPal Checkout with Smart Payment Buttons gives your merchants a simplified and secure checkout experience. PayPal intelligently presents the most relevant payment types to your shoppers, automatically, making it easier for them to complete their purchase using credit card payments. Also, you can enable the Pay in 4 feature at PayPal Checkout. In this case, you can split your purchase into 4 payments, with the down payment due at the time of transaction and 3 subsequent payments made every 2 weeks thereafter.
Add PayPal Gateway
First, you must connect to the PayPal gateway at Paydock. Please refer to our PayPal integration guide. After adding a gateway, you can use the PayPal Smart Button. This allows customers to log into PayPal during each checkout and select the shipping address and credit card or other payment method they wish to use. The Paypal Smart Button can be added to the website via the Client SDK package.
How the PayPal Smart Button works
Below is a step-by-step flow of the charge made via the PayPal Smart button: 1. Create a wallet token to utilize it in Client SDK using the {{url}}/v1/charges/wallet endpoint. 2. Use our Client SDK to create a payment form with the checkout button that redirects a client to an external PayPal checkout process. 3. After clicking the PayPal Smart Payment button, the client logs into their PayPal account. 4. As soon as the client is logged into the account, the PayPal Checkout page is rendered into PayPal SDK with a summary of the charge information and a PayPal Smart Button. 5. It is possible to modify the amount and shipping_amount parameters using the {{url}}/v1/charges/:id endpoint. These parameters can be updated if they were modified during the checkout. 6. After clicking the Pay Now button, a Successful/Failed payment message is sent to the client's side. 7. Finally, the PayPal popup is closed.
Add the PayPal Smart Button
The PayPal Smart Button can be added to the merchant's website via the Client SDK package. You can find more information about how to integrate this button into your website in the wallet-buttons-examples section of the package’s readme.
Apple Pay Integration
Apple Pay is a digital wallet service by Apple Inc. that allows merchants to make payments in person, in iOS apps, and on the web using Safari. This feature is supported by the iPhone, Apple Watch, iPad, and Mac.
Add Apple Pay & MasterCard Gateway
- It is needed to create an Apple developer account using this link. After the account is successfully created, you should set up a Merchant ID, Merchant Domain, Payment Processing Certificate (used for the encryption process) and Merchant Identity Certificate (used to authenticate the communication with Apple Pay servers). More information about this can be found using these links: Configuring Your Environment Configure Apple Pay on the web
- The next step is connecting the MasterCard gateway at Paydock. You can refer to our MasterCard integration guide.
- After the setup at Paydock is configured, upload the Apple Payment Processing Certificate to the MPGS Merchant Administration dashboard by going to Admin > Device Payments > Add New Certificate. Note: For Apple Pay to work correctly, it is needed to select the ‘Enable Wallet Payments’ checkbox for the MasterCard service at Paydock’s dashboard.
Apple Pay (MPGS) Checkout Flow
Below is a step-by-step flow of the Apple Pay checkout button:
- Create a wallet token to utilize it in Client SDK using the {{url}}/v1/charges/wallet endpoint.
- Use our Client SDK to create a payment form with the checkout button that displays the Apple Pay payment sheet to your customers.
- After clicking the Apple Pay button, the Apple Payment Sheet is displayed.
- The customer can update Credit Card and Billing information and confirm the payment.
- Finally, the Apple Pay sheet is closed.
Add the Apple Pay Checkout Button
The Apple Pay button can be added to the website via the Client SDK package. You can find information on how this can be integrated into your website here in the 'wallet-buttons-examples' section.
Google Pay Integration
Google Pay (formerly Android Pay) is a mobile payment service developed by Google to power in-app, online, and in-person contactless purchases on mobile devices, enabling users to make payments with Android phones, tablets, or watches. Users can authenticate via PIN, passcode, or biometrics such as 3D face scanning or fingerprint recognition.
When to a merchant the user makes a payment, Google Pay does not send the actual payment card number. Instead, it generates a virtual account number representing the user's account information.
Google Pay requires that a screen lock be set on the phone or watch. It has no card limit.
Users can add payment cards to the service by taking a photo of the card, or by entering the card information manually. To pay at point-of-sale, users hold their authenticated device to the point-of-sale system. The service has smart authentication, allowing the system to detect when the device is considered secure (for instance if unlocked in the last five minutes) and challenge if necessary for unlock information.
Introduction
Business Model of Google Pay revolves around the adept channelisation of digital wallet platform and online payment systems. It powers and processes in-app and tap-to-pay purchases on Smart-Phones, tablets, and other mobile devices so that the users can make payments using their phones, Smart-watches, or tablets.
Overall, Google Pay streamlines the payment process, enhances security, and offers various features that make it a convenient and efficient way for users to manage their payments both online and offline.
This integration guide provides instructions and guidance on how the merchants can integrate or connect with the Google Pay via MPGS functionality in Paydock. It outlines the steps and processes required to ensure smooth interoperability and collaboration.
Pre-requisites
Merchant will need to obtain the following data from Google:
- Google Pay developer account setup
Merchant will need to obtain the following data from Paydock:
- Paydock Secret key/Access token
- MPGS Gateway ID
- Google Pay widget setup (all versions supported; latest version recommended).
Key Benefits
Below are the key benefits from integrating with Paydock Google Pay solution:
- Helps businesses collect more payments
- Substitutes actual card numbers with virtual ones for security
- Easy to setup and use
Standard workflows
Service Setup
- Connect Mastercard Payment Gateway Service (MPGS) on the Paydock dashboard and add Google Pay wallet functionality.
- Select ‘Services’ on the left navigation pane.
- Click on ‘Add New’ tab.
- Go to ‘Service Group’ drop down list and select ‘Gateway Services’.
- Click on ‘Activate’ next to MPGS.
Complete all the required fields: * Label * Merchant * Password * Enable Wallet Payments * Enable Google Google Pay Merchant ID * Select the environment * Click connect.
Note: ApplePay option should be unticked otherwise the transaction will be routed via ApplePay.
- Ensure MPGS service is defined on the Paydock dashboard.
- Select ‘Services’ on the left navigation pane.
- Click on ‘Connected Services’ tab.
- Go to ‘Service Group’ drop down list and select ‘Gateway Services’.
- Note the ‘Gateway ID’ as this will be used for API calls.
- Google Pay account setup:
- Create a developers account: https://play.google.com/console/signup
- With the developer's account, create a payments profile: Create a payment profile – Google Payments center help.
- On MPGS account:
- The merchant profile on the gateway must be enabled for "Device Payments" by their payment service provider.
- After the merchant has integrated, in order to activate their Google Developer Account for products they need to follow the steps in
Also, after the merchant has integrated, in order to activate their Google Developer Account for products they need to follow the steps in Request production access | Google Pay API | Google Developers.
- End to end setup of Google Pay:
First, merchants must create a new “MasterCard” service (gateway) on the dashboard and check the “Enable Wallet Payments” checkbox. Then, merchants will need to fill all the required fields with the: “Merchant (MPGS)” , “Password (MPGS)”, “Merchant ID (Google)” The Checkout with Google Pay button can be added to the Merchant’s website via the Client SDK package. The merchant can find some information on how this can be integrated into their website here in the wallet-buttons-examples section.
- Integrate the Google Pay checkout button:
Below is a step-by-step flow of the Google Pay checkout button:
- Create a wallet token to utilize it in client-sdk using the {{url}}/v1/charges/wallet endpoint.
- Use our client-sdk to create a checkout button that displays the Google Pay payment button to clients.
- A secure hosting site is required for the HTTP response for Google Pay widget to load. Then, copy the HTML file to this secure hosting site to load the Google Pay widget.
- After clicking the Google Pay button, the Google Pay Payment Sheet is displayed.
- Clients will be able to update Credit Card and Billing information (Shipping is not in this first version scope) and confirm.
- Finally, the Google Pay sheet is closed.
Notes:
- Clients will need to be using a browser or phone where Google Pay is available.
- Clients will need to have a Google Pay configured on their end.
- Save a copy of the following Google Pay widget (from https://www.npmjs.com/package/@paydock/client-sdk):
<!DOCTYPE html>
<html lang="en">
<head>
    <meta charset="UTF-8">
    <title>Title</title>
</head>
<body>
    <h2>Payment using PayDock Wallet Button!</h2>
    <div id="widget"></div>
</body>
<script src="https://widget.paydock.com/sdk/latest/widget.umd.min.js" ></script>
<script>
    let button = new paydock.WalletButtons(
        "#widget",
"eyJhbGciOiJIUzI1NiIsInR5cCI6IkpXVCJ9.eyJpZCI6IjY0ZDViOTQyYjYwNTNkNGUzNjRiZGI2NCIsIm1ldGEiOiJleUp0WlhSaElqcDdJbU5vWVhKblpTSTZleUpwWkNJNklqWTBaRFZpT1RReVlUVm1ZV1F5TkdVek1HRmhNakEzTXlJc0ltRnRiM1Z1ZENJNk1UQXNJbU4xY25KbGJtTjVJam9pUVZWRUlpd2lZMkZ3ZEhWeVpTSTZkSEoxWlN3aWNtVm1aWEpsYm1ObElqb2lRMjlzWlhNaWZTd2laMkYwWlhkaGVTSTZleUowZVhCbElqb2lUV0Z6ZEdWeVEyRnlaQ0lzSW0xdlpHVWlPaUowWlhOMElpd2lZM0psWkdWdWRHbGhiSE1pT25zaVoyOXZaMnhsSWpwN0ltMWxjbU5vWVc1MElqb2ljR0Y1Wkc5amF5SjlmWDE5ZlE9PSIsImlhdCI6MTY5MTcyODE5NCwiZXhwIjoxNjkxODE0NTk0fQ.yWBQfKfOMgHups9Bc2-Acsedj9uDh4pWuKh6n6_k6sk",
        {
            amount_label: "Total",
            country: 'DE',
            request_shipping: true,
            style: {
                button_type: 'buy',
            },
            shipping_options: [
                {
                    id: "FreeShip",
                    label: "Free Shipping",
                    detail: "Arrives in 5 to 7 days",
                    amount: "0.00"
                },
                {
                    id: "FastShip",
                    label: "Fast Shipping",
                    detail: "Arrives in 1 day",
                    amount: "10.00"
                }
            ]
        }
    );
    button.setEnv('sandbox');
    button.onUnavailable(() => console.log("No wallet buttons available"));
    button.onPaymentSuccessful((data) => console.log("The payment was successful"));
    button.onPaymentError((data) => console.log("The payment was not successful"));
    button.onUpdate((data) => {
                console.log("Updating amount via a backend to backend call to POST charges/:id");
                //console.log("Update data for merchant to recalculate amount:  data", data);
                setTimeout(function () {
                    button.update({ success: true, body: {} });
                }, 3000);
            });
    button.load();
</script>
</html>
Typical Integration
Some relevant things extracted from this document are:
- Paydock will have a Single encryption key for all our merchants.
- Only needed credential from merchants will be Merchant ID (Google Merchant ID)
There are 5 main steps that Paydock need to follow to complete this “Processor” integration:
- Register a gateway ID and add a test key.
- Generate and decrypt the sample payload.
- Add the production key.
- Work with Google to validate merchant integration.
- Provide external documentation for review.
The integration of Google Pay using MPGS has two main steps, which can be divided into two categories.
- Front end
- Google Pay
- Back end
- MPGS Gateway API
The way it works is, Paydock integrate Google Pay library (in Client-SDK) using the official Google Pay APIs/SDKs, and then Paydock get a token which will decrypt on Paydock’s side and then use the decrypted data to make a Payment using MPGS gateway API. The merchant needs to create two accounts: Google Pay and MPGS.
API Reference
The following APIs are used for Google Pay wallet:
- Initialise charge for wallet payments - POST
{{url}}/v1/charges/wallet - Refund - POST
{{url}}/v1/charges/:chargeId/refunds - Initialise charge for wallet payments (pre-auth) - POST
{{url}}/v1/charges/wallet?capture=false - Capture for wallet payments - POST
{{url}}/v1/charges/:chargeId/capture - Cancel - DEL
{{url}}/v1/charges/:chargeId/capture
Services
Create direct charge on Google Pay
Workflow
- Merchant sends request to Paydock to initialise the charge for wallet payments with POST
{{url}}/v1/charges/wallet - Paydock responds with the Token
- Merchant initialises Google Pay widget using Charge Token and execute the HTML code on the web browser
- Google sends the transaction response to Merchant
Executing ‘Google Pay charge’ API
- Initialise the charge for wallet payments (Google Pay)
Paydock API / charges / initialize charge for wallet payments / initialize charge for wallet payments (Google Pay):
- Change the “gateway_id” to MPGS
- Copy the “token” value from the response message
POST {{url}}/v1/charges/wallet
REQUEST
{
    "customer": {
        "first_name": "Wanda",
        "last_name": "Mertz",
        "email": "wanda.mertz@example.com",
        "phone": "+1234567890",
        "payment_source": {
            "gateway_id": "646304c0979cd215eec095c3"
        }
    },
    "amount": 10,
    "reference": "Mel",
    "description": "Test",
    "currency": "AUD",
    "capture": **true**
}
RESPONSE
{
    "status": 201,
    "error": **null**,
    "resource": {
        "type": "charge",
        "data": {
            "token": "eyJhbGciOiJIUzI1NiIsInR5cCI6IkpXVCJ9.eyJpZCI6IjY0ZDljOGFjYjYwNTNkNGUzNjRmMDJiZCIsIm1ldGEiOiJleUp0WlhSaElqcDdJbU5vWVhKblpTSTZleUpwWkNJNklqWTBaRGxqT0dGallUVm1ZV1F5TkdVek1HRmpNalZpTUNJc0ltRnRiM1Z1ZENJNk1UQXNJbU4xY25KbGJtTjVJam9pUVZWRUlpd2lZMkZ3ZEhWeVpTSTZkSEoxWlN3aWNtVm1aWEpsYm1ObElqb2lUV1ZzSW4wc0ltZGhkR1YzWVhraU9uc2lkSGx3WlNJNklrMWhjM1JsY2tOaGNtUWlMQ0p0YjJSbElqb2lkR1Z6ZENJc0ltTnlaV1JsYm5ScFlXeHpJanA3SW1kdmIyZHNaU0k2ZXlKdFpYSmphR0Z1ZENJNkluQmhlV1J2WTJzaWZYMTlmWDA9IiwiaWF0IjoxNjkxOTk0Mjg0LCJleHAiOjE2OTIwODA2ODR9.dQc_x4kf8nuMZhJV0banGSGoDau1ur1vTPw7LUx77kk",
            "charge": {
                "_id": "64d9c8aca5fad24e30ac25b0",

                "amount": 10,
                "currency": "AUD",
                "reference": "Mel",
                "company_id": "6459ec32d5a3f85c5c9fa337",
                "description": "Test",
                "type": "financial",
                "status": "wallet_initialized",
                "capture": **true**,
                "authorization": **false**,
                "one_off": **true**,
                "amount_surcharge": **null**,
                "amount_original": **null**,
                "created_at": "2023-08-14T06:24:44.681Z",
                "updated_at": "2023-08-14T06:24:44.681Z",
                "schedule": {
                    "stopped": **false**
                },
                "archived": **false**,
                "meta": {},
                "customer": {
                    "last_name": "Mertz",
                    "first_name": "Wanda",
                    "email": "wanda.mertz@example.com",
                    "phone": "+1234567890",
                    "payment_source": {
                        "type": "wallet",
                        "wallet_type": **null**,
                        "gateway_id": "646304c0979cd215eec095c3",
                        "gateway_name": "MasterCard",
                        "gateway_type": "MasterCard"
                    }
                },
                "transactions": [],
                "shipping": {},
                "items": []
            }
        }
    }
}
- Execute Google Pay widget
- Edit Google Pay widget and enter ‘token’ value from the previous transaction to the field next to “widget”.
<!DOCTYPE html>
<html lang="en">
  <head>
    <meta charset="UTF-8" />
    <title>Title</title>
  </head>
  <body>
    <h2>Payment using PayDock Wallet Button!</h2>
    <div id="widget"></div>
  </body>
  <script src="https://widget.paydock.com/sdk/latest/widget.umd.min.js"></script>
  <script>
    let button = new paydock.WalletButtons(
      "#widget",
"eyJhbGciOiJIUzI1NiIsInR5cCI6IkpXVCJ9.eyJpZCI6IjY0ZDljOGFjYjYwNTNkNGUzNjRmMDJiZCIsIm1ldGEiOiJleUp0WlhSaElqcDdJbU5vWVhKblpTSTZleUpwWkNJNklqWTBaRGxqT0dGallUVm1ZV1F5TkdVek1HRmpNalZpTUNJc0ltRnRiM1Z1ZENJNk1UQXNJbU4xY25KbGJtTjVJam9pUVZWRUlpd2lZMkZ3ZEhWeVpTSTZkSEoxWlN3aWNtVm1aWEpsYm1ObElqb2lUV1ZzSW4wc0ltZGhkR1YzWVhraU9uc2lkSGx3WlNJNklrMWhjM1JsY2tOaGNtUWlMQ0p0YjJSbElqb2lkR1Z6ZENJc0ltTnlaV1JsYm5ScFlXeHpJanA3SW1kdmIyZHNaU0k2ZXlKdFpYSmphR0Z1ZENJNkluQmhlV1J2WTJzaWZYMTlmWDA9IiwiaWF0IjoxNjkxOTk0Mjg0LCJleHAiOjE2OTIwODA2ODR9.dQc_x4kf8nuMZhJV0banGSGoDau1ur1vTPw7LUx77kk",
      {
        amount_label: "Total",
        country: "DE",
        request_shipping: true,
        style: {
          button_type: "buy"
        },
        shipping_options: [
          {
            id: "FreeShip",
            label: "Free Shipping",
            detail: "Arrives in 5 to 7 days",
            amount: "0.00"
          },
          {
            id: "FastShip",
            label: "Fast Shipping",
            detail: "Arrives in 1 day",
            amount: "10.00"
          }
        ]
      }
    );
    button.setEnv("sandbox");
    button.onUnavailable(() => console.log("No wallet buttons available"));
    button.onPaymentSuccessful((data) =>
      console.log("The payment was successful")
    );
    button.onPaymentError((data) =>
      console.log("The payment was not successful")
    );
    button.onUpdate((data) => {
      console.log(
        "Updating amount via a backend to backend call to POST charges/:id"
      );
      *//console.log("Update data for merchant to recalculate amount:  data", data);*
      setTimeout(function () {
        button.update({ success: true, body: {} });
      }, 3000);
    });
    button.load();
  </script>
</html>
- Execute the Google Pay widget in the secure hosting site. Note: Turn on the console on the web browser.
- Click on the Pay with GPay button which will display Google Pay Payment Sheet.
- Google Pay payment sheet allow us to update Credit Card and Shipping information and confirm.
After clicking on Pay button, the transaction is now completed and Google Pay sheet is closed. Note: Browser console displays the status of the transaction.
Transaction is now displayed on Paydock dashboard with status ‘Complete”.
Create refund via MPGS
Workflow
- Merchant uses the “chargeId” to send request to Paydock to refund the Charge using POST
{{url}}/v1/charges/:chargeId/refunds - Paydock send the Refund Request to MPGS.
- MPGS responds to Paydock.
- Paydock responds to Merchant with 201 success.
Executing Refund API via MPGS
Copy "charge_id" from the previous charge (from sandbox transaction log) and paste it to Value field in the ‘Path Variables’ under 'Params' tab.
Ensure the amount is the same as the original transaction amount. The refunded amount will be shown in the response message.
Paydock API / charges / refund
POST {{url}}/v1/charges/:chargeId/refunds
REQUEST
{
    "amount": 10
}
RESPONSE
{
    "status": 200,
    "error": **null**,
    "resource": {
        "type": "charge",
        "data": {
            "transfer": {
                "items": []
            },
            "schedule": {
                "stopped": **false**
            },
            "statistics": {
                "total_refunded_amount": 0,
                "full_refund": **false**,
                "need_sync": **true**
            },
            "customer": {
                "payment_source": {
                    "gateway_id": "646304c0979cd215eec095c3",
                    "gateway_type": "MasterCard",
                    "gateway_name": "MasterCard",
                    "type": "wallet",
                    "wallet_type": "google",
                    "items": [],
                    "card_scheme": "VISA",
                    "ref_token":"{"signature":"MEYCIQC6R47tdilxNmYjS0Y63PgVy58itVDcZjs70V/+8kHE0wIhAPNx5nQxOk3XAXljCnB94z3q38HGznYKzZchAr7NCucE","intermediateSigningKey":{"signedKey":"{"keyValue":"MFkwEwYHKoZIzj0CAQYIKoZIzj0DAQcDQgAEMWefGQw6HXPkI3KAA4Qzeif+7CctYxOVKn4lIPBcp57oOARmYWDiRyuWOAZ/XmZLpuruFN018h37KjOc4CvDjg==","keyExpiration":"1692684186381"}","signatures":["MEQCIHDQyox1uPVnDpYcUEHcY6d41K8v5fFtl1LZU0AVRif2AiBUVKXQLukVlA4LkjOOzwLZh4dJjAA9lM60lHzse/YBSw=="]},"protocolVersion":"ECv2","signedMessage":"{"encryptedMessage":"9Se8jEx60yCGqGRTVmYM/0KDGFybzPUoAYuiYsvjS8clGZqGRQmE5jF5QAKba6l3eFidpXkTDek3mpZDgCHqbM/XS9eNjvdRJbJtb4xGTqh/7LlS0ORn920KrC+POnxdQGNemzo0w+A8TzL8GEU+sulxI/QBg5yjLfkiYmzuGi7PUls2lpzjioH7BnFJsUGmbKbaurYxQidCkZ4Lf3yxGpv+pfra7jOYkTLaix9fnauLV+cn6urC6WCZr7ooWSkGy1WCt0qMhDqg8c8X/CPXoZu/UzsbJlyXrewDvdBN/ZBhO/gHdzQttcXAE5ectD6dRnmXpz4p8T0aBAfIOtY2cEIzqfYypRkujuhHnVZahioP3ivnlNK2470P5yBxRbK+oV15XPs8W+ccleaQeITNAz2cxBNwwTlhW82vZvM6EHR1NT7OUze07sQYNICdtHmnqeYVUaNfaGtX7k1mNj3r3m7IbLom/k0F877qbo0xYU0gAlumVWtikudGzrViyFkuXD2SA5573Zp9A7nM7MEsB5FqXCzEd3qT1P+lxjDnW2SSrIoZz86pdpa1y/74aaI6utJn7MNo","ephemeralPublicKey":"BHYnV1MNevXw6oAZnPDq1lzMzhJSHGH5FeV5k4fi7UcE77WtcIvv/3TGErZvqsa9tH7wFOkxW7dv/y//DkAnJY4=","tag":"HX+YsI8Rp9R8vx/c0iYdmQxer6PAJyYkJoQAN6wylS8="}"}",
                    "card_number_bin": "411111",
                    "card_number_last4": "1111",
                    "card_number_length": 16,
                    "expire_month": 12,
                    "expire_year": 2025
                },
                "first_name": "Wanda",
                "last_name": "Mertz",
                "email": "wanda.mertz@example.com",
                "phone": "+1234567890"
            },
            "shipping": {
                "contact": {
                    "first_name": "Australian User"
                },
                "address_city": "Sydney",
                "address_country": "AU",
                "address_line1": "48 Pirrama Road",
                "address_postcode": "2009",
                "address_state": "NSW",
                "options": [
                    {
                        "_id": "64d9c907067be23784ee1580",
                        "id": "FreeShip",
                        "label": "Free Shipping",
                        "detail": "Arrives in 5 to 7 days",
                        "amount": "0.00"
                    },
                    {
                        "_id": "64d9c907067be23784ee1581",
                        "id": "FastShip",
                        "label": "Fast Shipping",
                        "detail": "Arrives in 1 day",
                        "amount": "10.00"
                    }
                ]
            },
            "type": "financial",
            "status": "refunded",
            "capture": **true**,
            "authorization": **false**,
            "archived": **false**,
            "one_off": **true**,
            "_source_ip_address": "110.175.46.51",
            "_id": "64d9c8aca5fad24e30ac25b0",
            "logs_migrated": **false**,
            "amount": 10,
            "currency": "AUD",
            "reference": "Mel",
            "description": "Test",
            "company_id": "6459ec32d5a3f85c5c9fa337",
            "items": [],
            "transactions": [
                {
                    "type": "sale",
                    "status": "complete",
                    "_source_ip_address": "127.0.0.1",
                    "gateway_specific_code": **null**,
                    "gateway_specific_description": **null**,
                    "error_message": **null**,
                    "error_code": **null**,
                    "status_code": "approved",
                    "status_code_description": **null**,
                    "include_authorization": **false**,
                    "service_logs": [],
                    "_id": "64d9c907067be23784ee1587",
                    "amount": 10,
                    "currency": "AUD",
                    "transaction_id": **null**,
                    "created_at": "2023-08-14T06:26:15.630Z",
                    "updated_at": "2023-08-14T06:26:20.798Z",
                    "amount_fee": **null**,
                    "external_id": "e7adc077-40b8-4d29-bc49-ec8764cab58c:0a82a4b5-29d6-404c-85ff-f975ac1c29cf",
                    "external_reference": "322606018885",
                    "amount_surcharge": **null**,
                    "amount_original": **null**
                },
                {
                    "type": "refund",
                    "status": "complete",
                    "_source_ip_address": "110.175.46.51",
                    "gateway_specific_code": **null**,
                    "gateway_specific_description": **null**,
                    "error_message": **null**,
                    "error_code": **null**,
                    "status_code": **null**,
                    "status_code_description": **null**,
                    "include_authorization": **false**,
                    "service_logs": [],
                    "_id": "64d9cf8fa88b3d045f298651",
                    "created_at": "2023-08-14T06:54:07.147Z",
                    "amount": 10,
                    "currency": "AUD",
                    "amount_fee": **null**,
                    "amount_surcharge": **null**,
                    "amount_original": **null**,
                    "external_id": "e7adc077-40b8-4d29-bc49-ec8764cab58c:322867a0-be1b-4f8b-b72b-191c3ebeb667",
                    "external_reference": "322606024197",
                    "reversal": **false**
                }
            ],
            "created_at": "2023-08-14T06:24:44.681Z",
            "updated_at": "2023-08-14T06:54:08.206Z",
            "amount_surcharge": **null**,
            "amount_original": **null**,
            "__v": 3,
            "external_id": "e7adc077-40b8-4d29-bc49-ec8764cab58c:0a82a4b5-29d6-404c-85ff-f975ac1c29cf"
        }
    }
}
Alternatively, the transaction can also be refunded by selecting ‘Refund Request’ from ‘Actions’ drop down list from Paydock dashboard.
A pop-up frame will request the refunded amount. This will give the same results as executing Refund API.
The transaction status is now changed from ‘Complete’ to ‘Refunded’.
Pre-authorisation, capture and cancellation on Google Pay
Workflow
- Merchant sends request to Paydock to initialise the pre-authorisation for wallet payments with POST
{{url}}/v1/charges/wallet?capture=false - Paydock responds with the Token
- Merchant initialises Google Pay widget using Charge Token and execute the HTML code on the web browser
- Google sends the transaction response to Merchant
- Merchant can either:
A.1 use the “chargeId” to send request to Paydock to cancel the Charge using DELETE
{{url}}/v1/charges/:chargeId/refundsA.2 Paydock send the Cancellation Request to Google Pay OR B.1 use the “chargeId” to send request to Paydock to capture the Pre-Authorisation using POST{{url}}/v1/charges/:chargeId/captureB.2 Paydock sends PreAuthorisation to Google Pay - Google Pay responds to Paydock.
- Paydock responds to Merchant with 201 success.
Executing ‘Google Pay Pre-authorisation’ API
- Initialise the pre-authorisation for wallet payments (Google Pay)
Paydock API / charges / initialize charge for wallet payments / initialize charge for wallet payments (capture=F):
- Change the “gateway_id” to Google Pay
- Copy the “token” value from the response message
POST {{url}}/v1/charges/wallet
REQUEST
{
    "customer": {
        "first_name": "Wanda",
        "last_name": "Mertz",
        "email": "wanda.mertz@example.com",
        "phone": "+1234567890",
        "payment_source": {
            "gateway_id": "646304c0979cd215eec095c3"
        }
    },
    "amount": 50,
    "currency": "AUD",
    "reference": "reference123",
    "description": "description123",
    "meta": {
        "store_name": "123",
        "store_id": "123"
    }
}
RESPONSE
{
    "status": 201,
    "error": **null**,
    "resource": {
        "type": "charge",
        "data": {
            "token": "eyJhbGciOiJIUzI1NiIsInR5cCI6IkpXVCJ9.eyJpZCI6IjY0ZGRiMWZhMmY5MTJkMjkyMmMxYjIzYiIsIm1ldGEiOiJleUp0WlhSaElqcDdJbU5vWVhKblpTSTZleUpwWkNJNklqWTBaR1JpTVdaaE1EWTNZbVV5TXpjNE5HWXdZbUl3TWlJc0ltRnRiM1Z1ZENJNk5UQXNJbU4xY25KbGJtTjVJam9pUVZWRUlpd2lZMkZ3ZEhWeVpTSTZabUZzYzJVc0luSmxabVZ5Wlc1alpTSTZJbkpsWm1WeVpXNWpaVEV5TXlKOUxDSm5ZWFJsZDJGNUlqcDdJblI1Y0dVaU9pSk5ZWE4wWlhKRFlYSmtJaXdpYlc5a1pTSTZJblJsYzNRaUxDSmpjbVZrWlc1MGFXRnNjeUk2ZXlKbmIyOW5iR1VpT25zaWJXVnlZMmhoYm5RaU9pSndZWGxrYjJOckluMTlmWDE5IiwiaWF0IjoxNjkyMjUwNjE4LCJleHAiOjE2OTIzMzcwMTh9.dwicmTyGIiuomTWrsdt6U4S4VTLzN1WXufVp3BQD-sc",
            "charge": {
                "_id": "64ddb1fa067be23784f0bb02",
                "amount": 50,
                "currency": "AUD",
                "reference": "reference123",
                "company_id": "6459ec32d5a3f85c5c9fa337",
                "description": "description123",
                "type": "financial",
                "status": "wallet_initialized",
                "capture": **false**,
                "authorization": **true**,
                "one_off": **true**,
                "amount_surcharge": **null**,
                "amount_original": **null**,
                "created_at": "2023-08-17T05:36:58.723Z",
                "updated_at": "2023-08-17T05:36:58.723Z",
                "schedule": {
                    "stopped": **false**
                },
                "archived": **false**,
                "meta": {
                    "store_id": "123",
                    "store_name": "123"
                },
                "customer": {
                    "last_name": "Mertz",
                    "first_name": "Wanda",
                    "email": "wanda.mertz@example.com",
                    "phone": "+1234567890",
                    "payment_source": {
                        "type": "wallet",
                        "wallet_type": **null**,
                        "gateway_id": "646304c0979cd215eec095c3",
                        "gateway_name": "MasterCard",
                        "gateway_type": "MasterCard"
                    }
                },
                "transactions": [],
                "shipping": {},
                "items": []
            }
        }
    }
}
- Execute Google Pay widget
- Edit Google Pay widget and enter ‘token’ value from the previous transaction to the field next to “widget”.
<!DOCTYPE html>
<html lang="en">
  <head>
    <meta charset="UTF-8" />
    <title>Title</title>
  </head>
  <body>
    <h2>Payment using PayDock Wallet Button!</h2>
    <div id="widget"></div>
  </body>
  <script src="https://widget.paydock.com/sdk/latest/widget.umd.min.js"></script>
  <script>
    let button = new paydock.WalletButtons(
      "#widget",
"eyJhbGciOiJIUzI1NiIsInR5cCI6IkpXVCJ9.eyJpZCI6IjY0ZGRiMWZhMmY5MTJkMjkyMmMxYjIzYiIsIm1ldGEiOiJleUp0WlhSaElqcDdJbU5vWVhKblpTSTZleUpwWkNJNklqWTBaR1JpTVdaaE1EWTNZbVV5TXpjNE5HWXdZbUl3TWlJc0ltRnRiM1Z1ZENJNk5UQXNJbU4xY25KbGJtTjVJam9pUVZWRUlpd2lZMkZ3ZEhWeVpTSTZabUZzYzJVc0luSmxabVZ5Wlc1alpTSTZJbkpsWm1WeVpXNWpaVEV5TXlKOUxDSm5ZWFJsZDJGNUlqcDdJblI1Y0dVaU9pSk5ZWE4wWlhKRFlYSmtJaXdpYlc5a1pTSTZJblJsYzNRaUxDSmpjbVZrWlc1MGFXRnNjeUk2ZXlKbmIyOW5iR1VpT25zaWJXVnlZMmhoYm5RaU9pSndZWGxrYjJOckluMTlmWDE5IiwiaWF0IjoxNjkyMjUwNjE4LCJleHAiOjE2OTIzMzcwMTh9.dwicmTyGIiuomTWrsdt6U4S4VTLzN1WXufVp3BQD-sc",
      {
        amount_label: "Total",
        country: "DE",
        request_shipping: true,
        style: {
          button_type: "buy"
        },
        shipping_options: [
          {
            id: "FreeShip",
            label: "Free Shipping",
            detail: "Arrives in 5 to 7 days",
            amount: "0.00"
          },
          {
            id: "FastShip",
            label: "Fast Shipping",
            detail: "Arrives in 1 day",
            amount: "10.00"
          }
        ]
      }
    );
    button.setEnv("sandbox");
    button.onUnavailable(() => console.log("No wallet buttons available"));
    button.onPaymentSuccessful((data) =>
      console.log("The payment was successful")
    );
    button.onPaymentError((data) =>
      console.log("The payment was not successful")
    );
    button.onUpdate((data) => {
      console.log(
        "Updating amount via a backend to backend call to POST charges/:id"
      );
      *//console.log("Update data for merchant to recalculate amount:  data", data);*
      setTimeout(function () {
        button.update({ success: true, body: {} });
      }, 3000);
    });
    button.load();
  </script>
</html>
- Execute the Google Pay widget in the secure hosting site. Note: Turn on the console on the web browser.
- Click on the Pay with GPay button which will display Google Pay Payment Sheet.
- Google Pay payment sheet allow us to update Credit Card and Shipping information and confirm.
- After clicking on Pay button, the transaction is now completed and Google Pay sheet is closed. Note: Browser console displays the status of the transaction.
- Transaction is now displayed on Paydock dashboard with status ‘Authorised”. After Pre-authorisation is completed, merchant can either send capture to fulfill the transaction or cancellation to void the pre-authorisation.
Executing ‘Google Pay Capture’ API
Copy "charge_id" from the previous charge transaction (from sandbox transaction log) and paste it to Value field in the ‘Path Variables’ under 'Params' tab.
Ensure the body is empty and click on ‘Send’ button.
Paydock API / charges / capture
POST {{url}}/v1/charges/:chargeId/capture
RESPONSE
{
    "status": 201,
    "error": **null**,
    "resource": {
        "type": "charge",
        "data": {
            "meta": {
                "store_id": "123",
                "store_name": "123"
            },
            "transfer": {
                "items": []
            },
            "schedule": {
                "stopped": **false**
            },
            "statistics": {
                "total_refunded_amount": 0,
                "full_refund": **false**,
                "need_sync": **true**
            },
            "customer": {
                "payment_source": {
                    "gateway_id": "646304c0979cd215eec095c3",
                    "gateway_type": "MasterCard",
                    "gateway_name": "MasterCard",
                    "type": "wallet",
                    "wallet_type": "google",
                    "items": [],
                    "card_scheme": "MASTERCARD",
                    "ref_token":"{"signature":"MEQCIBU4wPTQZNReySVnn4TfsZtnPgFcqedBPZFDf02BarAyAiAKVHyX0pZdvA+Mt88YVhq5eC/HcK603C833MU6l09zng==","intermediateSigningKey":{"signedKey":"{"keyValue":"MFkwEwYHKoZIzj0CAQYIKoZIzj0DAQcDQgAEuk9ExN84WQdSJHGYhbpK1EK/sQhbsVOAQ+y1JW1NfLgq4irGU/V7ZDZ6elkMh/gqCyVfdr4INwjuf4HEYAxd4w==","keyExpiration":"1692939533721"}","signatures":["MEUCIFDtkV8zF1Ak/xURsYFjdMXCKMTbW/zSJjgUOPbVHcgkAiEA937FwNSh4bbj9QxZv9NPCRXZ3EmsVw7FjjkTB0/Vugc="]},"protocolVersion":"ECv2","signedMessage":"{"encryptedMessage":"SBaP3Q4F+Wk1WBUN6n1Rq7JUq/O0V/Hx0Xn1vfjqI1luCbLVICIQ+Gh2d7oINUxBE/R47bust6qrkWhLtV1f05VzZMh3q6K9n8hLVzh+vqj0Xxdo+ixn/YIcG6Bow+q9yyA3lyZtGqh7fxR2PljGK1HbnAseMjAsRIoV91EwSrZoUVRppmj6kO/hSyUl5EdudhxVNe85Q0XUDCNO++So6XBgnKDb4upijR1qSg1x9cU7qLj24YLjPCq1FkAGtUE3OJ2ZFVlBT08vgzkmopJsGhkoxmPsISMLK7eOTETqNcwfk0d2qscPQDeK5SMPAThjOS9yMxSyN/0X8TwluRN8Kvrq49tP5Rp7rNiV2YZk25cT/6FO5I90TN7djrXaURGjYVkyxnwlIMgWHCKjK9m/PO6+QoeH6uzbvEAFlakPvmCkjmB2RCKXICpDAW5fMI3/9UnaXDLr/9esjXxYAnUy3V0+jtOKhJ3A/mfJodOWOxe2ICN5RO4IEXaLMceaA/6fZjzbff6NzBZTPKoZILYyeoCTHTFJpA56kKQLVZG8oz67ty5YTSMtPIRRx7pcnzshSEi+LbRz","ephemeralPublicKey":"BCiBNr2N0eLdRuCt5hr0UiflvamhY5EcZFlAV/hiCLu7QlN9H5hoOvxjiNy9ZbY5mB2+Vqk65+jyzGu6QfYzVvE=","tag":"I8McBSm425cmB4bdKTOksqf6XP+31sA7QgSI5Oxjw1o="}"}",
                    "card_number_bin": "555555",
                    "card_number_last4": "4444",
                    "card_number_length": 16,
                    "expire_month": 12,
                    "expire_year": 2025
                },
                "first_name": "Wanda",
                "last_name": "Mertz",
                "email": "wanda.mertz@example.com",
                "phone": "+1234567890"
            },
            "shipping": {
                "contact": {
                    "first_name": "Australian User"
                },
                "address_city": "Sydney",
                "address_country": "AU",
                "address_line1": "48 Pirrama Road",
                "address_postcode": "2009",
                "address_state": "NSW",
                "options": [
                    {
                        "_id": "64ddb31b067be23784f0bc82",
                        "id": "FreeShip",
                        "label": "Free Shipping",
                        "detail": "Arrives in 5 to 7 days",
                        "amount": "0.00"
                    },
                    {
                        "_id": "64ddb31b067be23784f0bc83",
                        "id": "FastShip",
                        "label": "Fast Shipping",
                        "detail": "Arrives in 1 day",
                        "amount": "10.00"
                    }
                ]
            },
            "type": "financial",
            "status": "complete",
            "capture": **true**,
            "authorization": **true**,
            "archived": **false**,
            "one_off": **true**,
            "_source_ip_address": "110.175.46.51",
            "_id": "64ddb1fa067be23784f0bb02",
            "logs_migrated": **false**,
            "amount": 50,
            "currency": "AUD",
            "reference": "reference123",
            "description": "description123",
            "company_id": "6459ec32d5a3f85c5c9fa337",
            "items": [],
            "transactions": [
                {
                    "type": "sale",
                    "status": "complete",
                    "_source_ip_address": "127.0.0.1",
                    "gateway_specific_code": **null**,
                    "gateway_specific_description": **null**,
                    "error_message": **null**,
                    "error_code": **null**,
                    "status_code": **null**,
                    "status_code_description": **null**,
                    "include_authorization": **true**,
                    "_id": "64ddb31b067be23784f0bc89",
                    "amount": 50,
                    "currency": "AUD",
                    "transaction_id": **null**,
                    "created_at": "2023-08-17T05:41:47.650Z",
                    "updated_at": "2023-08-17T05:41:52.920Z",
                    "amount_fee": **null**,
                    "external_id": "b26eecbe-b073-45b9-9ac9-6f7cbcb28a91:a0b4e5f8-e9c3-4fbb-a6e8-3a620e2a1c34",
                    "external_reference": "322905066267",
                    "amount_surcharge": **null**,
                    "amount_original": **null**
                },
                {
                    "type": "capture",
                    "status": "complete",
                    "_source_ip_address": "127.0.0.1",
                    "gateway_specific_code": **null**,
                    "gateway_specific_description": **null**,
                    "error_message": **null**,
                    "error_code": **null**,
                    "status_code": **null**,
                    "status_code_description": **null**,
                    "include_authorization": **true**,
                    "_id": "64ddb770a88b3d045f2ca29c",
                    "amount": 50,
                    "currency": "AUD",
                    "external_id": "b26eecbe-b073-45b9-9ac9-6f7cbcb28a91:a0b4e5f8-e9c3-4fbb-a6e8-3a620e2a1c34",
                    "amount_fee": **null**,
                    "amount_surcharge": **null**,
                    "amount_original": **null**,
                    "created_at": "2023-08-17T06:00:16.749Z",
                    "external_reference": "322905066267"
                }
            ],
            "created_at": "2023-08-17T05:36:58.723Z",
            "updated_at": "2023-08-17T06:00:18.814Z",
            "amount_surcharge": **null**,
            "amount_original": **null**,
            "__v": 3,
            "external_id": "b26eecbe-b073-45b9-9ac9-6f7cbcb28a91:a0b4e5f8-e9c3-4fbb-a6e8-3a620e2a1c34"
        }
    }
}
- The dashboard will then change the Google Pay transaction from status ‘Authorized to ‘Complete.
Executing ‘Google Pay Cancellation’ API
Copy "charge_id" from the previous charge transaction (from sandbox transaction log) and paste it to Value field in the ‘Path Variables’ under 'Params' tab.
Ensure the body is empty and click on ‘Send’ button.
Paydock API / charges / cancel authorised
DELETE {{url}}/v1/charges/:chargeId/capture
RESPONSE
{
    "status": 200,
    "error": **null**,
    "resource": {
        "type": "charge",
        "data": {
            "meta": {
                "store_id": "123",
                "store_name": "123"
            },
            "transfer": {
                "items": []
            },
            "schedule": {
                "stopped": **false**
            },
            "statistics": {
                "total_refunded_amount": 0,
                "full_refund": **false**,
                "need_sync": **true**
            },
            "customer": {
                "payment_source": {
                    "gateway_id": "646304c0979cd215eec095c3",
                    "gateway_type": "MasterCard",
                    "gateway_name": "MasterCard",
                    "type": "wallet",
                    "wallet_type": "google",
                    "items": [],
                    "card_scheme": "MASTERCARD",
                    "ref_token":"{"signature":"MEYCIQCqHj2w+PXIvq+eMQpKJgfAYuRtEoB4MVGNVGDf/IdXOgIhANAzQBWmOYpYMUUamh/GXOinoZvYdho+wPwF/Dnnum1v","intermediateSigningKey":{"signedKey":"{"keyValue":"MFkwEwYHKoZIzj0CAQYIKoZIzj0DAQcDQgAEHJMY8n4MDDzXnI29/hzKkOY4YPCpGjFWynkcikdUWnJs32B3h1d6WMHIPXrCx+TPA6ayNa+tMwRIrdO+gPyfdw==","keyExpiration":"1692901527714"}","signatures":["MEUCIQDGH+dVK6XpZYYfZVIctfesZQMTDXBbJTDEiKkk+9T/rgIgbd22YVuCS7Nvr+QLpl7j07FA8kwsefbmKcHbXzURIKE="]},"protocolVersion":"ECv2","signedMessage":"{"encryptedMessage":"oVSiXdEd+xZyb6QC1ThjuNYWFBot+mlj7Tml714FL4C/13KT0a2aRlTW9CzLwglv/JyRwQMJwjoB66a5YNlMOs5Pw3DyTgxmuQyZpKT2BkThrOIsdMEPLWnsupNBT9mbUJ2PkIooXwD6IVzV1Kn2ZN6JTmCyhDifVzw+fbVvhRX5n6H6vK0Ik8TME9KPur5jNY54Cion3uEA/UY6J6IoKZShLMYg0gm3yGweBk27nmfWDJHJrtAzRUIt1kjFFxicTZBi89JGZHPh+M2ZRR6jFKCjcC6FeHspCdpdtkePjehF08Mt4U5ZwXWquZBtH2C66fjHvFbNZmfnrMywbwgTuvqzWm9mvbw7FcqH0W6FhGUzt7H56SzMmAZeWqjaE2yDhps/SzjlWbhpBoIdZPfiqhcD+tS67yqZjKuCEW2xBVBSLbHODbVUOX7efQQ7YX7vln+pZ3wHdsQbw3ReZzq+CdUyRCcyyqtBrFNOWbchzeh8C/MTs+zCbk7R3K6sJCxvtXzG1MZQJm+dDiuyc8eLtJFbKdz99wd8wL4Jf+8UwHmAbPz7XbdN8JGfkN53KCvVYOpTbter","ephemeralPublicKey":"BA6RXplsZ0kfO9aJtvf5ObBEJRwLOWjDlekwjvMm56JnFd1CF67kOPMfF/FpsmNMvNIvZ5AjlagzymYGDgq4B6o=","tag":"IuUNiIbqXZXbhKoetKErajEaEqhAkm5pK/am6qoC/Cc="}"}",
                    "card_number_bin": "555555",
                    "card_number_last4": "4444",
                    "card_number_length": 16,
                    "expire_month": 12,
                    "expire_year": 2025
                },
                "first_name": "Wanda",
                "last_name": "Mertz",
                "email": "wanda.mertz@example.com",
                "phone": "+1234567890"
            },
            "shipping": {
                "contact": {
                    "first_name": "Australian User"
                },
                "address_city": "Sydney",
                "address_country": "AU",
                "address_line1": "48 Pirrama Road",
                "address_postcode": "2009",
                "address_state": "NSW",
                "options": [
                    {
                        "_id": "64ddb89ca5fad24e30aeb049",
                        "id": "FreeShip",
                        "label": "Free Shipping",
                        "detail": "Arrives in 5 to 7 days",
                        "amount": "0.00"
                    },
                    {
                        "_id": "64ddb89ca5fad24e30aeb04a",
                        "id": "FastShip",
                        "label": "Fast Shipping",
                        "detail": "Arrives in 1 day",
                        "amount": "10.00"
                    }
                ]
            },
            "type": "financial",
            "status": "cancelled",
            "capture": **false**,
            "authorization": **true**,
            "archived": **false**,
            "one_off": **true**,
            "_source_ip_address": "110.175.46.51",
            "_id": "64ddb87ca5fad24e30aeb03c",
            "logs_migrated": **false**,
            "amount": 50,
            "currency": "AUD",
            "reference": "reference123",
            "description": "description123",
            "company_id": "6459ec32d5a3f85c5c9fa337",
            "items": [],
            "transactions": [
                {
                    "type": "sale",
                    "status": "cancelled",
                    "gateway_specific_code": **null**,
                    "gateway_specific_description": **null**,
                    "error_message": **null**,
                    "error_code": **null**,
                    "status_code": **null**,
                    "status_code_description": **null**,
                    "_id": "64ddb89ca5fad24e30aeb050",
                    "amount": 50,
                    "currency": "AUD",
                    "transaction_id": **null**,
                    "created_at": "2023-08-17T06:05:16.453Z",
                    "updated_at": "2023-08-17T06:05:21.500Z",
                    "amount_fee": **null**,
                    "external_id": "8f728963-a71f-4012-b466-ca38df70d538:f01ed929-fcf1-4d01-bffa-2d751087aea5",
                    "external_reference": "322906062092",
                    "amount_surcharge": **null**,
                    "amount_original": **null**
                },
                {
                    "type": "cancel",
                    "status": "complete",
                    "gateway_specific_code": **null**,
                    "gateway_specific_description": **null**,
                    "error_message": **null**,
                    "error_code": **null**,
                    "status_code": **null**,
                    "status_code_description": **null**,
                    "_id": "64ddb8f8a88b3d045f2ca5dc",
                    "amount": 50,
                    "currency": "AUD",
                    "external_id": "8f728963-a71f-4012-b466-ca38df70d538:f01ed929-fcf1-4d01-bffa-2d751087aea5",
                    "amount_fee": **null**,
                    "amount_surcharge": **null**,
                    "amount_original": **null**,
                    "created_at": "2023-08-17T06:06:48.458Z",
                    "external_reference": "322906062092"
                }
            ],
            "created_at": "2023-08-17T06:04:44.227Z",
            "updated_at": "2023-08-17T06:06:49.414Z",
            "amount_surcharge": **null**,
            "amount_original": **null**,
            "__v": 3,
            "external_id": "8f728963-a71f-4012-b466-ca38df70d538:f01ed929-fcf1-4d01-bffa-2d751087aea5"
        }
    }
}
- The dashboard will then change the Google Pay transaction from status ‘Authorized to ‘Cancelled’.
Field Mapping
| Google Pay field | Paydock field | When/where it is sent |
|---|---|---|
| Gateway request | ||
| Frontend | ||
total.amount |
amount |
POST /charges/wallet |
total.label |
amount_label |
FE at paydock.WalletButtons(selector,token,{...,amount_label:"...", ...} |
total.type |
"final" | Since V1.0 does not support shipping, the amount does not change, so it is fixed to final amount. |
countryCode |
country |
FE at paydock.WalletButtons(selector,token,{...,country:"...", ...} |
currencyCode |
currency |
POST /charges/wallet |
merchantCapabilities |
["supports3DS","supportsCredit","supportsDebit"] | Paydock is accepting all that Apple offers, it is hardcoded. |
supportedNetworks |
["visa","masterCard","amex","discover"] | Paydock is accepting all that Apple offers, it is hardcoded. |
requiredBillingContactFields |
["name","postalAddress"] | Paydock is accepting all that Apple offers, it is hardcoded. |
shippingMethods |
shipping_options |
FE at paydock.WalletButtons(selector,token,{...,shipping_options: [{...},...], ...} |
| Backend | ||
merchantIdentifier |
Apple merchant ID | Entered at service creation in PayDock’s dashboard |
displayName |
store_name |
POST /charges/wallet - Used for creating applePay session https://developer.apple.com/documentation/apple_pay_on_the_web/apple_pay_js_api/requesting_an_apple_pay_payment_session |
initiative |
"web" | Harcoded since Paydock is offering it via web |
initiative_context |
Apple domain | Taken from Client SDK when attempting an Apple Pay |
| Gateway Response / Token Decrypt | ||
applicationExpirationDate (first 2 characters) (applicationExpirationDate format: ddmmyy) |
customer.payment_source.expire_year |
From decrypt token and stored in DB at customer.payment.source.expire_year |
applicationExpirationDate (characters at position 2 and 3 (applicationExpirationDate format: ddmmyy) |
customer.payment_source.expire_month |
From decrypt token and stored in DB at customer.payment.source.expire_ month |
card_number (last 4 characters) |
card_number_last_4 |
Stored in DB at customer.payment.source.card_number_last_4 |
| Gateway Response | ||
| MPGS API | Paydock field | When/where it is stored |
External_Id as orderId:transactionId |
id used to create Transactions external_id | From MPGS API response at api-mastercard-gateway-ms (POST /wallet-payments) |
Afterpay Integration
Afterpay checkout allows your customers to pay using Afterpay. The Afterpay checkout process creates a one-time token that can be used to add a direct payment.
Before allowing a customer to checkout with Afterpay, check the configuration for Afterpay to ensure that this order will be accepted successfully. You can do this by calling (Afterpay configuration)[#afterpay-configuration]. The configuration does not need to be checked before every order, but it should be checked regularly (eg every day).
Using the client SDK
The easiest way to do this is through the client SDK
Direct API integration
You can also integrate directly with the PayDock API, without using the client SDK.
The process for taking a payment with Afterpay checkout is:
- Call /v1/payment_sources/external_checkout with a redirect URL, which will return a custom Afterpay checkout link. Provide a way for the customer to visit this URL (eg pay with Afterpay button)
- When the customer visits this URL, they will be promoted to log into their Afterpay account, then is sent to the redirect URL.
- Collect the Afterpay token from the URL.
- Call /v1/payment_sources/tokens to create a single use token. This token can be used to add a direct payment.
Create checkout link
curl -X "POST https://api-sandbox.paydock.com/v1/payment_sources/external_checkout" \
     -H "x-user-secret-key: x-user-secret-key" \
     -H "Content-Type: application/json" \
     -d "{\”mode\”:\”test\”, \”error_redirect_url\”: \”https://docs.paydock.com\”, \”success_redirect_url\”: \”https://google.com\”, \”type\”:\”afterpay\”, \”gateway_id\”:\”59003f15eccac620e61aad6c\”, \”meta\”: { \”amount\”: \”50\”, \”currency\”: \”AUD\”, \”reference\”: \”testreference\”, \”email\”: \”samwashington@gmail.com\”,  \”first_name\”: \”Samantha\”, \”last_name\”: \”Washington\”, \”address_line1\”: \”Suite 660\”, \”address_line2\”: \”822 Ruiz Square\”,  \”address_city\”: \”Lake Edward\”, \”address_state\”: \”NSW\”, \”address_postcode\”: \“1234\”,  \”address_country\”: \”Australia\”,  \”phone\”: \”040000000\”} }"
var request = require('request');

request({
    url: 'https://api.paydock.com/v1/payment_sources/external_checkout',
    method: 'POST',
    body: {
            "error_redirect_url": "https://docs.paydock.com",
            "success_redirect_url": "https://google.com",
            "gateway_id":"59003f15eccac620e61aad6c",
            "meta":
                {
                "amount": "20",
                "currency": "AUD",
                "items":[{
                    "name": "widget1",
                    "sku": "1234122346",
                    "quantity": 1,
                    "price": {
                       "amount": "10.00",
                        "currency": "AUD"
                     }
                    },
                    { "name": "widget2",
                      "sku": "1234122345",
                      "quantity": 1,
                      "price": {
                         "amount": "10.00",
                         "currency": "AUD"
                        }
                    }
                ],
                "reference": "Vitae commodi provident assumenda",
                "email": "samwashington@gmail.com",
                "first_name": "Samantha",
                "last_name": "Washington",
                "address_line1": "Suite 660",
                "address_line2": "822 Ruiz Square",
                "address_city": "Lake Edward",
                "address_state": "NSW",
                "address_postcode": "1234",
                "address_country": "Australia",
                "phone": "040000000"
                }
          },
    headers: {
        'content-type' : 'application/json',
        'x-user-secret-key': 'user_secret_key'
    }
}, function(error, response, body){
    if(error) {
        console.log(error);
    } else {
        console.log(response.statusCode, body);
    }
});
<?php
$svc = new ExternalCheckout();

$meta =  [
    'amount' => '50',
    'currency' => 'AUD',
    'reference' => 'Vitae commodi provident assumenda',
    'email' => 'samwashington@gmail.com',
    'first_name' => 'Samantha',
    'last_name' => 'Washington',
    'address_line1' => 'Suite 660',
    'address_line2' => '822 Ruiz Square',
    'address_city' => 'Lake Edward',
    'address_state' => 'NSW',
    'address_postcode' => '1234',
    'address_country' => 'Australia',
    'phone' => '040000000'
];

$reference = uniqid();
$response = $svc->create("test", "59714107fd3abd105fd8ea42",  "https://wwww.success.com", "https://www.failure.com", "", $meta, "", $reference)
    ->call();
?>
"Example of response (201)"

{
  "status": 200,
  "error": null,
  "resource": {
    "type": "payment_source",
    "data": {
      "link": "https://www-sandbox.secure-afterpay.com.au/checkout/?token=4a76e7gd007j2dfducnrhpiemd79q37ocbp8drlt0041mnbn9afd",
      "mode": "test",
      "token": "eyJhbGciOiJIUzI1NiIsInR5cCI6IkpXVCJ9.eyJ0eXBlIjoiY2hlY2tvdXRfdG9rZW4iLCJnYXRld2F5X2lkIjoiNTkwMDNmMTVlY2NhYzYyMGU2MWFhZDZjIiwiZ2F0ZXdheV90eXBlIjoiQWZ0ZXJwYXkiLCJzcGVjaWZpY0RhdGEiOnsiY2hlY2tvdXRfdG9rZW4iOiI0YTc2ZTdnZDAwN2oyZGZkdWNucmhwaWVtZDc5cTM3b2NicDhkcmx0MDA0MW1uYm45YWZkIn0sIm1vZGUiOiJ0ZXN0IiwiaWF0IjoxNDkzMjk3MjY3fQ.z5pva920TWoe9q4wqAFii97j4Y9OEG0q6nnNICPaxn0"
    }
  }
}
Checkout link redirects a user to Afterpay website which will require them to accept the agreements for using Afterpay to process transaction. The Merchant should place this link on the site, so that the end user can accept the checkout token for further operation (create charge).
POST /v1/payment_sources/external_checkout
| Field Name | Description | Details |
|---|---|---|
| gateway_id | ID of a PayDock gateway. Note: only "Afterpay" gateway has ability to work with this type of checkout tokens | String, required |
| success_redirect_url | URL to which customers will be redirected to after accepting agreements on the Afterpay checkout page. After redirecting, Afterpay will add query param "token=[some Afterpay token here]". In PayDock response this token is named as "reference_id". See examples | String, required |
| error_redirect_url | URL to which customers will be redirected to after canceling operations or experiencing an error on the Afterpay checkout page. After redirecting, Afterpay will add query param "token=[some Afterpay token here]". In PayDock response this token is named as "reference_id". See examples | String, required |
| description | Custom description that will be shown on a Afterpay page when accepting the token | String, optional |
| meta | Object with additional information, needed for particular gateway | Object, optional |
| amount | Amount to be payed | String, required |
| currency | Currency code | String, optional |
| items | Additional information of an order items | Array, optional |
| name | Product name | String, required |
| sku | Product SKU | String, optional |
| quantity | The quantity of the item | Number, required |
| price | The price of the item | String, required |
| amount | The amount of an item rounded to 2 decimal places | Number, required |
| currency | The currency is a ISO 4217 format value. Currently only AUD is supported | String, required |
| The consumer’s email | String, optional | |
| first_name | The consumer’s given names | String, optional |
| last_name | The consumer’s surname | String, optional |
| address_line1 | Street address | String, optional |
| address_line2 | Second line of the address | String, optional |
| address_city | City | String, optional |
| address_state | State | String, optional |
| address_postcode | Postcode | String, optional |
| address_country | ISO 3166-1 country code | String, optional |
| phone | The consumer’s phone number in E.164 international notation (Example: +12345678901) | String, optional |
Create Afterpay one-time token using Afterpay checkout token
curl -X "POST https://api-sandbox.paydock.com/v1/payment_sources/tokens?public_key=[users_public_key]" \
     -H "x-user-secret-key: x-user-secret-key" \
     -H "Content-Type: application/json" \
     -d "{\"type\": \"checkout_token\" ,\"gateway_id\":\"583d7c75a1723f941b7137f4\",\"checkout_token\":\"eyJhbGciOiJIUzI1NiIsInR5cCI6IkpXVCJ9.eyJ0eXBlIjoicGF5cGFsIiwiZ2F0ZXdheV9pZCI6IjU4M2JlYjViYTIzMjc3ZjYxOTExZjg2YiIsImdhdGV3YXlfdHlwZSI6IlBheXBhbENsYXNzaWMiLCJzcGVjaWZpY0RhdGEiOnsiY2hlY2tvdXRfdG9rZW4iOiJFQy0xMkQ3NjUyN0JLMDM1OTEzWSJ9LCJtb2RlIjoidGVzdCIsImlhdCI6MTQ4MDQ1MjI5MH0.DN5eLG-VyAIcQJlkBRX0NHav5svPQ4jrM_u0V9QRD1I\"}"
var request = require('request');

request({
    url: 'https://api.paydock.com/v1/payment_sources/tokens?public_key=fdsrtk5jl83d7c75a1723f941b7137f4',
    method: 'POST',
    body: {
        "type": "checkout_token",
        "gateway_id":"583d78caa17233341b712bbc",
        "checkout_token":"eyJhbGciOiJIUzI1NiIsInR5cCI6IkpXVCJ9.eyJ0eXBlIjoicGF5cGFsIiwiZ2F0ZXdheV9pZCI6IjU4M2JlYjViYTIzMjc3ZjYxOTExZjg2YiIsImdhdGV3YXlfdHlwZSI6IlBheXBhbENsYXNzaWMiLCJzcGVjaWZpY0RhdGEiOnsiY2hlY2tvdXRfdG9rZW4iOiJFQy0xMkQ3NjUyN0JLMDM1OTEzWSJ9LCJtb2RlIjoidGVzdCIsImlhdCI6MTQ4MDQ1MjI5MH0.DN5eLG-VyAIcQJlkBRX0NHav5svPQ4jrM_u0V9QRD1I"
    },
    headers: {
        'content-type' : 'application/json'
    }
}, function(error, response, body){
    if(error) {
        console.log(error);
    } else {
        console.log(response.statusCode, body);
    }
});
<?php
$apiLink       = 'https://api-sandbox.paydock.com/v1/payment_sources/tokens';
$apiKey        = 'user_secret_key';
$apiPublicKey  = 'user_public_key';

$query = http_build_query([
    'public_key'   => $apiPublicKey
]);

$data = json_encode([
    'type'                 => 'checkout_token',
    'gateway_id'           => '583d78caa17233341b712bbc',
    'checkout_token'       => 'eyJhbGciOiJIUzI1NiIsInR5cCI6IkpXVCJ9.eyJ0eXBlIjoicGF5cGFsIiwiZ2F0ZXdheV9pZCI6IjU4M2JlYjViYTIzMjc3ZjYxOTExZjg2YiIsImdhdGV3YXlfdHlwZSI6IlBheXBhbENsYXNzaWMiLCJzcGVjaWZpY0RhdGEiOnsiY2hlY2tvdXRfdG9rZW4iOiJFQy0xMkQ3NjUyN0JLMDM1OTEzWSJ9LCJtb2RlIjoidGVzdCIsImlhdCI6MTQ4MDQ1MjI5MH0.DN5eLG-VyAIcQJlkBRX0NHav5svPQ4jrM_u0V9QRD1I'
]);

$ch = curl_init();
curl_setopt($ch, CURLOPT_CUSTOMREQUEST, 'POST');
curl_setopt($ch, CURLOPT_POSTFIELDS, $data);
curl_setopt($ch, CURLOPT_URL, $apiLink . '?' . $query);
curl_setopt($ch, CURLOPT_ENCODING, "gzip");
curl_setopt($ch, CURLOPT_RETURNTRANSFER, true);
curl_setopt($ch, CURLOPT_HTTPHEADER, [
    "Content-Type: application/json",
    "Content-Length: ". strlen($data),
    "x-user-secret-key:". $apiKey,
]);

$res = json_decode(curl_exec($ch));
?>
"Example of response (201)"

{
  "status": 201,
  "error": null,
  "resource": {
    "type": "token",
    "data": "bb7fcdfc-1322-sdd8-adba-2c265adb8b25"
  }
}
Before initiating a call to create a one-time token for Afterpay, the user must have created a Afterpay checkout token using the checkout link. The response returns a one-time token that can be used to:
POST /v1/payment_sources/tokens?public_key=[users_public_key]
| Field Name | Description | Details |
|---|---|---|
| type | Type of payment source gateway to be created. Use checkout_token for case, when token created on previous step in PayDock. Use external_checkout_token for token, that was created and accepted on gateway side | String, required |
| gateway_id | Id of a gateway, that was previously added to PayDock | String, required |
| public_key | PayDock users public key | String, required |
| checkout_token | Token, that was created on previous step (used with type - checkout_token) or generated and accepted on gateways side (used with type - external_checkout_token) . | String, required |
Afterpay Configuration
curl -X "GET https://api-sandbox.paydock.com/v1/gateways/[afterpay_gateway_id]/config" \
     -H "x-user-secret-key: x-user-secret-key" \
     -H "Content-Type: application/json"
var request = require('request');

request({
    url: 'https://api-sandbox.paydock.com/v1/gateways/[afterpay_gateway_id]/config',
    method: 'GET',
    headers: {
        'content-type' : 'application/json',
        'x-user-secret-key': 'user_secret_key'
    }
}, function(error, response, body){
    if(error) {
        console.log(error);
    } else {
        console.log(response.statusCode, body);
    }
});
<?php
$apiLink = 'https://api-sandbox.paydock.com/v1/gateways/[afterpay_gateway_id]/config';
$apiKey  = 'user_secret_key';

$ch = curl_init();
curl_setopt($ch, CURLOPT_CUSTOMREQUEST, 'GET');
curl_setopt($ch, CURLOPT_URL, $apiLink);
curl_setopt($ch, CURLOPT_ENCODING, "gzip");
curl_setopt($ch, CURLOPT_RETURNTRANSFER, true);
curl_setopt($ch, CURLOPT_HTTPHEADER, [
  "Content-Type: application/json",
  "x-user-secret-key:". $apiKey,
]);

$res = json_decode(curl_exec($ch));
?>
"Example of response (200)"

{
    "status": 200,
    "error": null,
    "resource": {
        "type": "configs",
        "data": [
            {
                "type": "PAY_BY_INSTALLMENT",
                "description": "Pay over time",
                "maximumAmount": {
                    "amount": "1000.00",
                    "currency": "AUD"
                }
            }
        ]
    }
}
Retrieve the configuration from Afterpay to confirm the maximum amount allowed for a transaction. This should be called regularly (eg every day).
GET https://api-sandbox.paydock.com/v1/gateways/[afterpay_gateway_id]/config
Other features
You can also use other standard requests from the PayDock API to work with Afterpay transactions including:
- Refund transactions (including partial refunds) Refund Charge
- Get status for a single transaction Get Single Charge
- Search for transactions Transaction Search
Zip Money Integration
ZipMoney checkout allows your customers to pay using ZipMoney or ZipPay. The checkout process creates a one-time token that can be used to add a direct payment.
The process includes the customer logging in or signing up for ZipMoney or ZipPay.
ZipMoney will allow you to store payment details, without needing the customer to log in again. This needs to be approved by ZipMoney for your account. If tokenisation is enabled for your account, you can through tokenize = true to enable.
We also recommend that you send through as many parameters as possible, as it is more likely that transactions will be approved with more information.
When a new account is being created, it might not be immediately approved. See Refer Process for more details.
Using the client SDK
The easiest way to do this is through the client SDK, which handles the process of displaying a login window through to creating a payment token. Once you have a token, you can use that to either save the payment details or create a payment, see Client SDK Documentation.
Direct API integration
We recomment that the client SDK should be used with ZipMoney. However you can also directly integrate with the PayDock API.
The process for taking a payment with ZipMoney checkout is:
- Call /v1/payment_sources/external_checkout with a redirect URL, which will return a custom Zip Money checkout link. Provide a way for the customer to visit this URL (eg pay with ZipPay)
- When the customer visits this URL, they will be promoted to log into their Zip Money account or register for a new account. When they've completed this they will be sent is sent to the redirect URL.
- Collect the Zip Money token from the URL.
- Call /v1/payment_sources/tokens to create a single use token. This token can be used to add a direct payment or to use as a recurring payment token. Important note: When you set this up as a recurring payment token, this will take a payment for that items selected.
Create checkout link
curl -X "POST https://api-sandbox.paydock.com/v1/payment_sources/external_checkout" \
     -H "x-user-secret-key: x-user-secret-key" \
     -H "Content-Type: application/json" \
     -d "{\"mode\": \"test\",\"gateway_id\":\"59637d35f2aa0c136b0128e2\",\"redirect_url\":\"https://docs.paydock.com\",\"reference\": \"transaction_reference_number\",\"meta\": {\"first_name\": \"Samantha\",\"last_name\": \"Washington\",\"tokenize\": true,\"shipping_address\": { \"first_name\": \"Samantha\", \"last_name\": \"Washington\", \"line1\": \"Suite 660\", \"country\": \"AU\", \"postcode\": \"2000\", \"city\": \"Sydney\", \"state\": \"NSW\" }, \"billing_address\": { \"first_name\": \"Samantha\", \"last_name\": \"Washington\", \"line1\": \"Suite 660\", \"country\": \"AU\", \"postcode\": \"2000\", \"city\": \"Sydney\", \"state\": \"NSW\" },\"amount\": \"4\", \"currency\":\"AUD\",\"reference\":\"transaction_reference\",\"email\":\"curtischarles@diaz-brown.net.au\",\"items\": [{\"name\":\"ACME Tollbox\",\"amount\":\"2\",\"quantity\": 1,\"reference\":\"sds\"},{\"name\":\"Device 42\",\"amount\":\"2\",\"quantity\": 1,\"reference\":\"sds1\"}],\"statistics\": {\"account_created\": \"2017-05-05\",\"sales_total_number\": \"5\",\"sales_total_amount\": \"4\",\"sales_avg_value\": \"45\",\"sales_max_value\": \"400\",\"refunds_total_amount\": \"1\",\"previous_chargeback\": \"false\",\"currency\": \"AUD\",\"last_login\": \"2017-06-01\"}},\"description\": \"Vitae commodi provident assumenda\"}"
var request = require('request');

request({
    url: 'https://api.paydock.com/v1/payment_sources/external_checkout',
    method: 'POST',
    body: {
            "mode": "test",
            "gateway_id":"59637d35f2aa0c136b0128e2",
            "redirect_url":"https://docs.paydock.com",
            "reference": "transaction_reference_number",
            "meta": {
                "first_name": "Samantha",
                "last_name": "Washington",
                "email":"curtischarles@diaz-brown.net.au",
                "tokenize": true,
                 "description": "Vitae commodi provident assumenda",
                "charge": {
                    "shipping_address": {
                        "first_name": "Samantha",
                        "last_name": "Washington",
                        "line1": "Suite 660",
                        "country": "AU",
                        "postcode": "2000",
                        "city": "Sydney",
                        "state": "NSW"
                    },
                    "billing_address": {
                        "first_name": "Samantha",
                        "last_name": "Washington",
                        "line1": "Suite 660",
                        "country": "AU",
                        "postcode": "2000",
                        "city": "Sydney",
                        "state": "NSW"
                    },
                    "amount": "4",
                    "currency":"AUD",
                    "items": [{
                        "name":"ACME Toolbox",
                        "amount":"2",
                        "quantity": 1,
                        "reference":"Fuga consequuntur sint ab magnam"
                    },
                    {
                        "name":"Device 42",
                        "amount":"2",
                        "quantity": 1,
                        "reference":"Fuga consequuntur sint ab magnam"
                    }],
                },
                "statistics": {
                    "account_created": "2017-05-05",
                    "sales_total_number": "5",
                    "sales_total_amount": "4",
                    "sales_avg_value": "45",
                    "sales_max_value": "400",
                    "refunds_total_amount": "1",
                    "previous_chargeback": "false",
                    "currency": "AUD",
                    "last_login": "2017-06-01"
                }
            },
        },
    headers: {
        'content-type' : 'application/json',
        'x-user-secret-key': 'user_secret_key'
    }
}, function(error, response, body){
    if(error) {
        console.log(error);
    } else {
        console.log(response.statusCode, body);
    }
});
<?php
$svc = new ExternalCheckout();

$meta =  [
    "first_name"=> "Samantha",
    "last_name"=> "Washington",
    "email"=>"curtischarles@diaz-brown.net.au",
    "tokenize"=> true,
    "description"=> "Vitae commodi provident assumenda",
    "charge"=> [
        "shipping_address"=> [
            "first_name"=> "Samantha",
            "last_name"=> "Washington",
            "line1"=> "Suite 660",
            "country"=> "AU",
            "postcode"=> "2000",
            "city"=> "Sydney",
            "state"=> "NSW"
        ],
        "billing_address"=> [
            "first_name"=> "Samantha",
            "last_name"=> "Washington",
            "line1"=> "Suite 660",
            "country"=> "AU",
            "postcode"=> "2000",
            "city"=> "Sydney",
            "state"=> "NSW"
        ],
        "amount"=> "4",
        "currency"=>"AUD",
        "items"=> [[
            "name"=>"ACME Tollbox",
            "amount"=>"2",
            "quantity"=> 1,
            "reference"=>"Fuga consequuntur sint ab magnam"
        ],
        [
            "name"=>"Device 42",
            "amount"=>"2",
            "quantity"=> 1,
            "reference"=>"Fuga consequuntur sint ab magnam"
        ]],
    ],
    "statistics"=> [
        "account_created"=> "2017-05-05",
        "sales_total_number"=> "5",
        "sales_total_amount"=> "4",
        "sales_avg_value"=> "45",
        "sales_max_value"=> "400",
        "refunds_total_amount"=> "1",
        "previous_chargeback"=> "false",
        "currency"=> "AUD",
        "last_login"=> "2017-06-01"
    ]
];

$reference = uniqid();
$response = $svc->create("test", "599a76529c1d950790167453", "", "", "https://www.redirecturl.com", $meta, "", $reference)
    ->call();
?>
"Example of response (201)"

{
  "status": 200,
  "error": null,
  "resource": {
    "type": "payment_source",
    "data": {
      "link": "https://www-sandbox.secure-Zip Money.com.au/checkout/?token=4a76e7gd007j2dfducnrhpiemd79q37ocbp8drlt0041mnbn9afd",
      "mode": "test",
      "token": "eyJhbGciOiJIUzI1NiIsInR5cCI6IkpXVCJ9.eyJ0eXBlIjoiY2hlY2tvdXRfdG9rZW4iLCJnYXRld2F5X2lkIjoiNTkwMDNmMTVlY2NhYzYyMGU2MWFhZDZjIiwiZ2F0ZXdheV90eXBlIjoiQWZ0ZXJwYXkiLCJzcGVjaWZpY0RhdGEiOnsiY2hlY2tvdXRfdG9rZW4iOiI0YTc2ZTdnZDAwN2oyZGZkdWNucmhwaWVtZDc5cTM3b2NicDhkcmx0MDA0MW1uYm45YWZkIn0sIm1vZGUiOiJ0ZXN0IiwiaWF0IjoxNDkzMjk3MjY3fQ.z5pva920TWoe9q4wqAFii97j4Y9OEG0q6nnNICPaxn0"
    }
  }
}
Checkout link redirects a user to Zip Money website which will require them to accept the agreements for using Zip Money to process transaction or create a new account. When this link is clicked the user can accept the checkout token for further operation (create charge).
When you create the checkout link, some of the information is optional. However providing as much information as possible will mean a new registration is more likely to be approved.
If someone is registering for the for a new account, their registration can be:
- Approved
- Delined
- Referred
Referals require special handling, see Refer Process
POST /v1/payment_sources/external_checkout
| Field Name | Description | Details |
|---|---|---|
| mode | Parameter which determines Zip Money account mode. Values: 'test', 'live' | String, optional |
| gateway_id | ID of a PayDock gateway. Note: this will only work for gateways that are either Zip Money / Zip Pay | String, required |
| redirect_url | URL to which customers will be redirected to after signing into Zip Money / Zip Pay or registering for a new account. After redirecting, Zip Money will add query param "checkoutid=[some Zip Money token here]". In PayDock response this token is named as "reference_id". See examples | String, required |
| description | Custom description that will be shown on a Zip Money page when accepting the token | String, optional |
| meta | Object with additional information | Object, required |
| first_name | First name for the customer | String, required |
| last_name | Last name for the customer | String, required |
| phone | The consumer’s phone number in E.164 international notation (Example: +12345678901) | String, optional |
| tokenize | Controls whether to tokenize the Zip Money / Zip Pay account, defaults to 'false' | Boolean, optional |
| The consumer’s email | String, required | |
| gender | Customer's gender | String, optional |
| date_of_birth | Birthday of the customer | String, optional |
| charge | Charge information | Object, required |
| amount | Amount to be paid | Float, required |
| currency | Currency code | String, required |
| items | Collection of order items | Object, required |
| name | Name of the item | String, required |
| amount | Amount of the item | String, required |
| quantity | Quantity of the item | Integer, required |
| type | Type of the item, values can be: 'sku', 'tax', 'shipping', 'discount' | String, optional |
| reference | Reference of the item | String, optional |
| item_uri | Url of the item in your store | String, optional |
| image_url | Url of the image in your store | String, optional |
| shipping_address | Object with shipping address details | Object, required |
| first_name | Shipping first name | String, optional |
| last_name | Shipping last name | String, optional |
| line1 | Shipping address line 1 | String, required |
| line2 | Shipping address line 2 | String, optional |
| city | Shipping city | String, required |
| state | Shipping state | String, required |
| postcode | Shipping postcode | String, required |
| country | Shipping country | String, required |
| billing_address | Object with billing address details | Object, optional |
| first_name | Billing first name | String, optional |
| last_name | Billing last name | String, optional |
| line1 | Billing address line 1 | String, required |
| line2 | Billing address line 2 | String, optional |
| city | Billing city | String, required |
| state | Billing state | String, required |
| postcode | Billing postcode | String, required |
| country | Billing country | String, required |
Create Zip Money one-time token using Zip Money checkout token
curl -X "POST https://api-sandbox.paydock.com/v1/payment_sources/tokens?public_key=[users_public_key]" \
     -H "x-user-secret-key: x-user-secret-key" \
     -H "Content-Type: application/json" \
     -d "{\"type\": \"checkout_token\" ,\"gateway_id\":\"583d7c75a1723f941b7137f4\",\"checkout_token\":\"eyJhbGciOiJIUzI1NiIsInR5cCI6IkpXVCJ9.eyJ0eXBlIjoicGF5cGFsIiwiZ2F0ZXdheV9pZCI6IjU4M2JlYjViYTIzMjc3ZjYxOTExZjg2YiIsImdhdGV3YXlfdHlwZSI6IlBheXBhbENsYXNzaWMiLCJzcGVjaWZpY0RhdGEiOnsiY2hlY2tvdXRfdG9rZW4iOiJFQy0xMkQ3NjUyN0JLMDM1OTEzWSJ9LCJtb2RlIjoidGVzdCIsImlhdCI6MTQ4MDQ1MjI5MH0.DN5eLG-VyAIcQJlkBRX0NHav5svPQ4jrM_u0V9QRD1I\"}"
var request = require('request');

request({
    url: 'https://api.paydock.com/v1/payment_sources//tokens?public_key=fdsrtk5jl83d7c75a1723f941b7137f4',
    method: 'POST',
    body: {
        "type": "checkout_token",
        "gateway_id":"583d78caa17233341b712bbc",
        "checkout_token":"eyJhbGciOiJIUzI1NiIsInR5cCI6IkpXVCJ9.eyJ0eXBlIjoicGF5cGFsIiwiZ2F0ZXdheV9pZCI6IjU4M2JlYjViYTIzMjc3ZjYxOTExZjg2YiIsImdhdGV3YXlfdHlwZSI6IlBheXBhbENsYXNzaWMiLCJzcGVjaWZpY0RhdGEiOnsiY2hlY2tvdXRfdG9rZW4iOiJFQy0xMkQ3NjUyN0JLMDM1OTEzWSJ9LCJtb2RlIjoidGVzdCIsImlhdCI6MTQ4MDQ1MjI5MH0.DN5eLG-VyAIcQJlkBRX0NHav5svPQ4jrM_u0V9QRD1I"
    },
    headers: {
        'content-type' : 'application/json'
    }
}, function(error, response, body){
    if(error) {
        console.log(error);
    } else {
        console.log(response.statusCode, body);
    }
});
<?php
$apiLink       = 'https://api-sandbox.paydock.com/v1/payment_sources/tokens';
$apiKey        = 'user_secret_key';
$apiPublicKey  = 'user_public_key';

$query = http_build_query([
    'public_key'   => $apiPublicKey
]);

$data = json_encode([
    'type'                 => 'checkout_token',
    'gateway_id'           => '583d78caa17233341b712bbc',
    'checkout_token'       => 'eyJhbGciOiJIUzI1NiIsInR5cCI6IkpXVCJ9.eyJ0eXBlIjoicGF5cGFsIiwiZ2F0ZXdheV9pZCI6IjU4M2JlYjViYTIzMjc3ZjYxOTExZjg2YiIsImdhdGV3YXlfdHlwZSI6IlBheXBhbENsYXNzaWMiLCJzcGVjaWZpY0RhdGEiOnsiY2hlY2tvdXRfdG9rZW4iOiJFQy0xMkQ3NjUyN0JLMDM1OTEzWSJ9LCJtb2RlIjoidGVzdCIsImlhdCI6MTQ4MDQ1MjI5MH0.DN5eLG-VyAIcQJlkBRX0NHav5svPQ4jrM_u0V9QRD1I'
]);

$ch = curl_init();
curl_setopt($ch, CURLOPT_CUSTOMREQUEST, 'POST');
curl_setopt($ch, CURLOPT_POSTFIELDS, $data);
curl_setopt($ch, CURLOPT_URL, $apiLink . '?' . $query);
curl_setopt($ch, CURLOPT_ENCODING, "gzip");
curl_setopt($ch, CURLOPT_RETURNTRANSFER, true);
curl_setopt($ch, CURLOPT_HTTPHEADER, [
    "Content-Type: application/json",
    "Content-Length: ". strlen($data),
    "x-user-secret-key:". $apiKey,
]);

$res = json_decode(curl_exec($ch));
?>
"Example of response (201)"

{
  "status": 201,
  "error": null,
  "resource": {
    "type": "token",
    "data": "bb7fcdfc-1322-sdd8-adba-2c265adb8b25"
  }
}
Before initiating a call to create a one-time token for Zip Money, the user must have created a Zip Money checkout token using the checkout link. The response returns a one-time token that can be used to:
POST /v1/payment_sources/tokens?public_key=[users_public_key]
| Field Name | Description | Details |
|---|---|---|
| type | Type of payment source gateway to be created. Use checkout_token for case, when token created on previous step in PayDock. Use external_checkout_token for token, that was created and accepted on gateway side | String, required |
| gateway_id | Id of a gateway, that was previously added to PayDock | String, required |
| public_key | PayDock users public key | String, required |
| checkout_token | Token, that was created on previous step (used with type - checkout_token) or generated and accepted on gateways side (used with type - external_checkout_token) . | String, required |
Zip Money Refer Process
In some cases when a new account is registered, it might not be possible to make an immediate approval. In this case, if this is approved, the user will get an email with a link to confirm their new account. This link will redirect them to the success_redirect_url configured in the checkout link. It's important that this URL contains enough information for them to continue the checkout. For example, this should include the id for the shopping cart for the user.
From there, the process is similar to a standard checkout flow, Create a PayDock token then use that token to make the payment.
Other features
You can also use other standard requests from the PayDock API to work with ZipMoney transactions including:
- Refund transactions (including partial refunds) Refund Charge
- Get status for a single transaction Get Single Charge
- Search for transactions Transaction Search
Other Resources
Fraud detection service
Available only if configured for your account. PayDock Fraud detection API has an ability to operate in 'active' mode where PayDock will: Collect and report but also take the following actions
- Block transactions and flag when the status is REJECT
- Allow transactions to continue when the status is APPROVE
Or in ‘passive' mode (where PayDock collects and reports, but does not respond to Fraud Service responses, and doesn’t block transaction processing)
PayDock API returns all fraud-related response data inside the "fraud" section of each processed transaction.
Fraud Data Description
| Field Name | Description | Possible values |
|---|---|---|
| score | Overall score of the fraud risk. Bigger number means bigger risk Optional. Not all fraud providers return it. | Numeric |
| status | Service-agnostic recommendation from PayDock on the base of the service response | "approve", "reject", "review", "failed" |
| specific_code | Fraud service specific code | Depends on the fraud service |
| specific_message | Explanation of the code, coming from the fraud service | Human-readable text |
Testing
PayDock Fraud API in the Sandbox mode is set to return custom results based on the email. While creating one-time token request use "email" key or on tha stage of creating a charge with fraud check use "fraud.data.transaction.billing.customerEmailAddress" key to reproduce different type of responses:
| Email value | Fraud status |
|---|---|
| reject@example.com | reject |
| review@example.com | review |
| failed@example.com | failed |
| any other | approve |
Also PayDock Fraud API in the Sandbox mode is set to return custom results based on the transaction amount.
| Amount | Fraud status |
|---|---|
| 101 | reject |
| 102 | review |
| 103 | failed |
| any other | approve |
Required Fields by Gateway
Different gateways require different fields, see detailed listing below
| Field Name | Options |
|---|---|
| amount | required |
| currency | required |
| reference | optional |
| description | optional |
| first_name | optional |
| last_name | optional |
| optional | |
| address_line1 | optional |
| address_line2 | optional |
| address_city | optional |
| address_state | optional |
| address_country | optional |
| address_postcode | optional |
| gateway_id | required |
| card_name | optional |
| card_number | required |
| expire_month | required |
| expire_year | required |
| card_ccv | required |
| type | n/a |
| account_name | n/a |
| account_bsb | n/a |
| account_number | n/a |
| account_routing | n/a |
| account_holder_type | n/a |
| account_bank_name | n/a |
| Field Name | Options |
|---|---|
| amount | required |
| currency | required |
| reference | optional |
| description | optional |
| first_name | required |
| last_name | required |
| optional | |
| address_line1 | optional |
| address_line2 | optional |
| address_city | optional |
| address_state | optional |
| address_country | optional |
| address_postcode | optional |
| gateway_id | required |
| card_name | required |
| card_number | required |
| expire_month | required |
| expire_year | required |
| card_ccv | optional |
| type | n/a |
| account_name | n/a |
| account_bsb | n/a |
| account_number | n/a |
| account_routing | n/a |
| account_holder_type | n/a |
| account_bank_name | n/a |
| Field Name | Options |
|---|---|
| amount | required |
| currency | required |
| reference | optional |
| description | optional |
| first_name | optional |
| last_name | optional |
| required | |
| address_line1 | optional |
| address_line2 | optional |
| address_city | optional |
| address_state | optional |
| address_country | optional |
| address_postcode | optional |
| gateway_id | required |
| card_name | required |
| card_number | required |
| expire_month | required |
| expire_year | required |
| card_ccv | required |
| type | n/a |
| account_name | n/a |
| account_bsb | n/a |
| account_number | n/a |
| account_routing | n/a |
| account_holder_type | n/a |
| account_bank_name | n/a |
| Field Name | Options |
|---|---|
| amount | required |
| currency | required |
| reference | optional |
| description | optional |
| first_name | optional |
| last_name | optional |
| optional | |
| address_line1 | optional |
| address_line2 | optional |
| address_city | optional |
| address_state | optional |
| address_country | optional |
| address_postcode | optional |
| gateway_id | required |
| card_name | required |
| card_number | required |
| expire_month | required |
| expire_year | required |
| card_ccv | optional |
| type | n/a |
| account_name | n/a |
| account_bsb | n/a |
| account_number | n/a |
| account_routing | n/a |
| account_holder_type | n/a |
| account_bank_name | n/a |
| Field Name | Options |
|---|---|
| amount | required |
| currency | required |
| reference | optional |
| description | optional |
| first_name | optional |
| last_name | optional |
| optional | |
| address_line1 | optional |
| address_line2 | optional |
| address_city | optional |
| address_state | optional |
| address_country | optional |
| address_postcode | optional |
| gateway_id | required |
| card_name | n/a |
| card_number | n/a |
| expire_month | n/a |
| expire_year | n/a |
| card_ccv | n/a |
| type | required |
| account_name | required |
| account_bsb | required |
| account_number | required |
| account_routing | n/a |
| account_holder_type | n/a |
| account_bank_name | n/a |
| Field Name | Options |
|---|---|
| amount | required |
| currency | required |
| reference | optional |
| description | optional |
| first_name | optional |
| last_name | optional |
| optional | |
| address_line1 | optional |
| address_line2 | optional |
| address_city | optional |
| address_state | optional |
| address_country | optional |
| address_postcode | optional |
| gateway_id | required |
| card_name | optional |
| card_number | required |
| expire_month | required |
| expire_year | required |
| card_ccv | optional |
| type | n/a |
| account_name | n/a |
| account_bsb | n/a |
| account_number | n/a |
| account_routing | n/a |
| account_holder_type | n/a |
| account_bank_name | n/a |
| Field Name | Options |
|---|---|
| amount | required |
| currency | required |
| reference | optional |
| description | optional |
| first_name | optional |
| last_name | optional |
| optional | |
| address_line1 | optional |
| address_line2 | optional |
| address_city | optional |
| address_state | optional |
| address_country | optional |
| address_postcode | optional |
| gateway_id | required |
| card_name | required |
| card_number | required |
| expire_month | required |
| expire_year | required |
| card_ccv | optional |
| type | n/a |
| account_name | n/a |
| account_bsb | n/a |
| account_number | n/a |
| account_routing | n/a |
| account_holder_type | n/a |
| account_bank_name | n/a |
| Field Name | Options |
|---|---|
| amount | required |
| currency | required |
| reference | optional |
| description | optional |
| first_name | optional |
| last_name | optional |
| optional | |
| address_line1 | optional |
| address_line2 | optional |
| address_city | optional |
| address_state | optional |
| address_country | optional |
| address_postcode | optional |
| gateway_id | required |
| card_name | required |
| card_number | required |
| expire_month | required |
| expire_year | required |
| card_ccv | optional |
| type | n/a |
| account_name | n/a |
| account_bsb | n/a |
| account_number | n/a |
| account_routing | n/a |
| account_holder_type | n/a |
| account_bank_name | n/a |
| Field Name | Options |
|---|---|
| amount | required |
| currency | required |
| reference | optional |
| description | optional |
| first_name | optional |
| last_name | required |
| optional | |
| address_line1 | optional |
| address_line2 | optional |
| address_city | optional |
| address_state | optional |
| address_country | optional |
| address_postcode | optional |
| gateway_id | required |
| card_name | n/a |
| card_number | n/a |
| expire_month | n/a |
| expire_year | n/a |
| card_ccv | n/a |
| type | required |
| account_name | required |
| account_bsb | required |
| account_number | required |
| account_routing | n/a |
| account_holder_type | n/a |
| account_bank_name | n/a |
| Field Name | Options |
|---|---|
| amount | required |
| currency | required |
| reference | optional |
| description | optional |
| first_name | optional |
| last_name | optional |
| optional | |
| address_line1 | optional |
| address_line2 | optional |
| address_city | optional |
| address_state | optional |
| address_country | optional |
| address_postcode | optional |
| gateway_id | required |
| card_name | optional |
| card_number | required |
| expire_month | required |
| expire_year | required |
| card_ccv | optional |
| type | n/a |
| account_name | n/a |
| account_bsb | n/a |
| account_number | n/a |
| account_routing | n/a |
| account_holder_type | n/a |
| account_bank_name | n/a |
| Field Name | Options |
|---|---|
| amount | required |
| currency | required |
| reference | optional |
| description | optional |
| first_name | optional |
| last_name | optional |
| optional | |
| address_line1 | optional |
| address_line2 | optional |
| address_city | optional |
| address_state | optional |
| address_country | optional |
| address_postcode | optional |
| gateway_id | required |
| card_name | n/a |
| card_number | n/a |
| expire_month | n/a |
| expire_year | n/a |
| card_ccv | n/a |
| type | required |
| account_name | required |
| account_bsb | required |
| account_number | required |
| account_routing | n/a |
| account_holder_type | n/a |
| account_bank_name | n/a |
| Field Name | Options |
|---|---|
| amount | required |
| currency | required |
| reference | optional |
| description | optional |
| first_name | optional |
| last_name | optional |
| optional | |
| address_line1 | optional |
| address_line2 | optional |
| address_city | optional |
| address_state | optional |
| address_country | optional |
| address_postcode | optional |
| gateway_id | required |
| card_name | optional |
| card_number | required |
| expire_month | required |
| expire_year | required |
| card_ccv | required |
| type | n/a |
| account_name | n/a |
| account_bsb | n/a |
| account_number | n/a |
| account_routing | n/a |
| account_holder_type | n/a |
| account_bank_name | n/a |
| Field Name | Options |
|---|---|
| amount | required |
| currency | required |
| reference | optional |
| description | optional |
| first_name | optional |
| last_name | optional |
| optional | |
| address_line1 | optional |
| address_line2 | optional |
| address_city | optional |
| address_state | optional |
| address_country | optional |
| address_postcode | optional |
| gateway_id | required |
| card_name | optional |
| card_number | required |
| expire_month | required |
| expire_year | required |
| card_ccv | optional |
| type | n/a |
| account_name | n/a |
| account_bsb | n/a |
| account_number | n/a |
| account_routing | n/a |
| account_holder_type | n/a |
| account_bank_name | n/a |
| Field Name | Options |
|---|---|
| amount | required |
| currency | required |
| reference | optional |
| description | optional |
| first_name | optional |
| last_name | optional |
| optional | |
| address_line1 | optional |
| address_line2 | optional |
| address_city | optional |
| address_state | optional |
| address_country | optional |
| address_postcode | optional |
| gateway_id | required |
| card_name | optional |
| card_number | required |
| expire_month | required |
| expire_year | required |
| card_ccv | required |
| type | n/a |
| account_name | n/a |
| account_bsb | n/a |
| account_number | n/a |
| account_routing | n/a |
| account_holder_type | n/a |
| account_bank_name | n/a |
| Field Name | Options |
|---|---|
| amount | required |
| currency | required |
| reference | optional |
| description | optional |
| first_name | optional |
| last_name | optional |
| required | |
| address_line1 | optional |
| address_line2 | optional |
| address_city | optional |
| address_state | optional |
| address_country | required |
| address_postcode | required |
| gateway_id | required |
| card_name | required |
| card_number | required |
| expire_month | required |
| expire_year | required |
| card_ccv | required |
| type | n/a |
| account_name | n/a |
| account_bsb | n/a |
| account_number | n/a |
| account_routing | n/a |
| account_holder_type | n/a |
| account_bank_name | n/a |
| Field Name | Options |
|---|---|
| amount | required |
| currency | required |
| reference | optional |
| description | optional |
| first_name | required |
| last_name | required |
| optional | |
| address_line1 | optional |
| address_line2 | optional |
| address_city | optional |
| address_state | optional |
| address_country | optional |
| address_postcode | optional |
| gateway_id | required |
| card_name | optional |
| card_number | required |
| expire_month | required |
| expire_year | required |
| card_ccv | optional |
| type | n/a |
| account_name | n/a |
| account_bsb | n/a |
| account_number | n/a |
| account_routing | n/a |
| account_holder_type | n/a |
| account_bank_name | n/a |
| Field Name | Options |
|---|---|
| amount | required |
| currency | required |
| reference | optional |
| description | optional |
| first_name | optional |
| last_name | optional |
| optional | |
| address_line1 | required |
| address_line2 | optional |
| address_city | required |
| address_state | required |
| address_country | required |
| address_postcode | required |
| gateway_id | required |
| card_name | required |
| card_number | required |
| expire_month | required |
| expire_year | required |
| card_ccv | optional |
| type | n/a |
| account_name | n/a |
| account_bsb | n/a |
| account_number | n/a |
| account_routing | n/a |
| account_holder_type | n/a |
| account_bank_name | n/a |
| Field Name | Options |
|---|---|
| amount | required |
| currency | required |
| reference | optional |
| description | optional |
| first_name | optional |
| last_name | optional |
| required | |
| address_line1 | optional |
| address_line2 | optional |
| address_city | required |
| address_state | required |
| address_country | required |
| address_postcode | required |
| gateway_id | required |
| card_name | n/a |
| card_number | n/a |
| expire_month | n/a |
| expire_year | n/a |
| card_ccv | n/a |
| type | required |
| account_name | required |
| account_bsb | required |
| account_number | required |
| account_routing | n/a |
| account_holder_type | n/a |
| account_bank_name | n/a |
| Field Name | Options |
|---|---|
| amount | required |
| currency | required |
| reference | optional |
| description | optional |
| first_name | optional |
| last_name | optional |
| optional | |
| address_line1 | optional |
| address_line2 | optional |
| address_city | optional |
| address_state | optional |
| address_country | optional |
| address_postcode | optional |
| gateway_id | required |
| card_name | optional |
| card_number | required |
| expire_month | optional |
| expire_year | optional |
| card_ccv | optional |
| type | n/a |
| account_name | n/a |
| account_bsb | n/a |
| account_number | n/a |
| Field Name | Options |
|---|---|
| amount | required |
| currency | required |
| reference | optional |
| description | optional |
| first_name | optional |
| last_name | optional |
| optional | |
| address_line1 | optional |
| address_line2 | optional |
| address_city | optional |
| address_state | optional |
| address_country | optional |
| address_postcode | optional |
| gateway_id | required |
| card_name | n/a |
| card_number | n/a |
| expire_month | n/a |
| expire_year | n/a |
| card_ccv | n/a |
| type | required |
| account_name | optional |
| account_bsb | required |
| account_number | required |
| Field Name | Options |
|---|---|
| amount | required |
| currency | required |
| reference | optional |
| description | optional |
| first_name | optional |
| last_name | optional |
| optional | |
| address_line1 | optional |
| address_line2 | optional |
| address_city | required |
| address_state | required |
| address_country | required |
| address_postcode | required |
| gateway_id | required |
| card_name | required |
| card_number | required |
| expire_month | required |
| expire_year | required |
| card_ccv | optional |
| type | n/a |
| account_name | n/a |
| account_bsb | n/a |
| account_number | n/a |
| Field Name | Options |
|---|---|
| amount | required |
| currency | required |
| reference | optional |
| description | optional |
| first_name | optional |
| last_name | optional |
| optional | |
| address_line1 | optional |
| address_line2 | optional |
| address_city | required |
| address_state | required |
| address_country | required |
| address_postcode | required |
| gateway_id | required |
| card_name | n/a |
| card_number | n/a |
| expire_month | n/a |
| expire_year | n/a |
| card_ccv | n/a |
| type | required |
| account_name | required |
| account_bsb | required |
| account_number | required |
| Field Name | Options |
|---|---|
| amount | required |
| currency | required |
| reference | optional |
| description | optional |
| first_name | optional |
| last_name | optional |
| optional | |
| address_line1 | optional |
| address_line2 | optional |
| address_city | optional |
| address_state | optional |
| address_country | optional |
| address_postcode | optional |
| gateway_id | required |
| card_name | required |
| card_number | required |
| expire_month | required |
| expire_year | required |
| card_ccv | required |
| Field Name | Options |
|---|---|
| amount | required |
| currency | required |
| reference | optional |
| description | optional |
| first_name | optional |
| last_name | optional |
| optional | |
| address_line1 | optional |
| address_line2 | optional |
| address_city | optional |
| address_state | optional |
| address_country | optional |
| address_postcode | optional |
| gateway_id | required |
| card_name | optional |
| card_number | required |
| expire_month | required |
| expire_year | required |
| card_ccv | optional |
| type | n/a |
| account_name | n/a |
| account_bsb | n/a |
| account_number | n/a |
| Field Name | Options |
|---|---|
| amount | required |
| currency | required |
| reference | optional |
| description | optional |
| first_name | optional |
| last_name | optional |
| optional | |
| address_line1 | optional |
| address_line2 | optional |
| address_city | optional |
| address_state | optional |
| address_country | optional |
| address_postcode | optional |
| gateway_id | required |
| card_name | optional |
| card_number | required |
| expire_month | required |
| expire_year | required |
| card_ccv | required |
| type | n/a |
| account_name | n/a |
| account_bsb | n/a |
| account_number | n/a |
| Field Name | Options |
|---|---|
| amount | required |
| currency | required |
| reference | optional |
| description | optional |
| first_name | optional |
| last_name | optional |
| required | |
| address_line1 | optional |
| address_line2 | optional |
| address_city | optional |
| address_state | optional |
| address_country | required |
| address_postcode | required |
| gateway_id | required |
| card_name | optional |
| card_number | required |
| expire_month | required |
| expire_year | required |
| card_ccv | required |
| type | n/a |
| account_name | n/a |
| account_bsb | n/a |
| account_number | n/a |
| Field Name | Options |
|---|---|
| amount | required |
| currency | required |
| reference | optional |
| description | optional |
| first_name | required |
| last_name | optional |
| required | |
| address_line1 | optional |
| address_line2 | optional |
| address_city | optional |
| address_state | optional |
| address_country | required |
| address_postcode | optional |
| gateway_id | required |
| card_name | n/a |
| card_number | n/a |
| expire_month | n/a |
| expire_year | n/a |
| card_ccv | n/a |
| type | required |
| account_name | required |
| account_bsb | n/a |
| account_number | required |
| account_routing | required |
| account_type | required |
| account_holder_type | required |
| account_bank_name | required |
| Field Name | Options |
|---|---|
| amount | required |
| currency | required |
| reference | optional |
| description | optional |
| first_name | optional |
| last_name | optional |
| optional | |
| address_line1 | optional |
| address_line2 | optional |
| address_city | optional |
| address_state | optional |
| address_country | optional |
| address_postcode | optional |
| gateway_id | required |
| card_name | optional |
| card_number | required |
| expire_month | required |
| expire_year | required |
| card_ccv | required |
Swap Values for templates
The notification templates can be used to load parameters from the customer or transaction into the notification. These can also be used to populate the destination (eg phone number for sms).
The full list of available swap values is:
| Field Name | Description |
|---|---|
| {{CHARGE_ID}} | PayDock ID for the charge |
| {{EMAIL}} | The email address for the customer associated with the event |
| {{FIRST_NAME}} | The first name for the customer associated with the event |
| {{LAST_NAME}} | The last name for the customer associated with the event |
| {{PHONE}} | The phone number for the customer associated with the event |
| {{AMOUNT}} | The amount for the transaction |
| {{CURRENCY}} | The currency for the transation |
| {{CUSTOMER_REFERENCE}} | The customer reference number provided by the merchant for the customer |
| {{CHARGE_REFERENCE}} | The reference number provided by the merchant for the transaction |
| {{CHARGE_DESCRIPTION}} | The description provided by the merchant for the transaction |
| {{CREATED_AT}} | create date for the object (eg customer, subscription) in ISO format date and time (eg 2016-12-22T10:36:08.170Z) |
| {{UPDATED_AT}} | updated date for the object (eg customer, subscription) in ISO format date and time (eg 2016-12-22T10:36:08.170Z) |
Card scheme mapping
| Card first n digits | Code | Name |
|---|---|---|
| 5610, 560221, 560222, 560223, 560224, 560225 | ausbc | Australian Bank Card |
| 2014, 2149 | diners | Diner's Club |
| 36 | diners | Diner's Club International |
| 3528 - 3589 | japcb | Japanese Credit Bureau |
| 5018, 5020, 5038, 6304, 6759, 6761 - 6763 | maestro | Maestro |
| 6304, 6706, 6709, 6771 | laser | Laser |
| 6334, 6767 | solo | Solo (Paymentech) |
| 51 - 55, 22 - 27 | mastercard | MasterCard |
| 6011, 622, 64, 65 | discover | Discover |
| 34,37 | amex | American Express |
| 300 - 305, 36, 38, 54, 55, 2014, 2149 | diners | Diner's Club / Carte Blanche |
| 4026, 417500, 4508, 4844, 4913, 4917 | visa | Visa Electron |
| 4 | visa | Visa |